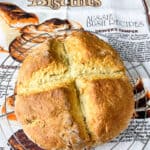
Australian Damper Bread
Servings: 12 -16 slices and small wedges
Calories: 199kcal
Damper is a quick no-yeast bread recipe that is especially useful for those times when you find yourself in a pickle with no bread supplies! Damper bread provides valuable calories especially for budget-friendly meals as a few slices of toasted damper bread easily fills up hungry tummies. Enjoy a slice or two toasted and topped with a scoop of baked beans or spaghetti hoops. Add a wee sprinkle of nutritional yeast flakes for a deliciously easy, satisfying meal.
Print Recipe
Equipment
- Baking sheet or tray
- Mixing bowl
- metal cutlery knife or similar
- Pastry brush
Ingredients
- 580 grams self-raising flour [plus extra for dusting hands, work surface, and baking sheet] see the notes below for using plain or all-purpose flour
- 2 tablespoons vegan butter [or your usual butter, baking block, or margarine that's suitable for baking] plus a little extra for greasing the baking sheet
- 1½ teaspoons salt [use ½ teaspoon salt if using self-raising or self-rising flour that originates outwith the UK, as salt will likely already be added to your flour]
- 250 millilitres plant-based milk [we used soya milk, but you can use your usual milk] plus a little extra milk for brushing over the bread dough
- 120 millilitres water
Instructions
- Preheat the oven to 180 Fan, 200C, 392 Fahrenheit, Gas 6.
- Add the flour to a mixing bowl and rub the butter into the flour using your fingertips, until the butter is crumbled finely into the flour.580 grams self-raising flour, 2 tablespoons vegan butter
- Stir through the salt.1½ teaspoons salt
- Make a small gap or well in the bottom of the bowl by pushing the flour to the side exposing the bottom of the bowl.
- Pour in the milk and water and use a metal cutlery knife to stir the liquids into the flour until it starts to clump together and leave the sides of the bowl.[If your using a 240ml or a US cup measurement, then add an extra 2 teaspoons of milk to your cup measurement, so that it will equal the 250mls required]250 millilitres plant-based milk, 120 millilitres water
- Using floured hands pat the dough together to form a ball of dough, knead gently for a few seconds just until it is firmly together.
- If the dough is too wet to handle easily into a dough ball then sprinkle in a little more flour until it does come together, If the dough is too dry sprinkle in more water or milk, incorporating the liquid in just until the dough is easier to handle.
- Place the dough onto a greased and floured baking tray. Pat the dough into a circle shape that is about roughly around 3 cm high and 16-17cm wide.Use a sharp knife to score a cross about 1cm, or a little deeper, throughout the centre of the bread surface.
- Brush the surface of the bread dough with milk.
- Bake on the middle shelf for about 35-40 minutes, until risen and golden, and tapping its surface and underside sounds hollow. Fan ovens will likely bake faster so check at the 30 minute mark if using a fan oven or if your oven tends to bake quite quick. [We used an electric oven at 200C and our damper was baked around the 38-39 minute mark.]
- Cool the damper on a wire rack, and enjoy while still warm.
Notes
- Nutritional data: This is for guidance only and is not an exact calculation as ingredients vary.
- Flour variations: If you don't have self-raising flour, you can make your own by using all-purpose or plain flour and adding one tablespoon of baking powder and a half teaspoon of bicarbonate of soda [baking soda].
- Salt consideration: If you're using self-raising or self-rising flour from different countries, be aware that the salt content can vary as self-raising from the UK does not usually contain salt. If salt is already added to your flour reduce the salt in the recipe to ½ [half] teaspoon.
- Milk alternatives: This recipe uses soya milk but feel free to use almond, oat, or any type of milk you normally use.
- Baking time: Ovens can vary widely, so keep an eye on your damper, especially during the last few minutes. For fan ovens check the bread at the 30 minute mark.
- Storing: Damper is best eaten fresh but can be wrapped in a tea towel, or within a bread bag, and stored in a bread bin or container for a few days. Older slices can be toasted. Or freeze for 2-3 months and perhaps warm through the slices once thawed.
- Softer crust: If a softer crust is preferred wrap the damper in a clean tea towel as soon as it comes out of the oven, and cool the bread within the towel. Doing so can helps retain moisture that softens the crust.
- Golden syrup: In Australia it is traditional to add butter to freshly baked damper and drizzle golden syrup over warm damper bread especially if it has been baked over a camp fire. Alternatively, use any syrup you prefer. Or dunk your bread into a tasty soup or stew, or enjoy a slice toasted for a snack.
- Recipe notes and FAQs: Check out our recipe notes above the recipe for more useful information to help bake the best damper bread.
Nutrition
Calories: 199kcal | Carbohydrates: 37g | Protein: 6g | Fat: 3g | Saturated Fat: 1g | Polyunsaturated Fat: 1g | Monounsaturated Fat: 1g | Trans Fat: 0.01g | Sodium: 317mg | Potassium: 59mg | Fiber: 1g | Sugar: 2g | Vitamin A: 133IU | Calcium: 38mg | Iron: 1mg
