This is week two of my new series where I test 7 dinner and 7 dessert recipes from British vintage recipe cards, but re-make them with vegan and plant-based everyday ingredients. There are also 2 bonus recipes - one for the cake tin and a pot of soup for the week! So that makes 16 vegan vintage recipes in total. These recipes are perfect for building your own weekly meal plan or recipe card binder. I will be sending out free recipe card printables once they are ready for my subscribers so do sign up if you haven't already.
For 15 more vegan vintage recipes do have a look at - Week One Vintage Recipe Cards Re-Made Vegan!
Why I Remake Vintage Recipes With Plant-Based Ingredients (and Share Them With You!)
Sometimes we look back on vintage recipes with a feeling of nostalgia and think about giving them a go but then hesitate, worried the recipe might fail or that we'll end up wasting ingredients. I completely understand as I feel the same way too! But I'm always drawn to these older recipes as they fascinate me, and I'm motivated to give them a try even if they might not turn out perfectly, because the results are usually still quite edible! And if I can share my vegan versions with others then that feels like a lovely bonus.
Vintage recipes were created in a different era, and while some are very easy to veganise, others need a little or a lot of tweaking. Sometimes they need more sugar or seasoning, or maybe less of something else, just to make them work better in a modern kitchen. (Although I live in today's world, I think my heart, mind and soul are still rooted in the past, probably wearing a pinny and baking a seed cake! One of my relatives traced our family ancestors back to Victorian bakers so that thought seems quite realistic!)
I do hope these vegan vintage recipes brings something useful to your life whether you're wondering what to make for dinner or tea, or you're in the mood for a traditional dessert or pudding, are planing a retro or vintage themed dinner party, or are looking for some traditional home baking to enjoy with a nice cup of tea.
I always find that good home-made cooking and baking can brighten even the dullest day and it certaintly brings comfort and satisfaction. It doesn't have to be expensive or made with fancy, hard-to-find ingredients either.
These recipes are for everyone so I hope they find their way into many kitchens be that vegan, plant-based, vegetarian, omnivore, allergy-aware kitchens, etc., it really doesn't matter. The recipes are based on everyday ingredients you'll likely find in supermarkets, corner shops, wholefood stores or your own cupboards. Home cooks throughout history have always adapted recipes to suit what they could afford and access so I hope that you will make these recipes your own and tailor them to your taste preferences and dietary needs.
Historically for many, a meat-free diet wasn't a choice but a necessity. I love continuing that tradition by adapting these old British recipes to be egg-free, dairy-free, and meat-free not only for ethical reasons but also because I genuinely prefer and enjoy cooking with plant-based ingredients.
Even if I did eat meat, I'm not sure I could afford to as it's just too pricey! But for those who do still include animal products in their diets, these recipes can still offer frugal, delicious alternatives that aim to stay true to the heart of traditional British home cooking.
🍽️ WEEK TWO - SEVEN VINTAGE MAIN MEAL RECIPES 🍽️
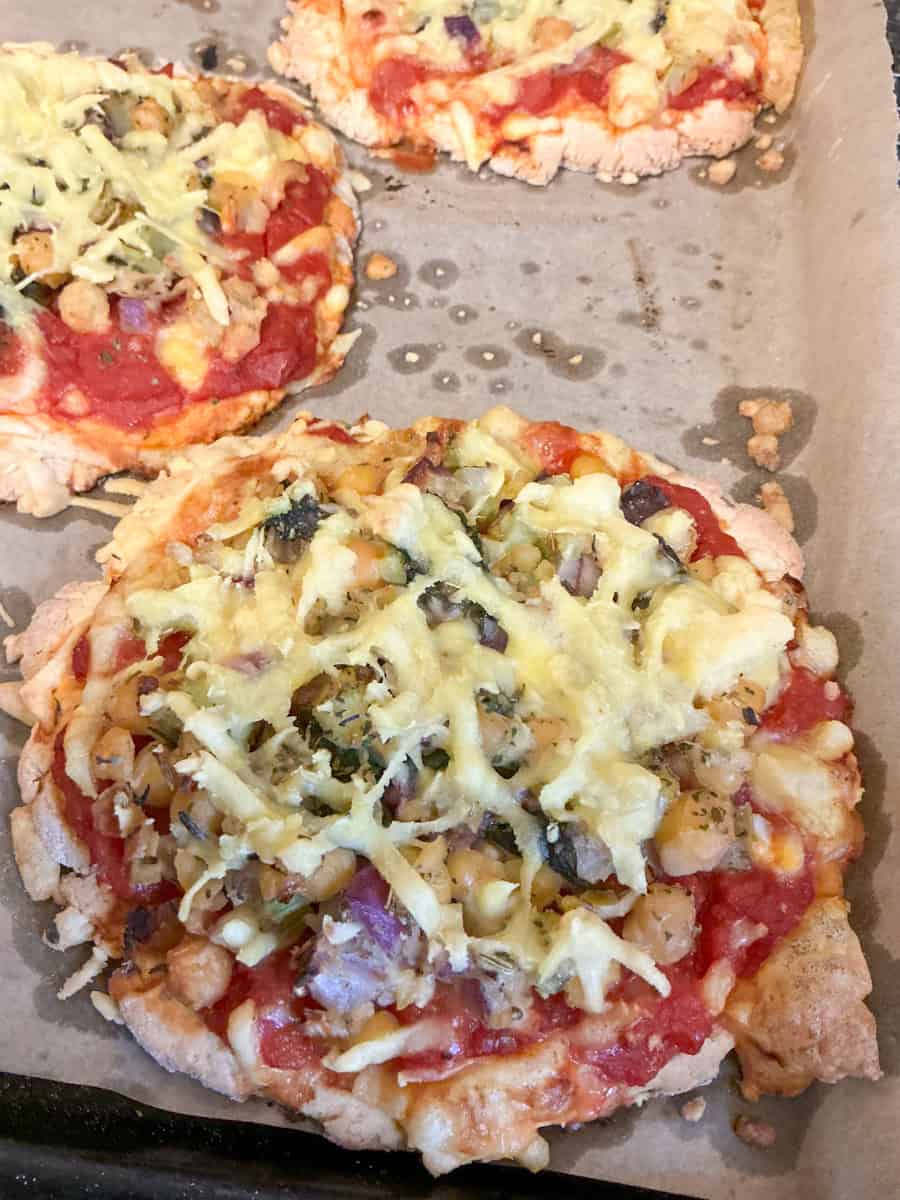
🧀 Scone-Base Pizzas (1980 Recipe) Re-Made Vegan!
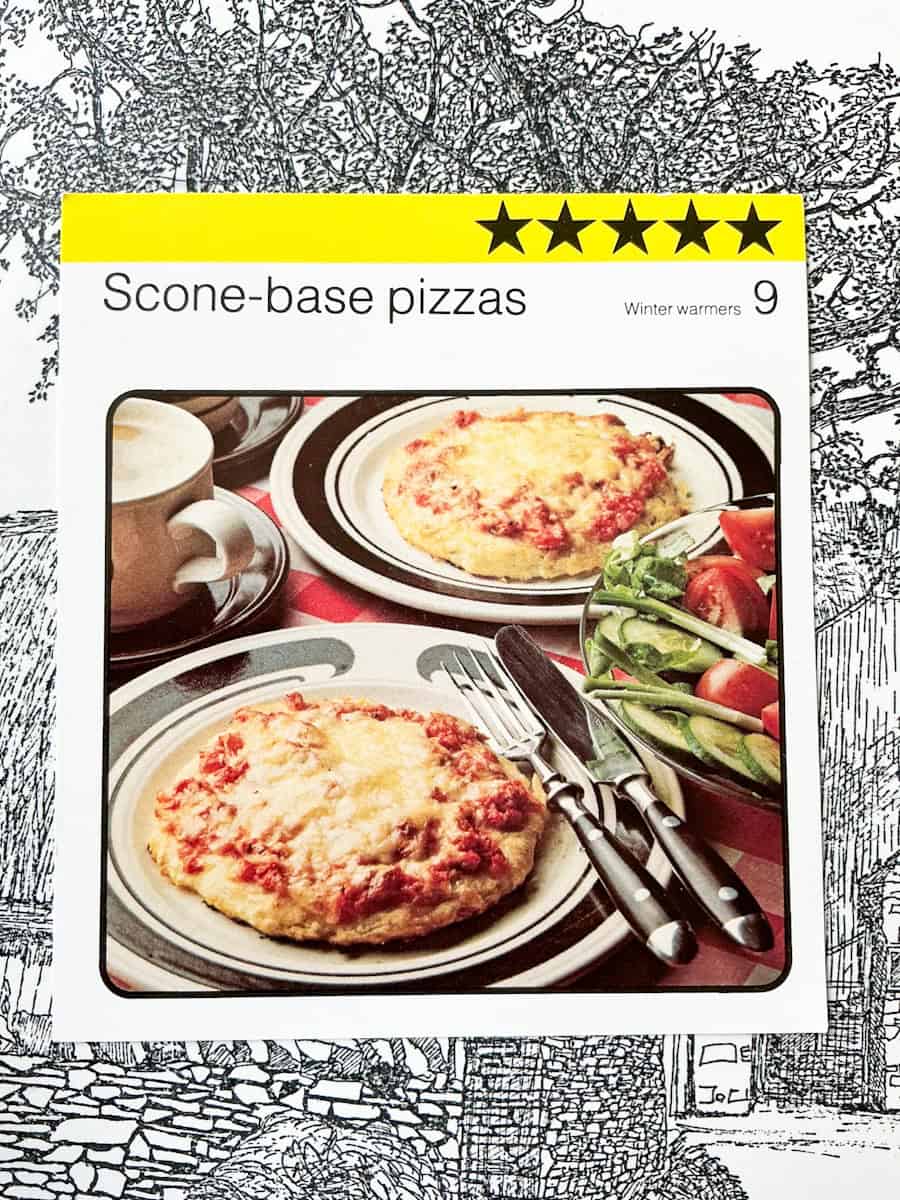

- Original recipe: Home-made pizzas with a scone base, prepared with egg, and a canned tuna topping with Edam cheese. Recipe card number 9 ' Winter Warmers' from Kathie Webber's All-Star Cookery Club recipe box set.
- Serves: 4
- What I changed: I used dairy-free cheese instead of Edam and prepared a vegan tuna chickpea filling instead of the can of tuna. There are vegan tuna in a can products available but my family disliked this when I bought a can to test as the flavours and textures were not pleasant. Instead of the egg I used aquafaba.
- My notes: I really enjoyed these pizzas as the scone base was very nice and it actually tasted similar to a savoury scone. It had nice crisp edges with soft insides. The chickpea tuna topping went very well with the thick tomato base and cheesy topping. I will definitely be making these pizzas again as the bases are easy to prepare and are a good hack for when you want quick home-made pizzas without the fuss, or don't have time to make yeast-based pizza dough from scratch. Next time I will try this recipe with a vegetable topping rather than the vegan tuna, just for a change.
- Ingredients for scone pizza base:
- 225 grams [8 oz] plain flour
- pinch of salt
- 2 teaspoons baking powder
- 50 grams [2 oz] dairy-free margarine
- 3 tablespoons [60 millilitres / 2 fl oz] aquafaba - this is the drained liquid from a can of chickpeas and is ideal for replacing eggs in some savoury recipes.
- 1 tablespoon [15 millilitres] dairy-free milk, such as unsweetened soya milk
- Pizza tomato topping:
- 1 x 400 grams [14 oz] can chopped or diced tomatoes, can be replaced with tomato ketchup or tomato puree/paste - use however much is required to cover the scone pizza base before adding the vegan tuna topping.
- For the vegan tuna pizza topping:
- (if preferred you can omit the chickpea tuna and add your own choice of toppings)
- 1 x 400 grams [14 oz] can chickpeas, or about 240 grams [8 ½ oz] cooked chickpeas
- 1 medium [about 160 grams / 6 oz] red onion, finely diced
- 1 stick celery [about 65 grams / 2 ¼ oz] finely diced
- 2 teaspoons fish seasoning or a seasoning mix of your choice or dried mixed herbs
- 2 tablespoons olive oil or your usual oil [I used cold-pressed rapeseed oil]
- Optional:
- 2 grams (approx. 0.07 oz) dried seaweed [I used dried small pieces of wakame and rehydrated it with boiling water for 5 minutes before draining and squeezing excess water away]
- 1 teaspoon mixed dried herbs or dried thyme
- Pizza cheese topping:
- 100 grams [4 oz] dairy-free cheese, use more if preferred [I used Morrisons supermarket cheddar alternative vegan cheese]
- Method:
- Prepare the chickpea tuna topping:
- Drain the canned chickpea liquid (aquafaber) into a small bowl and place the chickpeas into another bowl.
- Rehydrate the dried seaweed if you haven't already done so. Once rehydrated drain the liquid and squeeze the excess liquid out of the seaweed.
- Mash the chickpeas with a fork and mix through the finely diced red onion and celery. Stir through 1-2 teaspoons of fish seasoning (or your choice of spices/herbs) and some salt & pepper.
- Mix the seaweed through the chickpea mixture and stir through a tablespoon of oil.
- Prepare the pizza bases:
- Sift the flour and baking powder into a mixing bowl.
- Stir through the salt.
- Add the margarine in clumps then rub it into the flour using your fingertips until it resembles breadcrumbs.
- Add the aquafabar and 1 tablespoon milk and using a cutlery knife or the edge of a metal spoon to cut the liquids through the mixture. It will eventually look scraggly so keep going and it will start to come together picking up all the little crumbs.
- Dust your hands with flour and bring the mixture into a dough.
- Sprinkle flour over your work surface and roll the dough into 4 equal sized thin circles. I weighed the dough and divided it into 4 equal pieces. Place the rolled pizza bases onto a baking tray.
- Assemble the pizzas:
- Preheat the oven to 200°C / 180°C Fan / 400°F / Gas Mark 6.
- Add the canned chopped tomatoes to a sieve over a bowl and drain away the excess liquid (you can reserve the tomato juice for adding to soups, stews, or sauce recipes.) Use a cutlery knife or spoon to move the tomatoes around and help the juice escape through the sieve.
- Mash the tomatoes well until they are as smooth as you can get them, it doesn't matter if it's not completely smooth.
- Spread the mashed tomatoes evenly over each pizza base.
- Divide the chickpea tuna mixture evenly between the four pizzas - you will likely have some of this mixture left over, and it will keep in the refrigerator for 3 days. It makes a lovely vegan tuna sandwich or baked potato filling, especially if you mix some vegan mayonnaise through it, or use it as a salad to accompany another meal.
- Sprinkle dried mixed herbs or thyme over each pizza and drizzle the last tablespoon of olive oil over if using.
- Top each pizza with the cheese.
- Bake the pizzas:
- Bake the pizzas on the middle shelf of the oven for 20-25 minutes or until the pizza base has golden brown edges.
- Serving suggestion:
- Salad, chips, fries, or wedges, mashed potatoes or jacket potatoes, and baked beans or spaghetti hoops.
If you like chickpea tuna flavours, then you may also enjoy my Chickpea Tuna & Potato Mornay which is another vegan savoury bake recipe based on a British vintage meal. For another quick pizza base recipe, have a look at my recipe for 3 Ingredient Flat Breads.
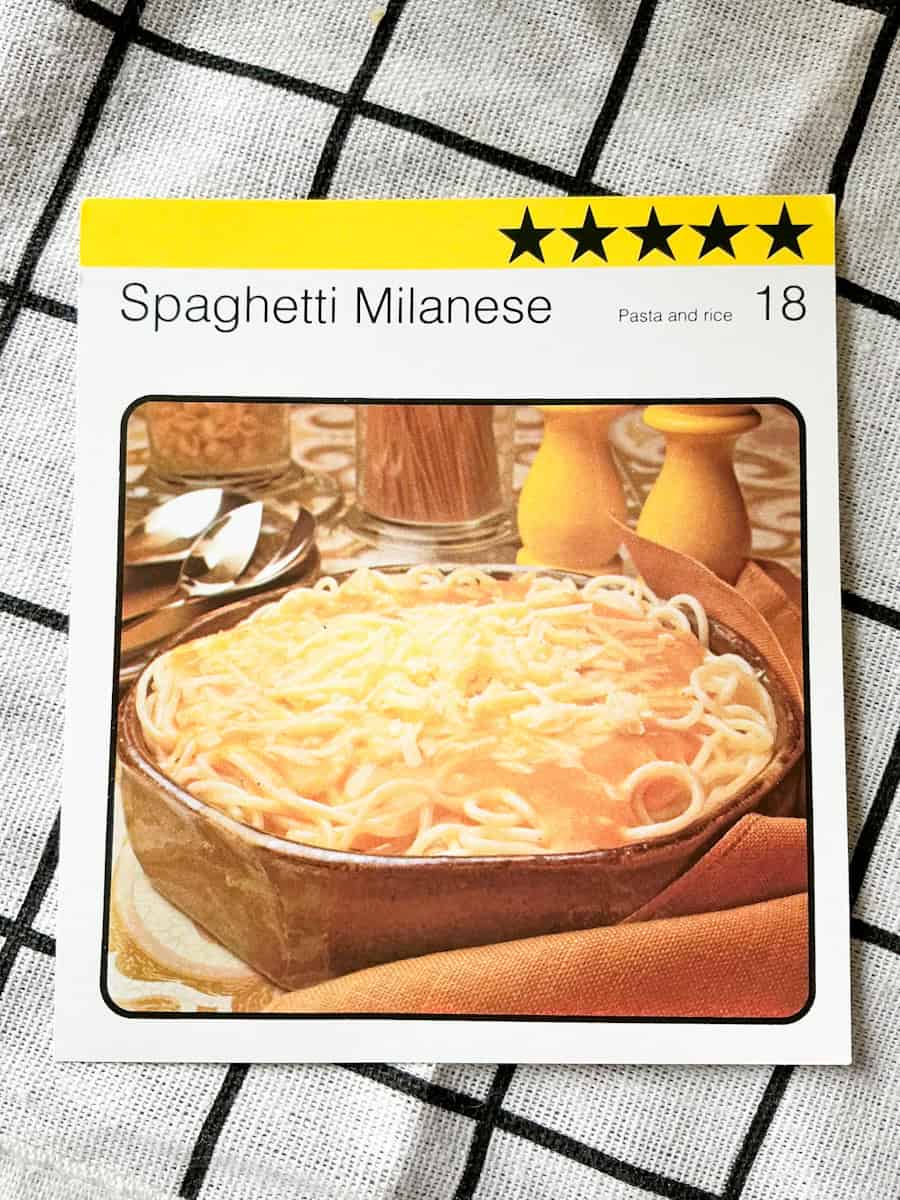
🍝 Spaghetti Milanese (1978 Recipe) Re-Made Vegan!


- Original recipe:
- A tomato pasta sauce made with butter and chicken stock, topped with Edam cheese. Recipe card number 18 ' Pasta and rice' from Kathie Webber's All-Star Cookery Club recipe box set.
- What I changed:
- I used vegan butter and vegetable stock, and for the cheese topping, I used dairy-free Cheddar cheese alternative. The original recipe calls for the sauce to be pushed through a sieve in order to achieve a smooth sauce. However, I used a stick immersion blender, and it worked fine.
- Serves: 4
- My notes:
- This was a very nice tomato and onion pasta sauce similar to that of canned tomato soup, and the onions provided a tasty sweetness. This is a good recipe for using up older tomatoes, reduced-price tomatoes or home-grown tomatoes. I'll definitely be making this Milanese sauce again.
- Ingredients:
- 1 large onion (about 340 grams / 12 oz), roughly chopped
- 3 large tomatoes or 6 smaller salad sized tomatoes, (about 450-500 grams / 16-18 oz), rough chopped, You can use more tomatoes if you like, as it won't affect the sauce.
- 60 grams (2 oz) vegan butter, margarine or vegetable oil
- 25 grams (1 oz) plain flour
- 125 millilitres (4½oz) vegetable stock
- 350 grams (12 oz) spaghetti
- 60 grams (2 oz) dairy-free cheese (use more if preferred), or a few tablespoons of nutritional yeast flakes
- Method:
- Heat half the butter in a non-stick frying pan or saucepan. Over a medium heat cook the onions for 5 minutes, stirring frequently.
- Stir through the tomatoes and place a lid over the pan. Cook over a low-medium heat for 30 minutes, stirring every now and then to prevent sticking. If it looks like the tomatoes and onions will stick add in a few tablespoons of water.
- Cook the spaghetti according to the package instructions. Once cooked, drain the liquid.
- Either push the tomato mixture through a sieve, which is the original method to prepare a smooth sauce, or use a stick immersion blender to puree the mixture. Alternatively, wait until the sauce has cooled and then blend in a stand blender or food processor or leave it chunky, if preferred.
- Melt the other half of butter in a large saucepan.
- Stir through the flour and cook for 1 minute, stirring constantly.
- Take the saucepan off the heat and whisk through the vegetable stock adding small amounts at a time.
- Next, place the saucepan back onto the heat and add in the blended tomatoes and mix well. Season with salt & pepper to taste.
- Cook for 2 minutes, stirring. I found that my sauce was very thick at this point and glugged everywhere as it simmered! So you may need to cook it on lower heat and add a lid! I think it depends on how much water your tomatoes held as to how thick your sauce is at this stage.
- Serve with the cooked spaghetti and sprinkle the cheese on top.
- Serving suggestion:
- Garlic bread, crusty bread, or toasted bread fingers, and a fresh salad. Basil or chives make a nice garnish.
For another easy vegan pasta recipe that is ideal for quick mid-week meals, do have a look at my Vegan Carbonara.
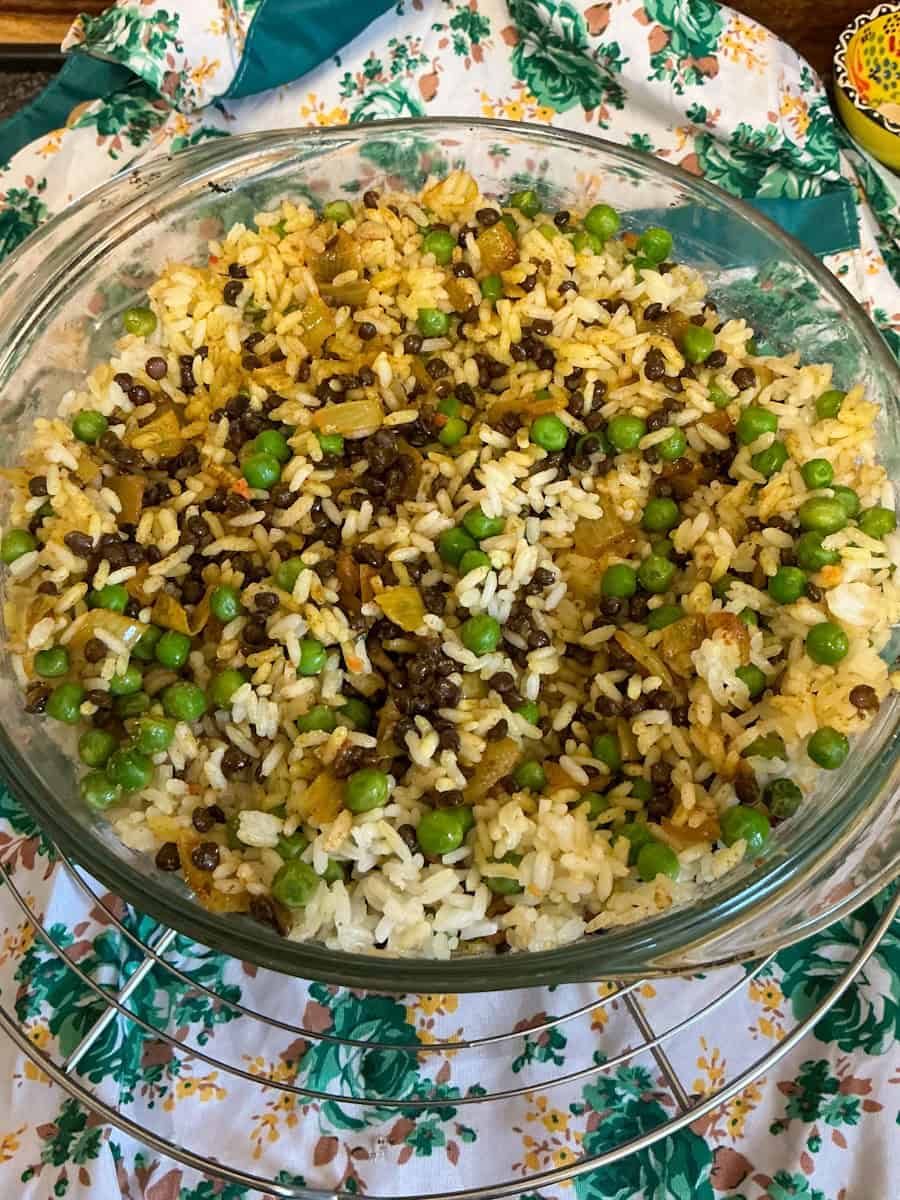
🍛 Biriani (1978 Recipe) Re-Made Vegan!

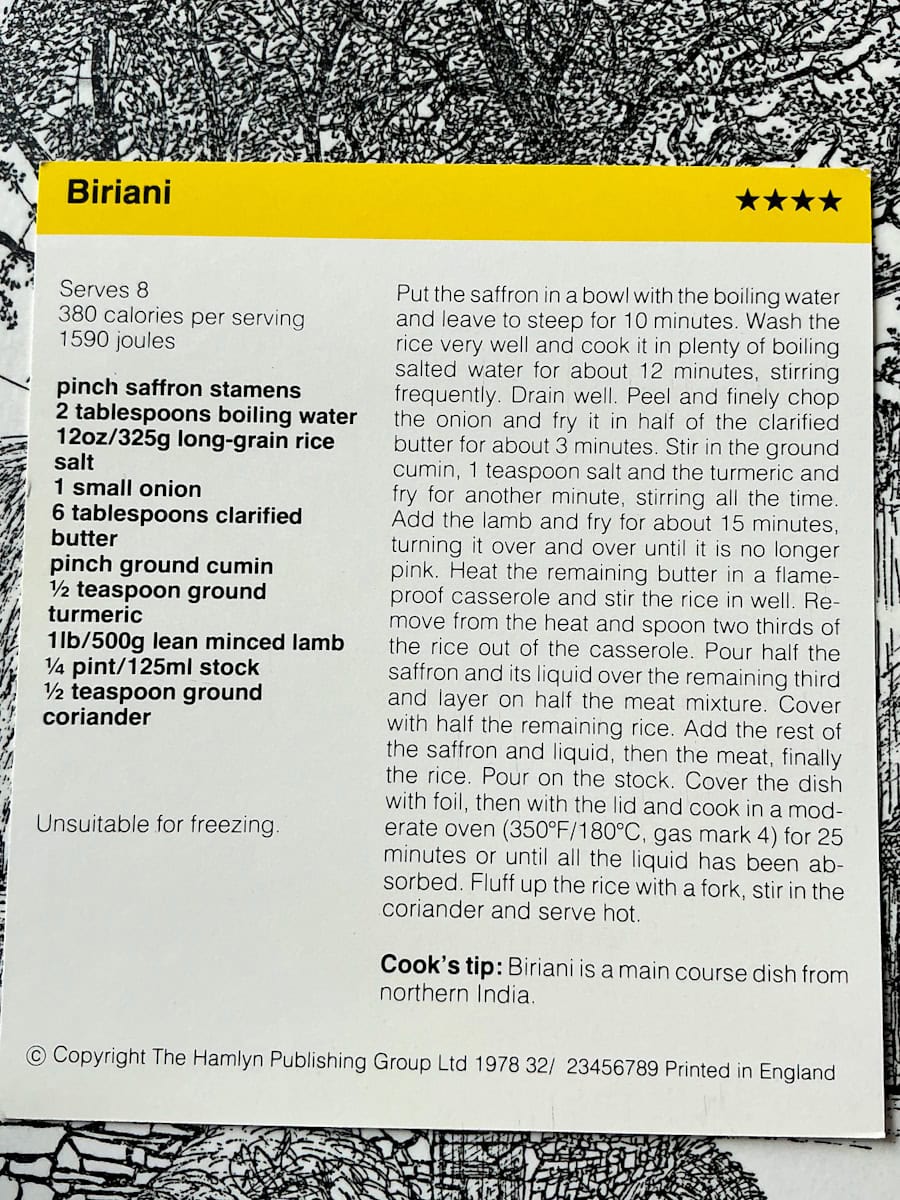
- Original recipe:
- Biriani cooked with clarified butter, saffron and minced lamb. Recipe card number 17 'Pasta and rice' from Kathie Webber's All-Star Cookery Club recipe box set.
- What I changed:
- I replaced the clarified butter with vegetable oil and vegan butter, and the minced lamb with cooked puy lentils. I also increased the amount of spices as I felt that the original amount would not be enough, added in some garlic powder, and I swapped the saffron for sweet paprika. Also, I used a medium onion instead of a small one. Another change was that I added in some frozen peas and increased the amount of vegetable stock required. During cooking, the biriani did not get up to a hot temperature after the set amount of cooking time and likely because it was covered with both kitchen foil and a lid. I removed the lid, kept the kitchen foil cover, and turned up the oven heat by a few notches and cooked for a further 20 minutes. The biriani was fine after those cooking method changes.
- Serves: 4-6
- My notes:
- This is a nice and easy biriani recipe and has a pleasant lightly spiced flavour. You can increase the amount of the spices you add if you prefer more spiciness. Note on the spelling of biriani: You might notice the spelling "biriani" is different from the more familiar "biryani." This version comes directly from the vintage recipe card I'm adapting, and it reflects how dishes from other cultures were often written in older British cookbooks and recipe sets. I've kept the original spelling here as my vegan biriani is adapted directly from a vintage-era recipe..
- Ingredients:
- Optional original recipe ingredient: pinch saffron stamens (however I replaced the saffron with 1 teaspoon sweet paprika as saffron is very expensive)
- 250 grams (9 oz) long-grain rice (my rice packet stated that it was easy cook and that it took 14 minutes to cook), plus a few good pinches of salt
- 1 medium onion, (about 200 grams / 8oz)
- 3 tablespoons vegetable oil
- 3 tablespoons vegan butter or margarine
- ½ teaspoon salt
- 1 teaspoon ground cumin
- ½ teaspoon ground turmeric
- 1 teaspoon garlic powder (or add a few garlic cloves along with the onion)
- 1 teaspoon ground coriander, divided: ½ teaspoon for the lentil layer, ½ teaspoon reserved for garnish
- 120 grams (5 oz) frozen peas
- 250 grams (9 oz) cooked puy lentils (I used a packet of Merchant Gourmet ready cooked puy lentils), this can be replaced with cooked brown or green lentils or vegan mince
- 135 millilitres (4 ½ oz) vegetable stock
- Method:
- You will need a medium oven-proof casserole dish, big enough to prepare 4 portions, although if the biriani is served with a few sides then it could feed 6.
- Prepare the rice layer: Wash the rice, drain, and place it in a pot of water. I cook rice by the absorption method so I add enough water so that it sits about one inch above the rice. I add a few good pinches of salt to the water, bring it to the boil then lower the heat and simmer for 12 minutes. If during cooking it looks like most of the water has evaporated you can remove the pot from the heat, place a lid over it and leave it for the rest of the required cooking time. If you haven't cooked the rice by the absorption method you will likely have to drain the rice after the cooking time. It's important not to overcook the rice as it will finish cooking in the oven. If you find that your rice is sticky place it in a colander and pour boiling water over it, and the grains should come apart.
- Mix three tablespoons of butter through the hot, drained rice.
- Prepare the lentil layer: While the rice is cooking add 3 tablespoons of oil to a frying pan and over a medium heat cook the onion for 3 minutes, stirring frequently.
- Add 1 teaspoon cumin, ½ teaspoon turmeric, 1 teaspoon paprika, 1 teaspoon garlic, ½ teaspoon coriander and salt and cook for 1 minute, stirring.
- Next add the lentils and cook for another 1-2 minutes, stirring frequently. If using meat-free mince, cook it for an extra 5 minutes to brown slightly as it will finish cooking in the oven.
- Preheat the oven to 200°C / 180°C Fan / Gas 6 / 400°F.
- Assemble the biriani:
- Create layers in a casserole dish as follows:
- ⅓ of the rice
- Half the peas
- Half the lentil mixture
- Half of the remaining rice
- The rest of the peas
- The remaining lentil mixture
- Finish with the rest of the rice spread evenly across the top.
- Pour over the stock. Cover tightly with foil.
- Bake for 25-30 minutes, or until the stock is absorbed and the biriani is piping hot.
- Sprinkle over the remaining ½ teaspoon of coriander and fluff the rice up with a fork as you stir the coriander through.
- Serving suggestion:
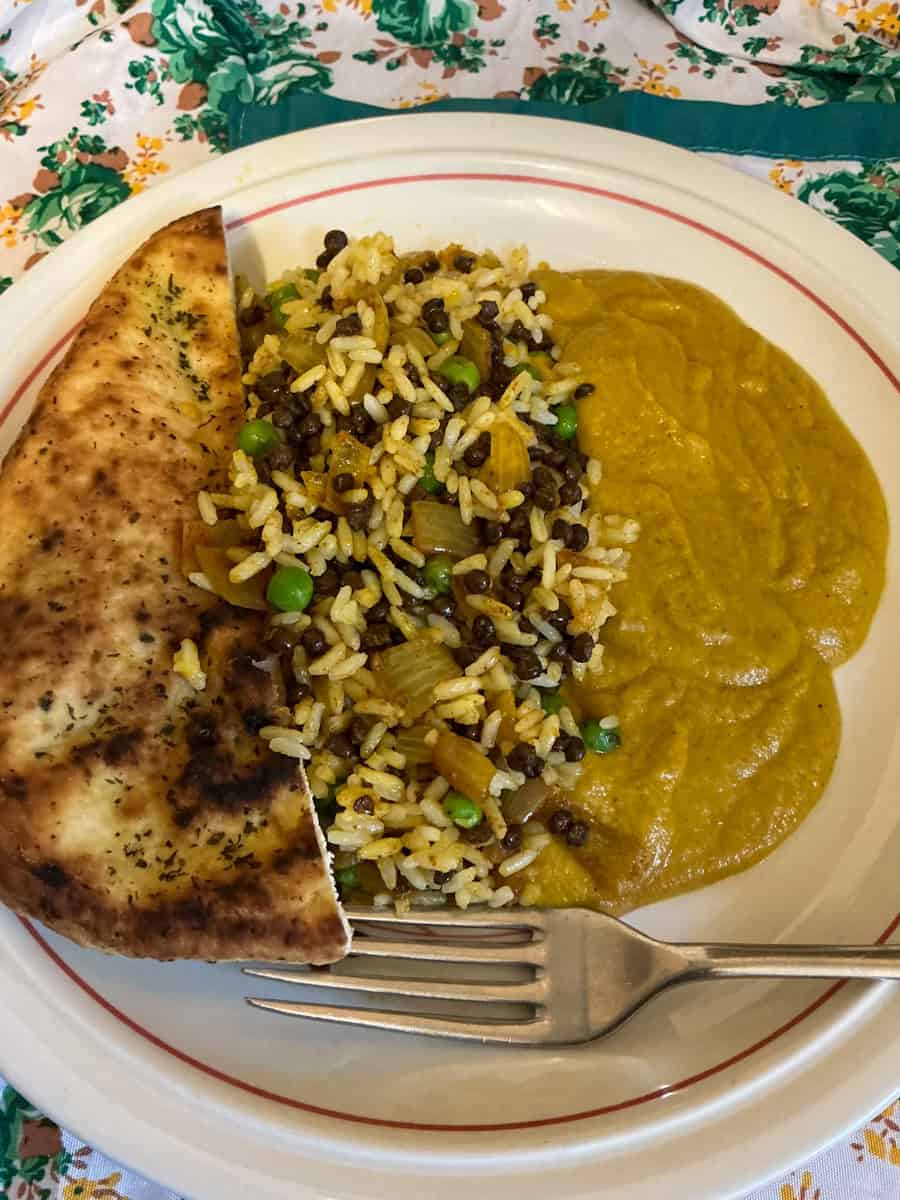
- I served home-made curry sauce and naan bread with my family's biriani- see the photo below. While eating the meal I was thinking some home-made potato chips or fries would also be quite nice and it would be like a take-out at home. Popadoms would also be nice, as would a simple salad of chopped red onion, cucumber & tomato. Raitas and chutneys are a nice addition. The biriani could also be served alongside other curry dishes.
- Please note:
- If using saffron stamens instead of paprika then follow these instructions - add the saffron to a bowl with 2 tablespoons of boiling water. Leave to soak for 10 minutes. To use, add the saffron and the liquid to the layers of rice while layering up the biriani.
- Original Recipe Cook's Tip: "Biriani is a main course dish from Northern India.
For another vegan rice recipe that's budget-friendly and perfect for family meals, we love our British Bean & Pea Pilaf as the vegetables can be easily adapted to whatever you have to use up.
🥕 Savoury Mince (1978 Recipe) Re-Made Vegan

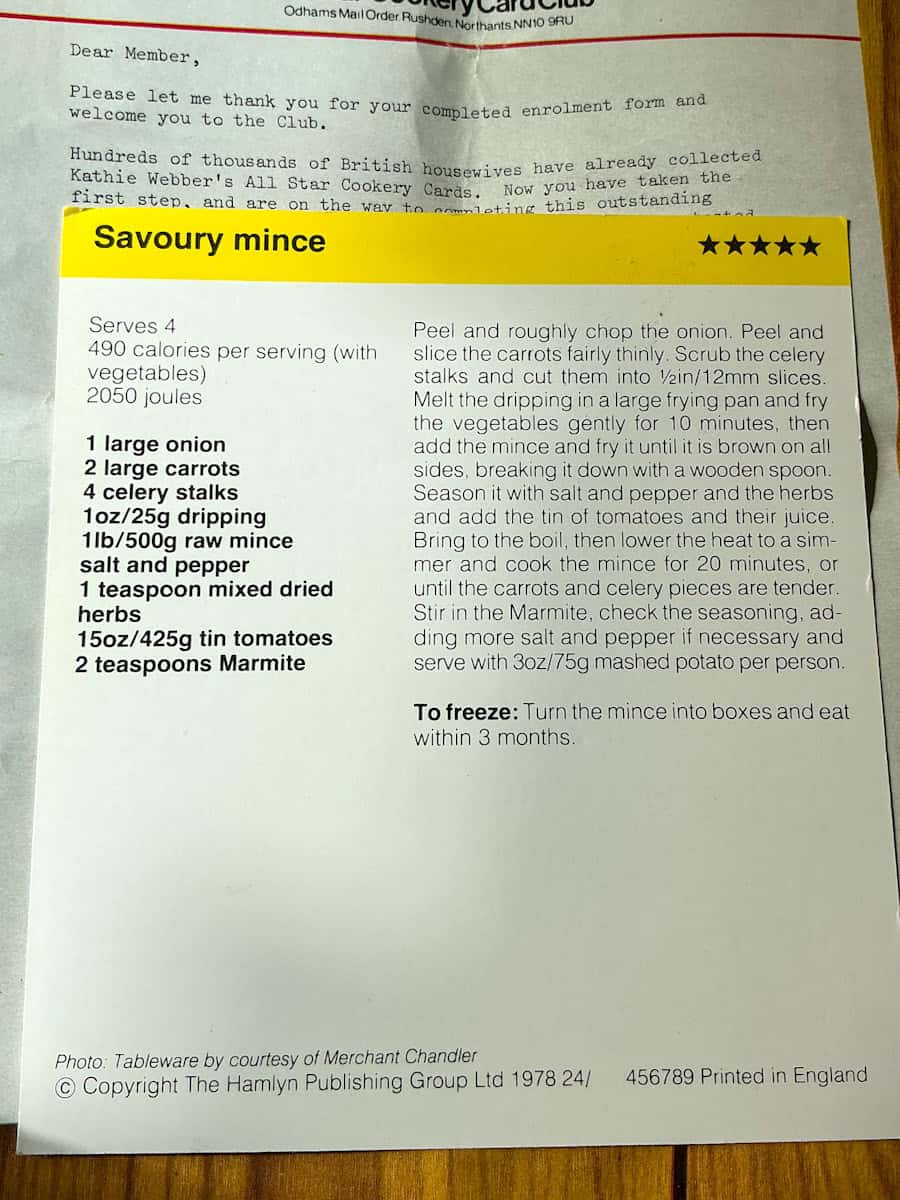
- Original recipe: Mince cooked in dripping. Recipe card number 5 ' Meals in a hurry' from Kathie Webber's All-Star Cookery Club recipe box set.
- What I changed:
- I used vegan mince in place of regular mince, and vegetable oil instead of dripping, which is an animal fat. I also added in some vegetable stock as the vegan mince needed more liquid.
- Serves: 4
- My notes:
- This was a nice tasting meat-free savoury mince that was easy to prepare, and I particularly enjoyed the carrots as they tasted very good cooked in the mince. I wouldn't normally add so many carrots to my vegan mince, but I did like how bright the carrots made the mince look. I will make this recipe again perhaps as a filling for vegan lasagne or cottage pie.
- Ingredients:
- 2 large carrots (about 340 grams / 12 oz), sliced thin
- 4 celery stalks, sliced into ½ inch pieces, any thick stalks can be sliced in half first
- 1 large onion (about 290 grams / 10 oz), chopped
- 350 grams (12 oz) vegan mince, either fresh or frozen, thaw first
- 25 grams (1 oz) vegetable oil
- 1 heaped teaspoon dried herbs
- 1 x 400 grams (14 oz) can chopped tomatoes
- 2 teaspoons Marmite or yeast extract
- 350 millilitres (12 oz) vegetable stock, add more if necessary while cooking
- Method:
- Heat the oil over a medium heat in a frying pan.
- Cook the onion, carrot and celery for 10 minutes, stirring frequently.
- Add the mince and cook for a further 2-3 minutes.
- Add the can of tomatoes, herbs, marmite, and season with salt & pepper.
- Stir through the vegetable stock.
- Bring to a boil, then simmer uncovered for 20 minutes.
- By the end of cooking, the carrots and celery should be soft.
- Add more salt and pepper if necessary.
- Serving suggestion:
- Serve with boiled or steamed new potatoes, or mashed potatoes. My family had our savoury mince with new potatoes (grown at my daughter's allotment) with a few tablespoons of vegan butter melted through, and fresh mint and chives from the garden. A slice of bread on the side was nice to mop up the tasty vegan savoury mince juices.

For another easy vegan mince recipe do have a look at my Scottish Vegan Mince & Tatties recipe.
🍚 Creamed Chicken on Rice (1978 Recipe) Re-Made Vegan!

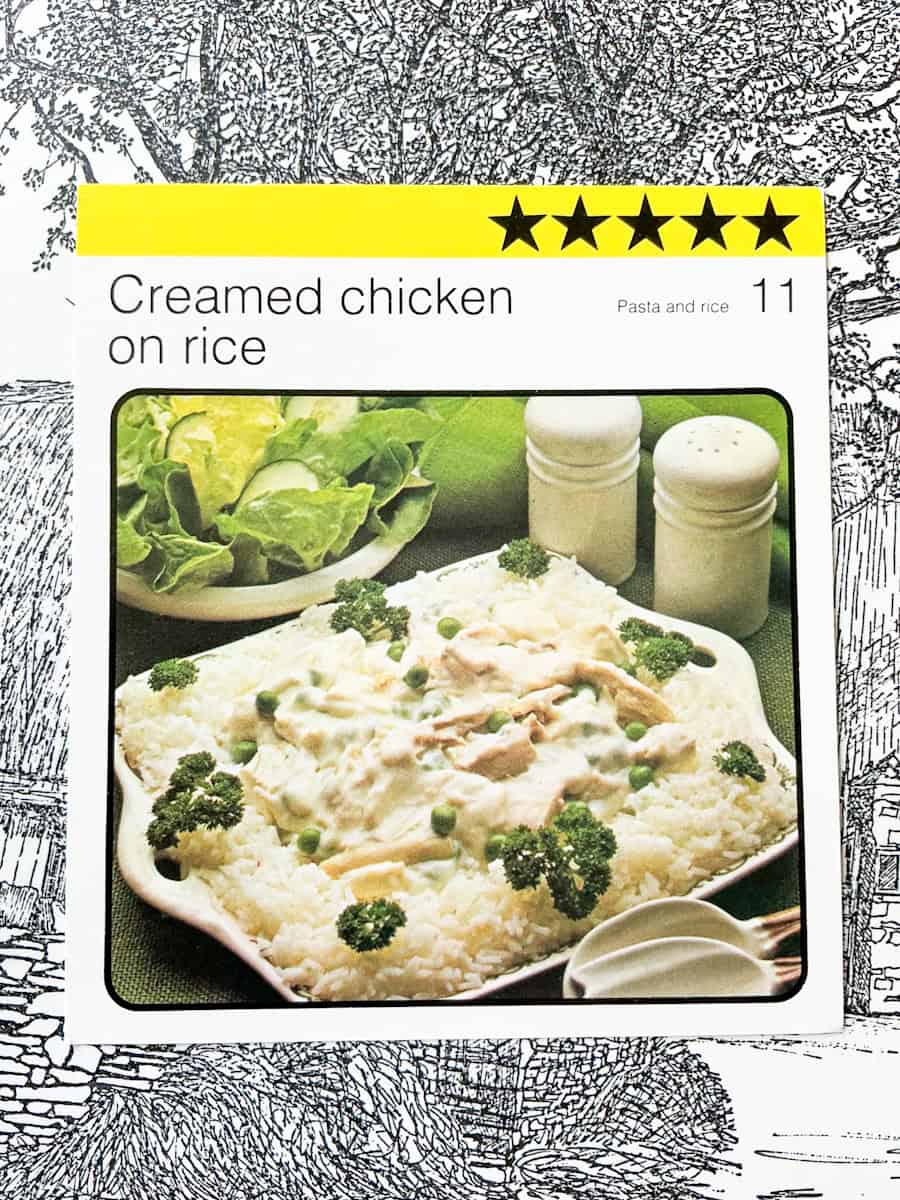
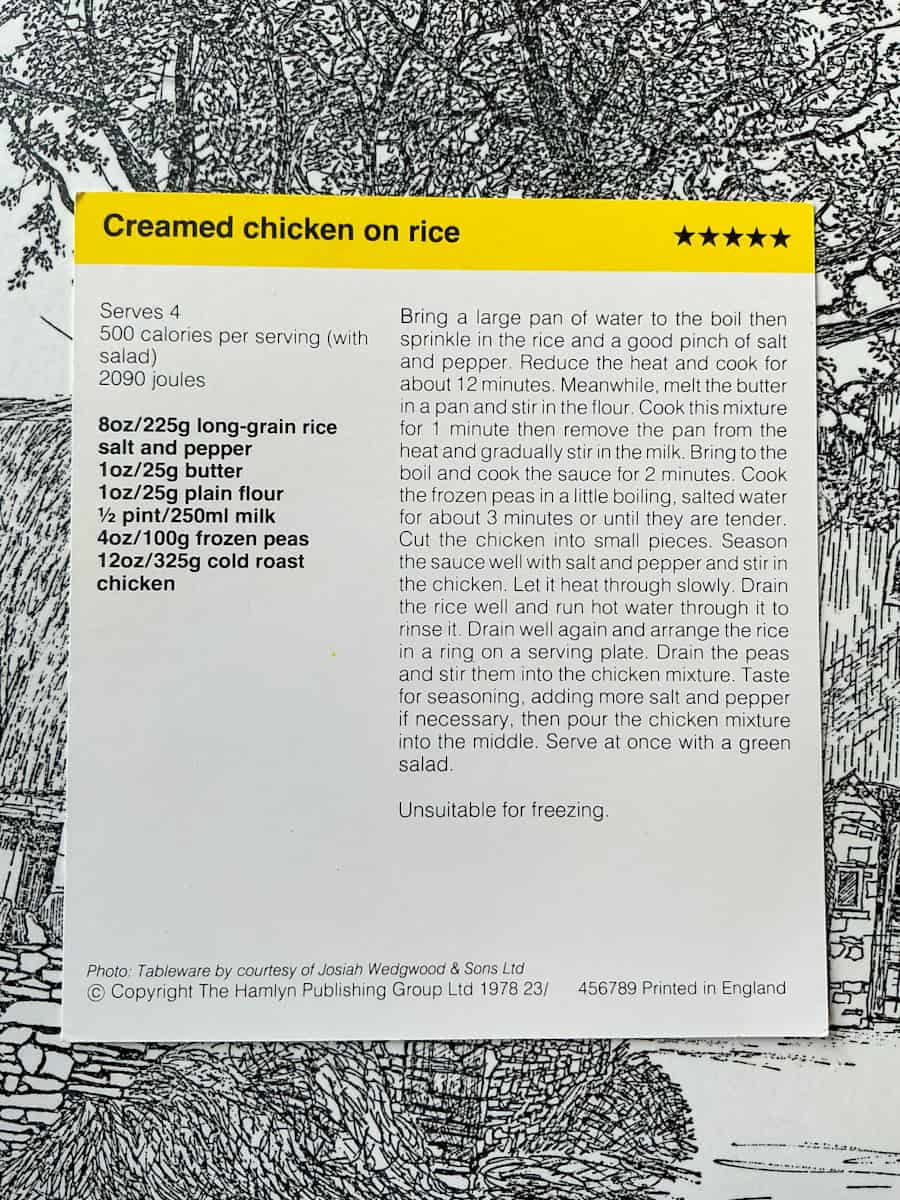
- Original recipe: Recipe card number 11 ' Pasta and rice' from Kathie Webber's All-Star Cookery Club recipe box set.
- Cooked chicken and peas mixed with a white sauce prepared with dairy milk and butter.
- What I changed:
- I used meat-free chicken-style pieces - 'This Isn't Chicken' pieces from Morrisons supermarket, and soya milk and vegetable oil. I also used less meat-free pieces to replace the chicken and increased the amount of peas required. I also used more milk than specified as I wanted a slightly looser sauce. The sauce is very thick so it could take some more milk if you preferred a less thick sauce.
- Serves: 4, or 3 if larger portions required.
- My notes:
- This was a very tasty meal and it was quick and easy to prepare. I really enjoyed the This Isn't Chicken Pieces in the thick creamy sauce as they have a very nice flavour and texture. If you're looking for a vegan creamy chicken soup recipe then this recipe will do the trick! The vegan chicken soup could be made by thinning the creamed chicken down with some vegetable stock as the creamed chicken was similar to condensed chicken soup. Another idea is to use the creamed chicken for a vegan chicken pie filling especially for a vegan chicken pasty. I will definitely be making this recipe again probably to use as a filling for vegan chicken pasties.
- Ingredients:
- 25 grams (1 oz) vegetable oil or vegan butter
- 1 packet (about 250-300 grams / 9-11 oz) of meat-free chicken style pieces such as 'This isn't chicken pieces'. Alternatively replace the chicken style pieces with 1-2 cans of chickpeas (400 grams / 14 oz ), drained * see note at end of recipe for guidance*
- 25 grams (1 oz) plain flour
- 175 grams (6 oz) frozen or fresh peas, cooked
- 350 millilitres dairy-free milk, I used soya milk
- Rice, use however much rice is required - consult the package instructions for portion sizes and cooking methods. To save time you could use packages of microwave rice. I used golden vegetable microwave rice for this meal as I was short of time that day.
- Method:
- Cook the rice according to package instructions while you prepare the vegan creamed chicken.
- Heat the oil in a non-stick frying pan or saucepan and cook the meat-free pieces according to how long is stated on the package instructions. I cooked my pieces for 8 minutes, stirring frequently.
- Stir through the flour.
- Slowly whisk in the milk and bring to a gentle boil.
- Cook for 2 minutes, stirring.
- Stir through the cooked peas and season with salt & pepper.
- More milk can be stirred through if the sauce needs loosening.
- Heat the sauce just until it's piping hot.
- Serve scooped over the cooked rice.
- Serving suggestion:
- The original recipe card suggests - 'Serve at once with a green salad'. My family also had some toasted bread on the side. Garlic bread would also be a nice accompaniment.
- 🧾 Note for using chickpeas instead of meat-free chicken pieces:
- If you're using 1-2 cans of drained chickpeas in place of the meat-free chicken-style pieces, you don't need to pre-cook them. Instead, follow this adjusted method:
- Melt the vegan butter or heat the oil in a saucepan over medium heat.
- Stir in the flour to make a roux and cook for 1-2 minutes, stirring frequently.
- Gradually whisk in the dairy-free milk, then bring to a gentle boil. If liked, you can add in extra flavours here such as garlic powder, onion powder, mustard powder, miso paste, mixed herbs, etc.
- Simmer the sauce for 2 minutes, stirring constantly until thickened.
- Add the drained chickpeas and cooked peas, season with salt and pepper, and heat through until piping hot.
- Serve over rice.
For more easy vegan dinner recipes that are similar to vegan creamed chicken on rice do have a look at these two delicious vintage recipes - Creamed Chickpeas on Toast and Creamed Mushrooms both are perfect for lunch.
🥬 Baked Cabbage Layer (1980 Recipe) Re-Made Vegan!

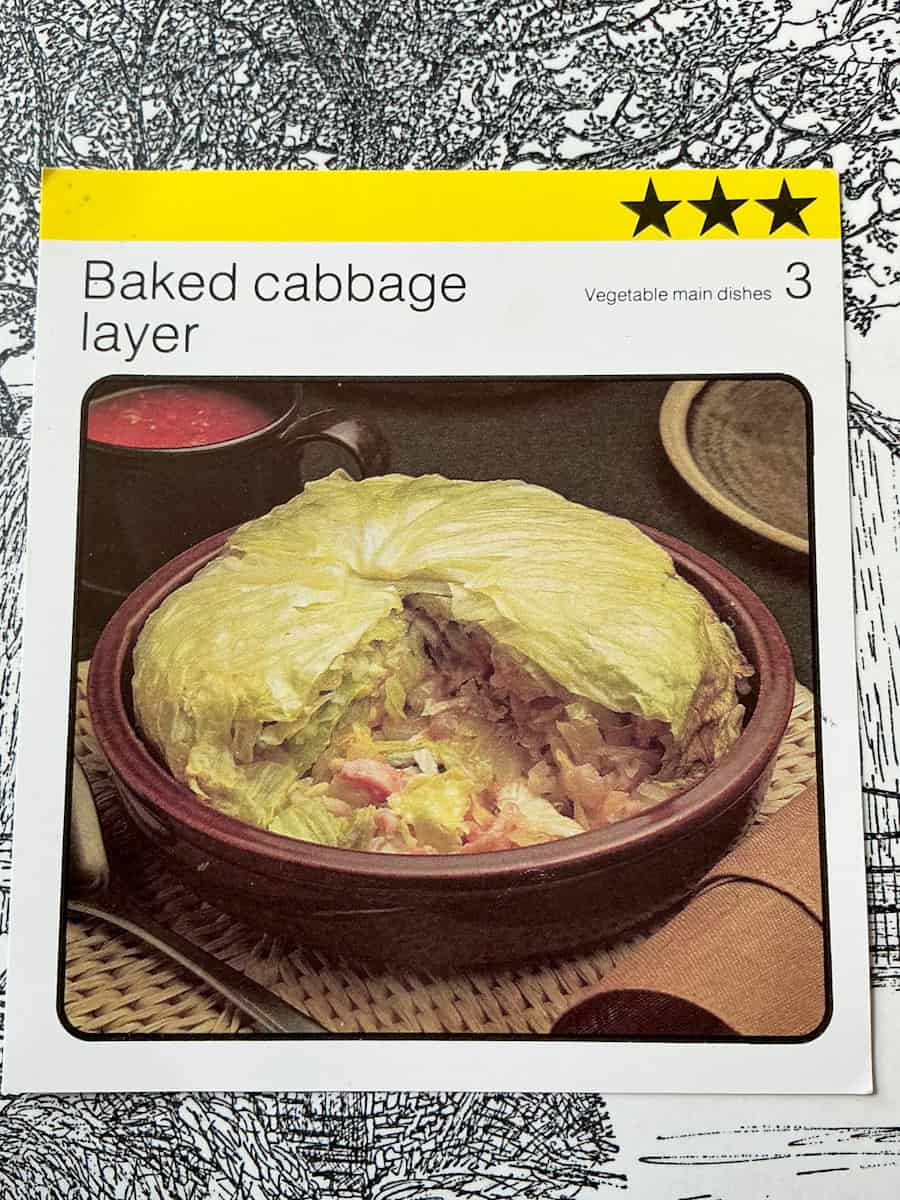
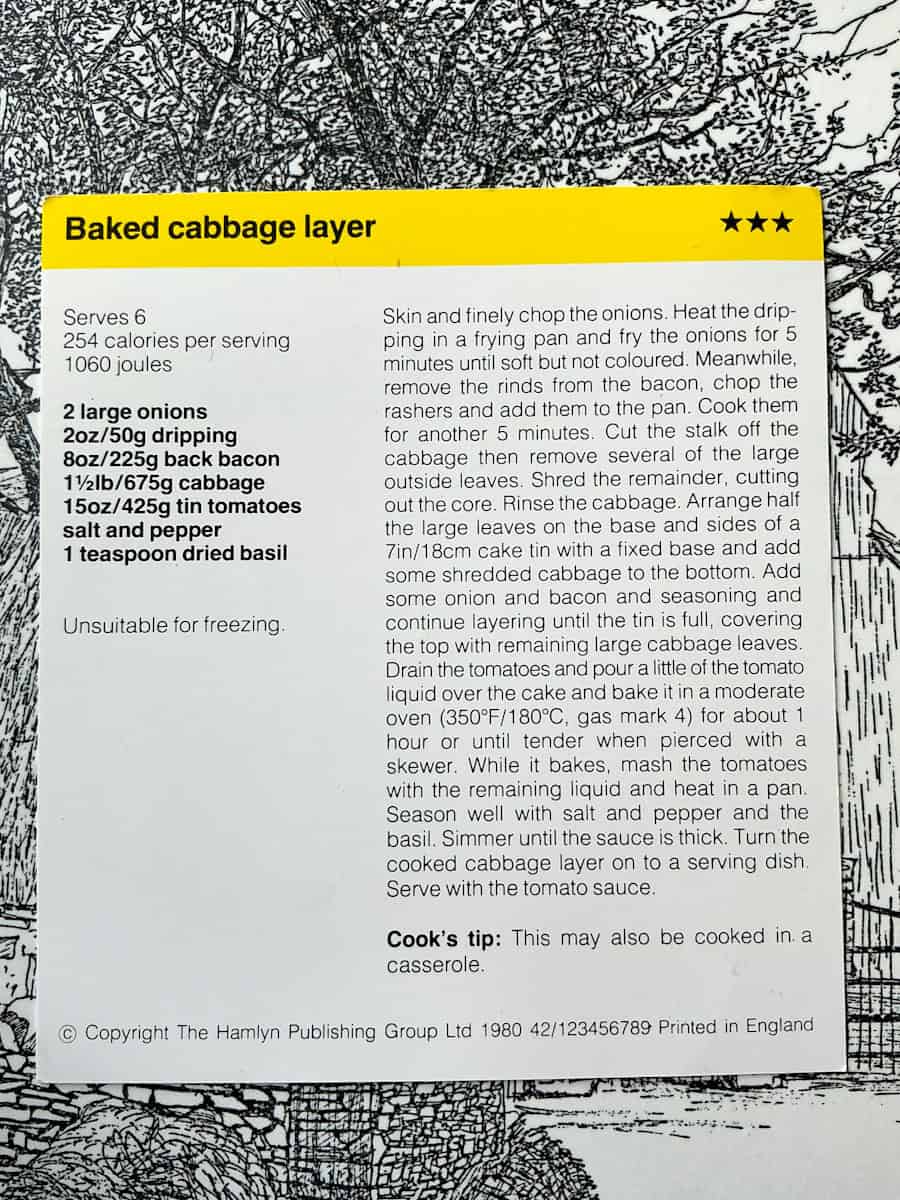
- Original recipe: Layers of large cabbage leaves with an onion, tomato and bacon filling cooked in dripping (animal fat). Recipe card number 3 ' Vegetable main dishes' from Kathie Webber's All-Star Cookery Club recipe box set.
- What I changed:
- I used vegan bacon and vegetable oil.
- Serves: 4-6
- My notes:
- I quite liked this very vintage looking meal! It reminded me of my children's grandma as it would have been a dish that she liked. When my children were very young (in the late 90s & early 2000s she used to keep me the Sunday newspaper recipe inserts if they had vegetable based recipes, as well as the Asda free booklets that were filled with interesting recipes. One Christmas she gifted a vegetarian cookbook which she enjoyed thumbing through herself. I was vegetarian back then and she was always very interested in what recipes I was cooking even though she was a meat eater, she was still curious about vegetable cooking. She would always take the time to prepare something vegetarian for us when we visited each Sunday for dinner. This cabbage layer did bring back lovely fond memories and I hope it will do so for others as well. I thought the flavour of the vegan bacon and onions worked really well with the cabbage and it was easy to form the layers. I think I will try with a rice-based filling next time as technically you could add any filling between the layers especially any leftovers that need using up. Also the cabbage leaves would make a nice pasta alternative for a home-made lasagne.)
- Ingredients:
- 1 large leafy cabbage (700 grams / 25 oz) (I used a Savoy cabbage, but any cabbage with large leaves will work fine)
- 1 pack (about 125 grams / 4 ½ oz) vegan bacon, if frozen thaw before using
- 1 x 400 grams / 14 oz can chopped tomatoes
- 2 large onions (about 530 grams) chopped
- 40 millilitres (1 ½ oz) vegetable oil
- 1 teaspoon dried basil or mixed dried herbs
- Method:
- Heat the oil in a frying pan and cook the onion for 5 minutes, stir frequently.
- Add the vegan bacon and cook for 5 minutes, stirring frequently and turn over the bacon a few times.
- Preheat the oven to 350°F / 180°C / 160°C Fan / Gas Mark 4
- Remove the 9 largest leaves from your cabbage. (However, the amount of cabbage leaves you use for this recipe will depend on the size of your cabbage and oven dish so just use how many seem appropriate to create three layers of cabbage leaves in your deep oven-proof casserole dish or cake tin. I used an 8 inch glass PYREX ovenproof dish)
- Remove the cabbage core and discard.
- Shred the remaining cabbage into thin slices.
- Using three of the cabbage leaves line the bottom and sides of the ovenproof dish.
- Add some of the shredded cabbage to the dish.
- Add some of the bacon-onion mixture over the shredded cabbage. Season with salt and pepper.
- Next add another layer of cabbage leaves pressing those down into the dish.
- Add some of the bacon-onion mixture and season.
- Add more of the cabbage leaves and then more of the bacon-onion mixture and continue doing this until you have used up the large cabbage leaves. Make sure to finish with a layer of cabbage leaves pressed firmly into the dish.
- Drizzle some of the tomato juice from the can of chopped tomatoes over the top cabbage leaves. I used about 70 mililitres (2 ½ fl oz) of the chopped tomato juice.
- Set aside the rest of the can of tomatoes in a saucepan as this will be used to prepare a tomato sauce to pour over the cooked cabbage layer.
- Cover the oven dish with kitchen foil (aluminium foil) - this wasn't suggested in the original recipe but I found that the top layer of the cabbage layer got cooked to a crisp in the oven!
- Bake the cabbage layer for 1 hour. Or until piping hot and the cabbage is tender.
- Prepare the tomato sauce: Mash the chopped tomatoes that you placed into a saucepan earlier, add the basil and season with salt and pepper. Bring to a gentle boil, and then simmer until the tomatoes have thickened. Some fresh basil stirred through the tomato sauce before serving is a nice addition.
- Remove the kitchen foil from the baked cabbage layer.
- Place a plate on top of the oven dish and carefully flip the dish over so that the cabbage layer slides out onto the plate.
- Serve sliced wedges of the cabbage layer with tomato sauce poured over the top.
- Serving suggestion:
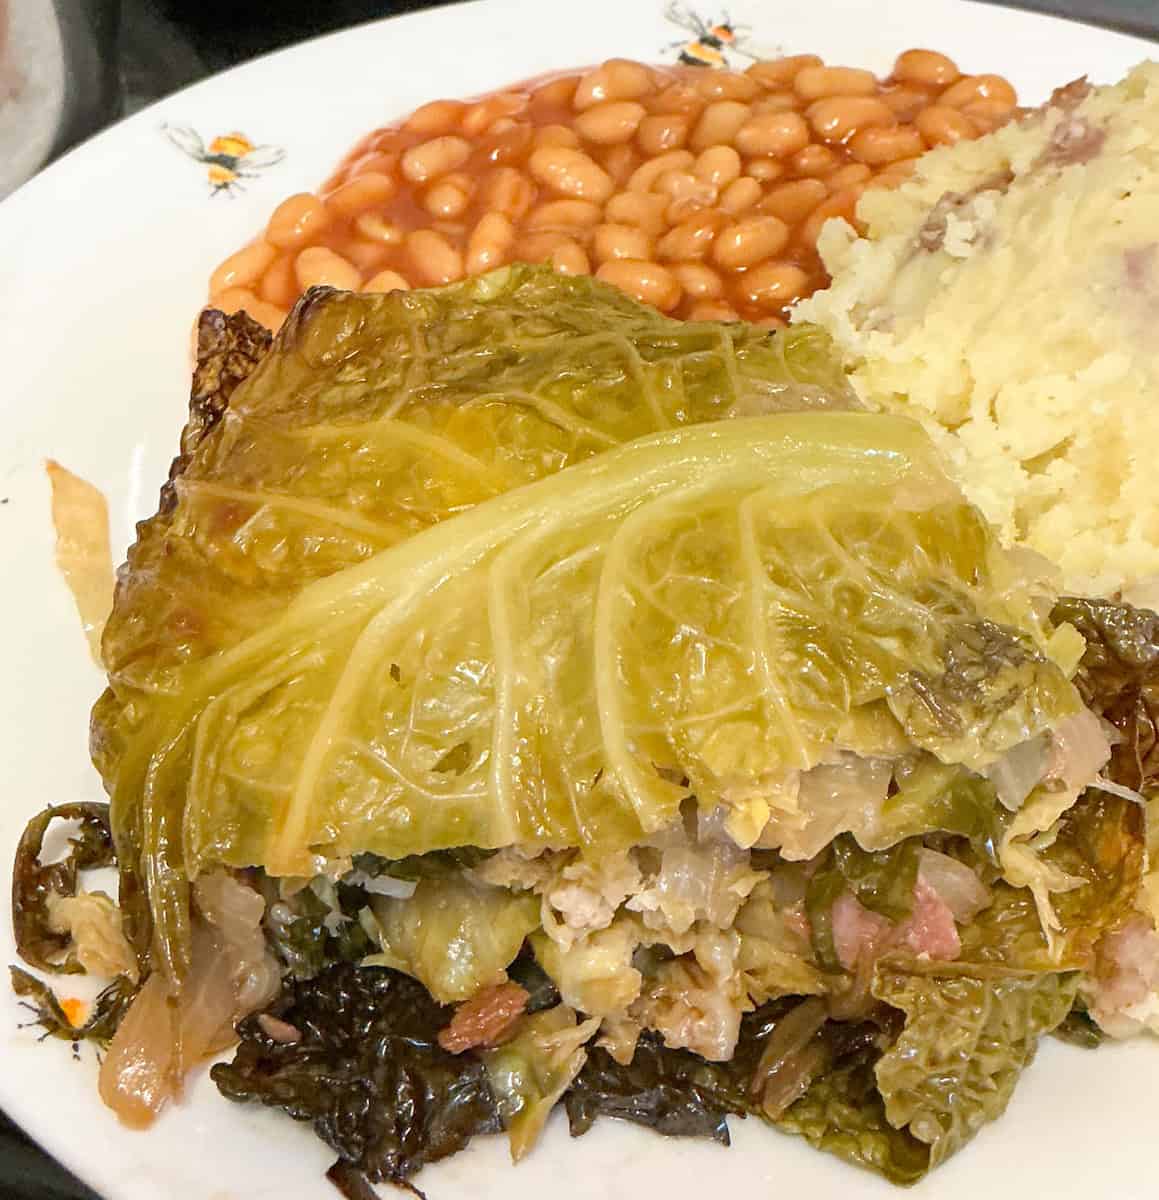
- Garlic bread or crusty bread, fresh salad, jacket potatoes. Or mashed potatoes and baked beans - see image below of my family's dinner. The mashed potatoes still have some of their skin on for the added nutrition so you may see some red parts in the potato!
For another easy vegan pasta recipe that is ideal for quick mid-week meals do have a look at our Cabbage & Noodles recipe.
🧄 Macaroni Cheese (1978 Recipe) Re-Made Vegan!
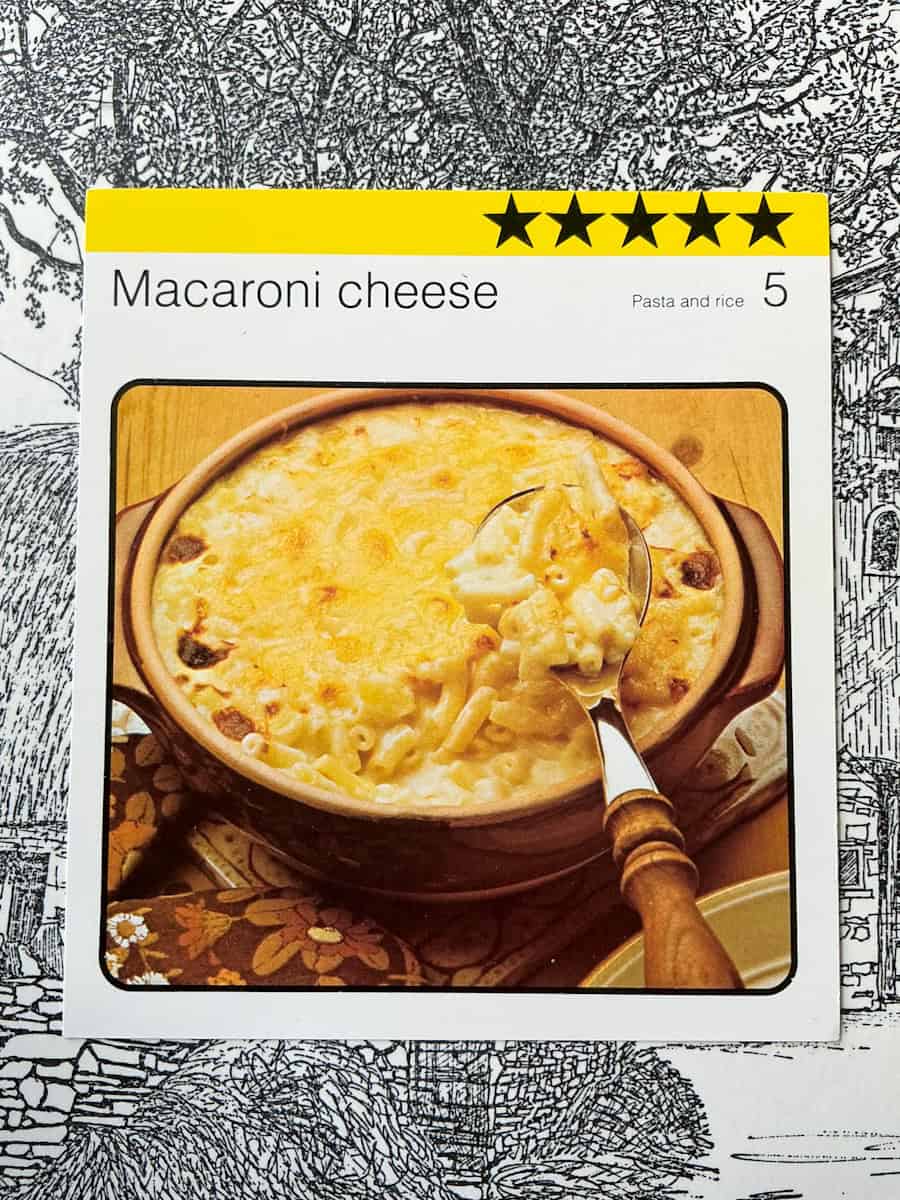

- Original recipe: Macaroni cheese prepared with milk, butter and cheddar cheese. Recipe card number 5 ' Pasta and rice' from Kathie Webber's All-Star Cookery Club recipe box set.
- What I changed:
- I used unsweetened soya milk, vegan butter and nutritional yeast flakes. I also replaced mustard powder with turmeric powder. I added garlic & onion powder as these help increase cheesy flavours. I also increased the amount of milk used as nutritional yeast flakes tend to thicken up sauces. Another change I made is to increase the amount of macaroni and increased the milk too, as I felt that the quantities used were too little for 4-6 portions.
- Serves: 4-6, depending on sides & appetites
- My notes:
- I really enjoyed this vintage macaroni recipe as it was easy to prepare and tasted lovely. Macaroni cheese is one of my kids favourites so they never get fed up of testing new macaroni recipes. For some it can be a faff to prepare a home-made cheese sauce but it really is quite easy once you have a good method and recipe and it's worth the few minutes it takes to prepare. This vegan cheese sauce recipe is versatile as you can also use it to prepare a cauliflower cheese or a broccoli cheese bake, or use it for a lasagne, or even just a sauce to pour over vegetables.
- Ingredients:
- 350 grams (12 ½ oz) macaroni or other tube pasta shape
- 50 grams (2 oz) vegan butter or margarine or vegetable oil
- 50 grams (2 oz) plain flour
- 1 teaspoon garlic powder and 1 teaspoon onion powder (can use granules or paste instead)
- ¼ teaspoon turmeric powder or 1 teaspoon mustard powder
- 850 millilitres (29 fl oz) unsweetened dairy-free milk
- 50 grams (2 oz) nutritional yeast flakes or 100 (4 oz) grams dairy-free cheese, add more to taste
- Garnish:
- A few tablespoons of extra nutritional yeast flakes or 50 grams (1 ¾ oz) dairy free cheese for sprinkling over the top of macaroni cheese before baking. Sliced tomatoes are also a nice garnish and can be added before the macaroni cheese is baked.
- Method:
- Cook the macaroni according to package instructions, drain once cooked.
- Preheat the oven to 425°F / 220°C / 200°C Fan / Gas Mark 7 alternatively for an oven-free method you can finish off the macaroni by placing it under a grill (broiler) until golden and bubbling.
- To make the sauce heat the butter in a non-stick pan over a medium heat.
- Stir through the flour and cook for 1 minute stirring constantly.
- Remove the pan from the heat, and stir through the turmeric, garlic and onion powders.
- Place the pan back on the heat and whisk in the milk in gradual amounts, stirring constantly.
- Bring the milk to the boil and gently simmer for 2 minutes, stirring constantly to prevent lumps.
- Mix through the nutritional yeast flakes or dairy-free cheese.
- Taste the sauce and season with some salt and pepper to taste.
- If you feel your sauce is too thick it can be thinned a little by whisking through some extra milk.
- Mix the sauce and macaroni together and place into an oven-proof dish.
- Sprinkle over some extra nutritional yeast flakes or dairy-free cheese over the top of the macaroni.
- Optional addition:
- Add a layer of thinly sliced tomatoes over the macaroni cheese. For an even more vintage look, sprinkle the top with fine breadcrumbs.
- Bake:
- Bake for 25 minutes or until it has some golden parts and is bubbling. Alternatively place it under a hot grill (broiler) until lightly golden and bubbling.
- Serving suggestions:
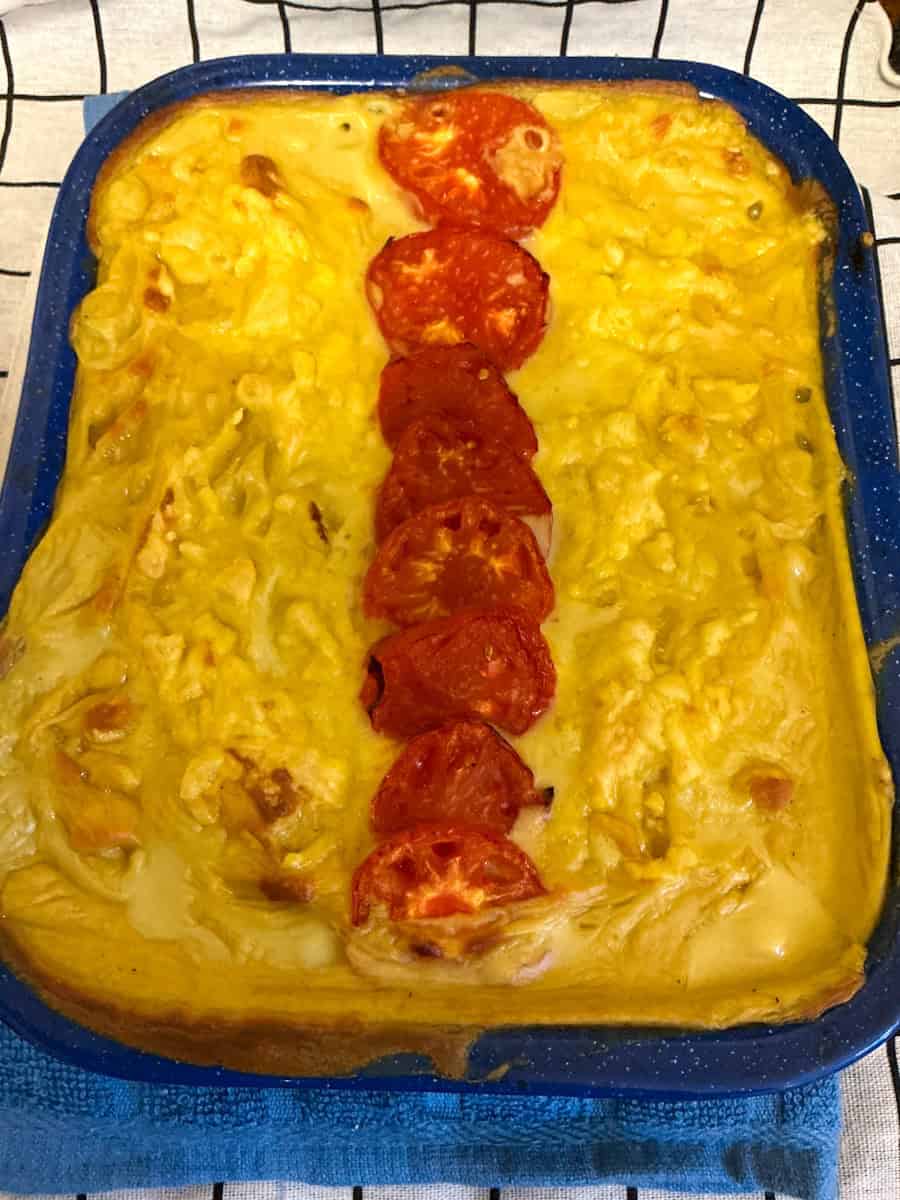
- Garlic bread or crusty bread, fresh salad, peas, green vegetables, potato chips/fries/or roast garlic potatoes - potatoes cut into cubes, mixed with a little oil and some garlic (can be fresh, powdered, granules, paste), a little salt, and roast until soft. In the image below our family's macaroni was topped with thin slices of home-grown tomatoes, and served with garlic potato wedges and a mixture of green beans & peas. All the vegetables, potatoes and garlic were grown by my daughter at her allotments.
- Original recipe cards Cook's tip:
- ''Any pasta shape may be used and wholemeal pasta is particularly tasty''

For more vegan macaroni cheese recipes do have a look at our Slow Cooker Vegan Macaroni Cheese recipe and this Quick Cheesy Pasta recipe, both are our family favourites.
🍰 WEEK TWO - SEVEN VINTAGE DESSERTS, PUDDINGS & AFTER-DINNER TREATS RECIPES 🍰
The dessert and pudding vintage recipe cards in this section are taken from the 'Meals on a budget', 'Cold puddings', 'Regional recipes', 'Hot puddings', and 'Health foods' collections.
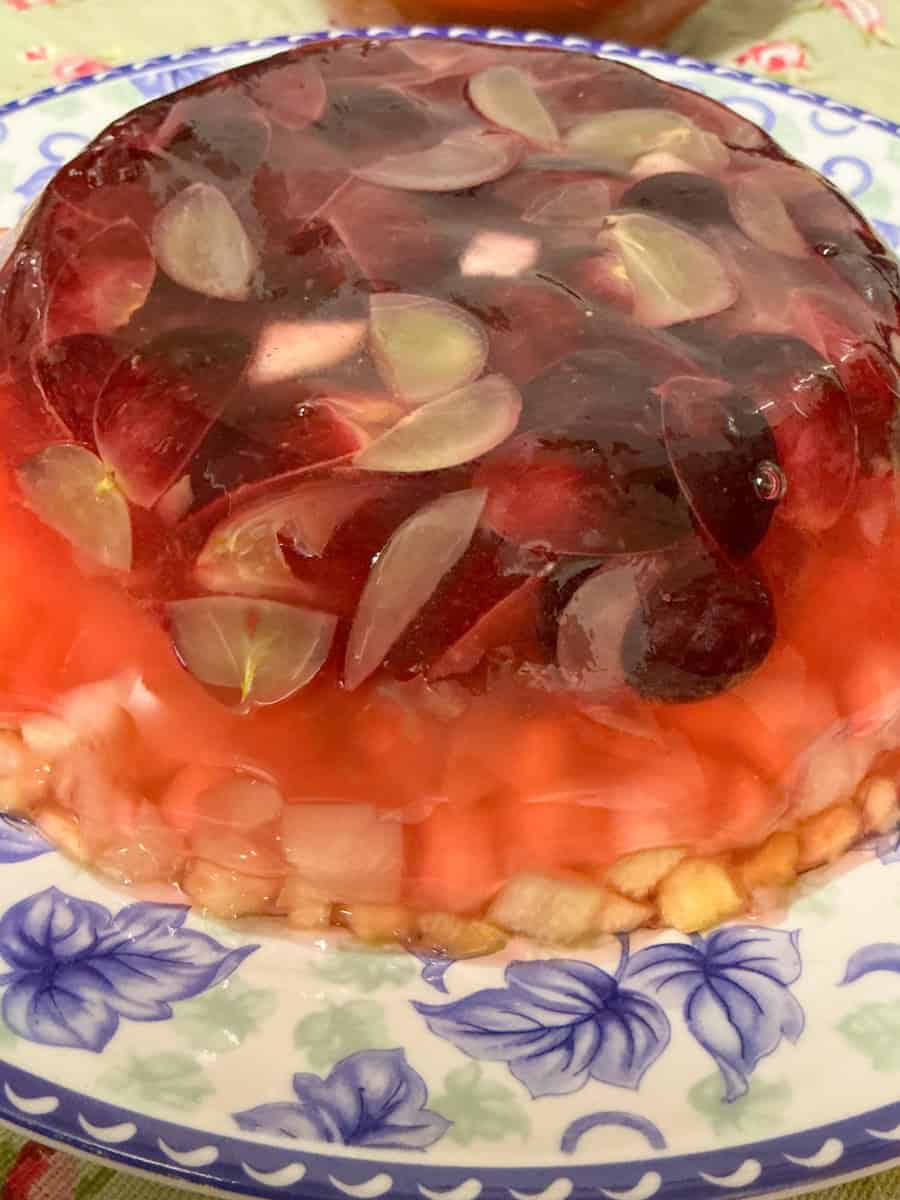
🍇 Fruit Jelly (1978 Recipe) Re-Made Vegan!
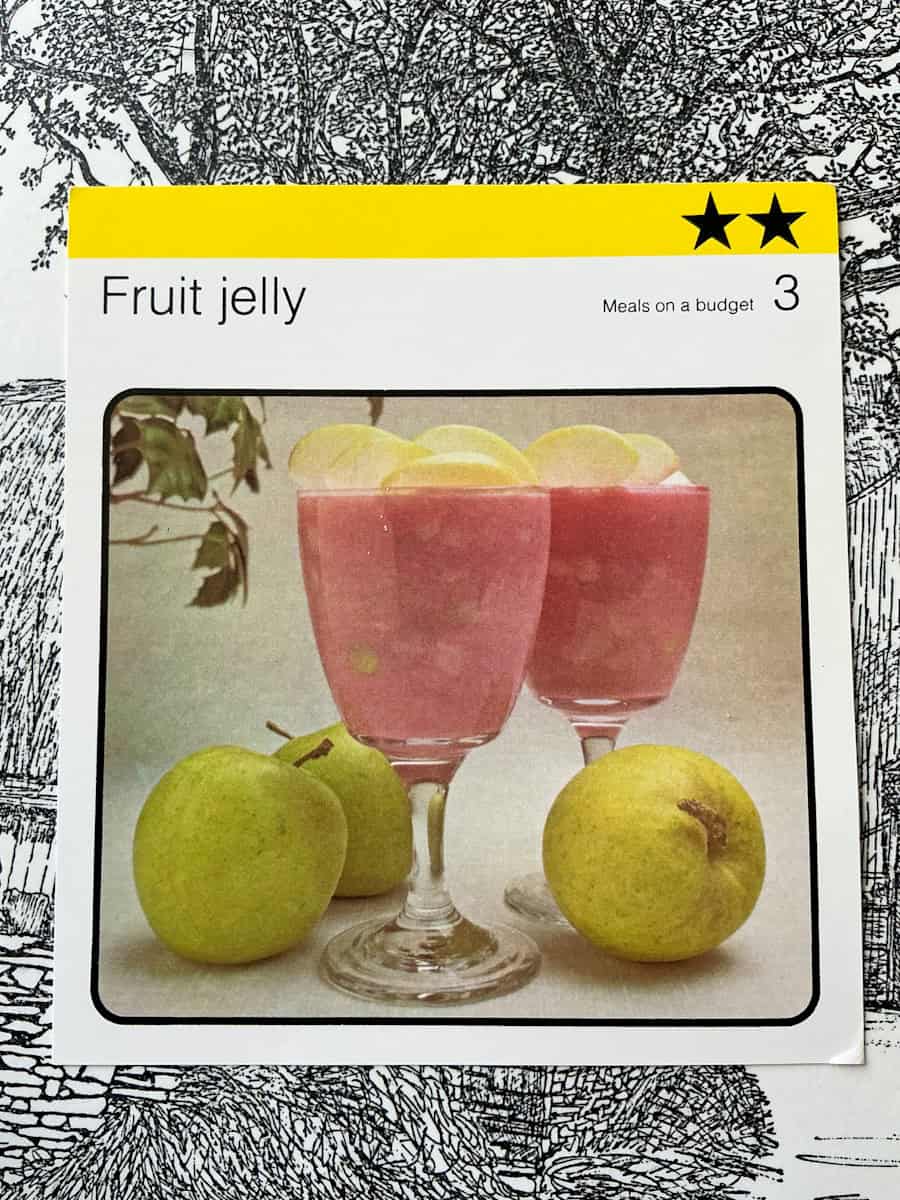

- Original recipe:
- Fruit jelly prepared with packet raspberry jelly which likely contains gelatine, an animal product, mixed with a can of evaporated milk. Recipe card number 3 ' Meals on a budget' from Kathie Webber's All-Star Cookery Club recipe box set.
- Serves: 4-6
- What I changed:
- I omitted the evaporated milk and instead used a packet of vegan fruit jelly - I used Just Wholefoods Vegan Raspberry Jelly which contains small crystals that dissolve into jelly when mixed with boiling water.
- My notes:
- Jelly and canned fruit is such a British children's classic that always made an appearance at vintage and retro kids birthday parties or was given to kids whenever they felt under the weather, especially if they had sore throats. It can be a special treat for adults who may have fond nostalgic memories of enjoying jelly and fruit as a child. A popular accompaniment is ice-cream. I really enjoyed adding grapes, apple and pear, to the jelly as the flavours were very fresh and light, and the crisp textures provided a pleasant contrast to the smooth soft jelly.
- Ingredients:
- 1 packet of vegan flavoured jelly, such as raspberry or strawberry, (use one that makes about 1 pint [568 millilitres / 19 fl oz] of jelly)
- 1 apple, peeled, cored & chopped
- 1 pear, peeled, cored & chopped
- a small bunch grapes, halved or quartered, or 1 small banana, thinly sliced
- 1 teaspoon lemon juice
- Optional garnish: fine slices of apple or chopped fruit - mixed with 1 teaspoon of lemon juice to prevent discolouring.
- Method:
- Mix the chopped fruit with the lemon juice.
- Add the chopped fruit to a large jelly mould, or use 6 individual serving dishes such as ramekins or wide drinking glasses.
- Prepare the fruit jelly according to the package instructions.
- Pour the jelly over the fruit once it has cooled but don't leave it too long, otherwise it will begin to set.
- Once the jelly and fruit are at room temperature place the dishes into the fridge to chill completely, which usually takes at least a few hours.
For more chilled vegan puddings that are also vintage classics, do have a look at our Chocolate Custard Pudding and one of our most popular recipes on our family blog this 4 ingredient (5 if you count water!)- Tofu Chocolate Pudding.
🍑 Peach Melba (1978 Recipe) Re-Made Vegan!
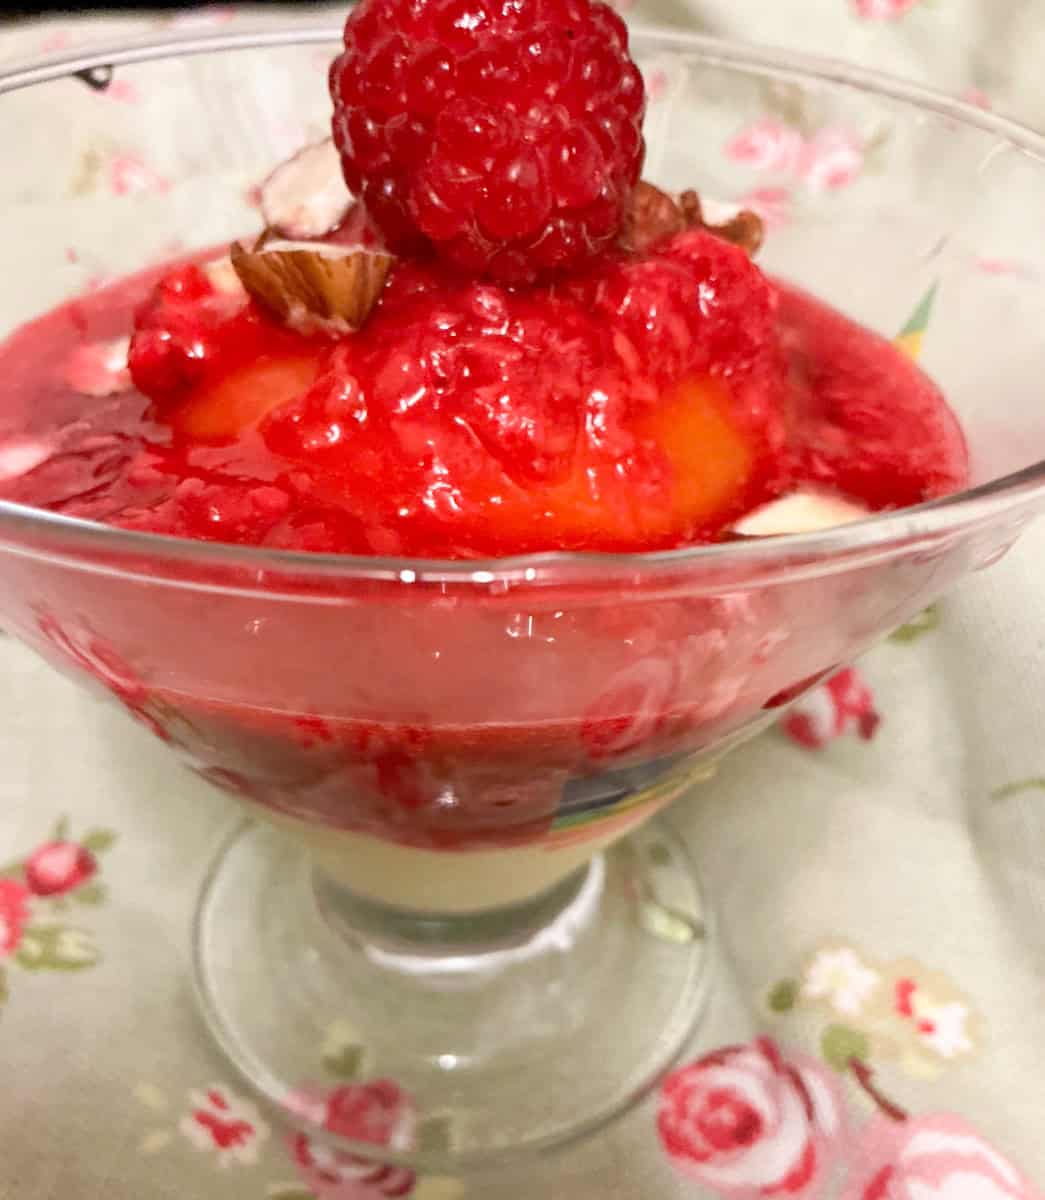
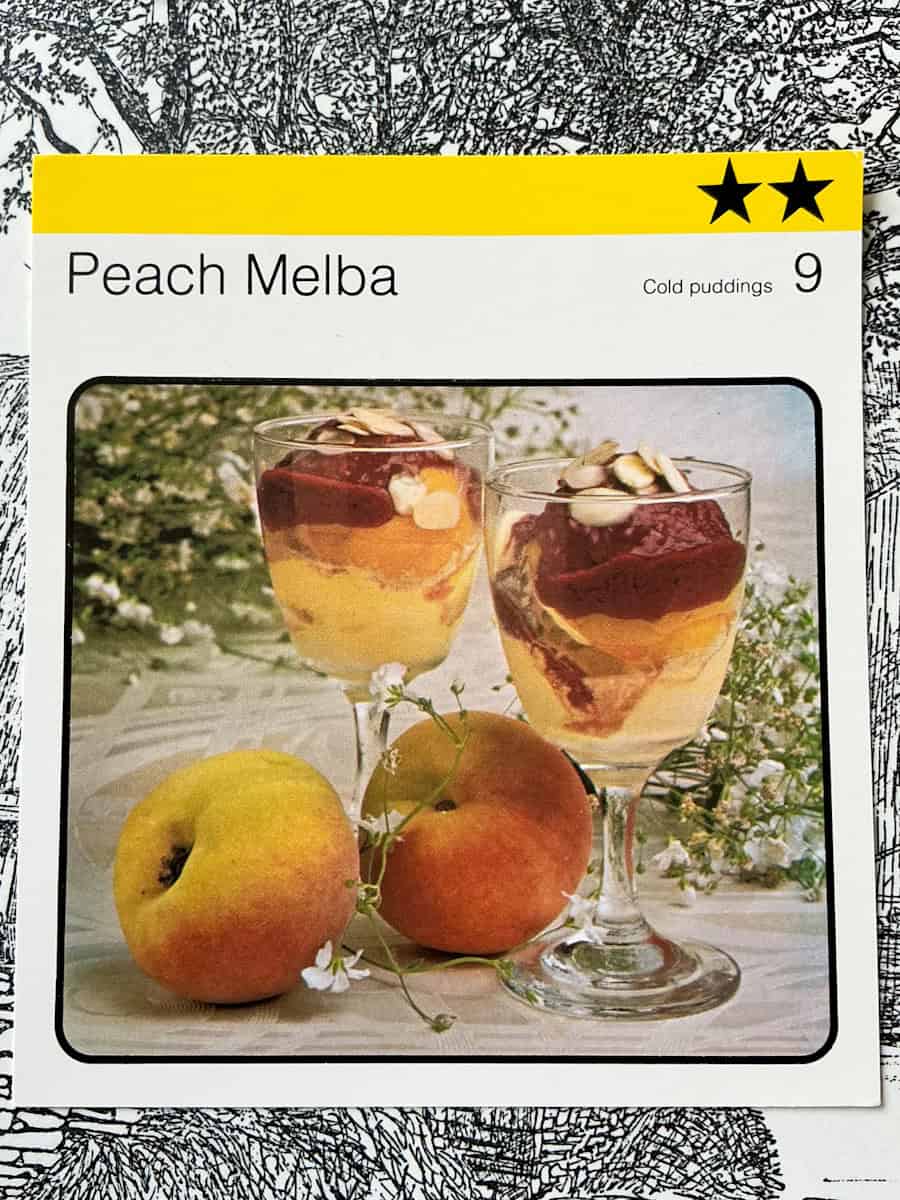
- Original recipe:
- Dairy ice cream topped with a layer of peaches and covered with raspberry sauce or coulis. Recipe card number 9 'Cold puddings' from Kathie Webber's All-Star Cookery Club recipe box set.
- Serves: 4
- What I changed:
- I didn't have to change much, as I simply swapped the dairy ice cream for vegan ice cream - I used Swedish Glace vanilla ice cream. I didn't have flaked almonds so I used hazelnuts. The original recipe prepares the raspberry sauce differently as it calls for the raspberries to be pushed through a sieve to make the sauce smooth and then to chill it in the fridge. However, I don't enjoy pushing fruit through a sieve as I feel that it wastes some of the fruit left behind and I don't mind eating the little raspberry seeds within the coulis as they're not very noticeable.
- My notes:
- This is such a classic retro dessert that it was a lot of fun to prepare and eat. It's very simple but looks impressive and tastes deliciously fresh and light so it would make a nice ending to a dinner party. I particularly liked the raspberry coulis, and the canned peaches and ice cream reminded me of childhood puddings.
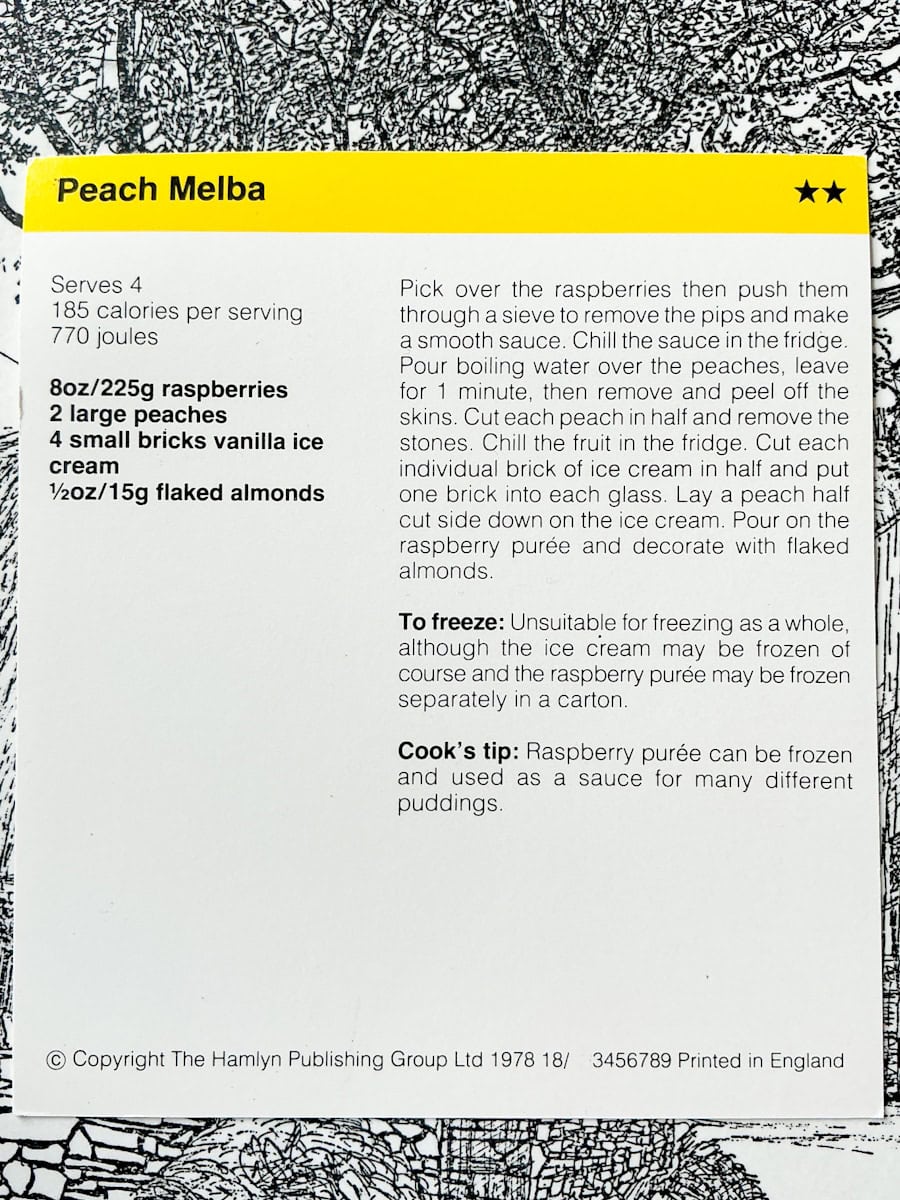
- Ingredients:
- 225 grams (8 oz) raspberries
- Optional: 1 teaspoon of sugar
- 1 x 400 grams (14 oz) can peach halves or slices, chilled (can replace with ripe fresh peaches)
- Vanilla ice cream, use as needed to fit in your chosen serving dishes - original recipe calls for ''4 small bricks vanilla ice cream''
- 15 grams (½ oz) flaked almonds or chopped hazelnuts
- Method:
- Reserve 4 of the raspberries for a garnish.
- Mash the rest of the raspberries, if using also add the sugar, in a small saucepan and bring to a gentle boil.
- Simmer for 2-3 minutes until the raspberries are smooth. Let the raspberry sauce cool before refrigerating.
- If you haven't already add the can of peaches to the fridge so it can also chill.
- To Serve:
- Add a few scoops of ice cream to fill about a third of your chosen serving dishes.
- Add a peach half or a few slices of peaches over the ice cream to cover.
- Pour over the raspberry sauce to cover the peaches in each serving.
- Garnish with the almond flakes or chopped hazelnuts, and top with a raspberry.
For another easy chilled vegan dessert recipe that can also be enjoyed with fruit, if liked, this Tofu Chocolate Pudding is incredibly quick to prepare as it takes just minutes and uses only 5 ingredients (one of which is water!).
🍞 Poor Knights of Windsor (1978 Recipe) Re-Made Vegan!


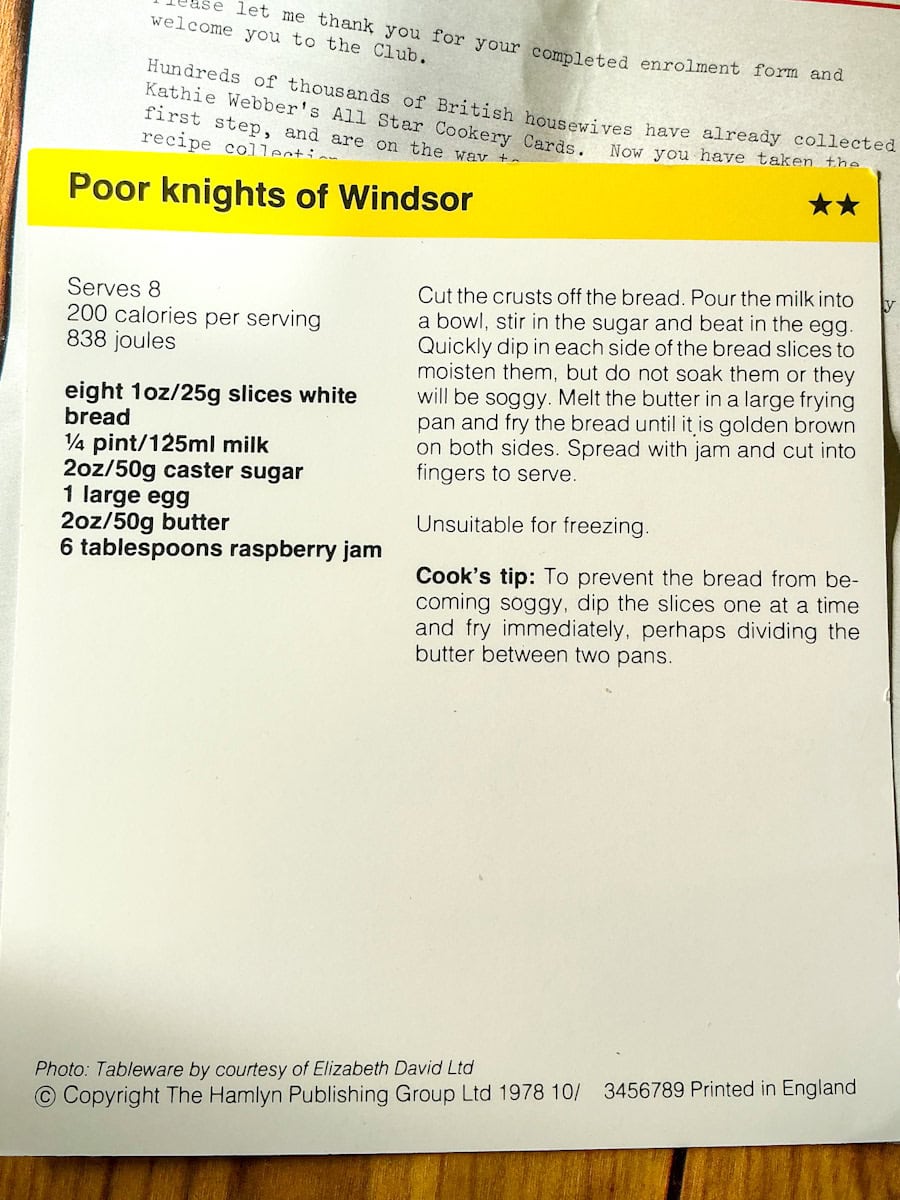
- Original recipe:
- Slices of bread dipped into an egg-milk mixture and fried until golden. The fried bread is covered in raspberry jam and sliced into strips. Very similar to French toast or eggy bread. Recipe card number 6 ' Regional recipes' from Kathie Webber's All-Star Cookery Club recipe box set.
- What I changed:
- I replaced the egg with ground flax mixed with water and used soya milk instead of dairy milk. The original recipe was often prepared without eggs, as these were a valuable ingredient in some households. For an oil-free poor knights of Windsor the bread can be fried using an electric pancake maker.
- Why is it called "Poor Knights of Windsor"?
This humble dessert is actually named after the Military Knights of Windsor, a group of retired army officers who lived within Windsor Castle dating back to the 14th century. Many of them had fallen on hard times, so this simple pudding prepared from a base of stale bread soaked in milk and fried, provided a quick, easy, frugal, and filling meal. Bread was too valuable to waste so this comforting meal is a nice example of how traditional recipes often made the most use of what was available which is something I always like to do with recipes. That's why this traditional, simple after-dinner treat is one of my favourites. - Serves: 4
- My notes:
- This was a nice easy recipe and I really enjoyed eating it! It is very similar in taste and texture to traditional French toast or eggy bread and the jam topping was very nice. I will be making this again as it's a good budget-friendly recipe to have on hand when you want something sweet and home-made. when you want something sweet and home-made. It's also a great way to use up stale bread. You can change the jam topping to something like a cinnamon-sugar topping which is just sugar mixed with some cinnamon.
- Ingredients:
- To replace the egg: 2 tablespoons of ground (milled) flaxseed & 4 tablespoons of water mixed together and left to sit for 5 minutes
- 8 slices of bread, crusts removed
- 125 millilitres (4 ½ fl oz) dairy-free milk, top the milk up if necessary when making the dish
- 50 grams (2 oz) caster sugar (super-fine sugar) or granulated sugar
- 50 grams (2 oz) vegan butter or vegetable oil
- 6 tablespoons raspberry jam, can use more as required
- Method:
- Prepare the flax meal egg by mixing the ground flax with the water and allowing it to sit for at least 5 minutes to thicken.
- Whisk the flax egg into the milk and sugar.
- Heat the butter or oil in a non-stick frying pan over a medium-high heat.
- Dip the bread slices into the flax-milk mixture and fry each side until golden with crisp edges.
- Once each slice is cooked, spread it with the jam and slice into fingers. For an alternative jam-free topping mix a few tablespoons of sugar with a few pinches of cinnamon, and sprinkle the cinnamon sugar over the poor knights of Windsor.
- Variation:
- Add ground cinnamon or other warm spice into the milk mixture.
- Serving suggestion:
- We enjoyed it with fresh blueberries, but any fresh fruit would be a nice accompaniment.
- Optional suggestion:
- As this is a frugal recipe at heart it didn't seem right to discard the bread crusts. Instead you can dip the chopped crusts in the milky mixture and fry those off as well. You may need to add more milk if it has been used up during cooking, and top up the butter or oil in the pan if needed. Fry the small pieces of crust until crisp and golden. These taste so good! They can be dipped in jam or dusted with sugar, especially cinnamon sugar.
For another easy vegan sweet recipe that makes good use of bread, have a look at our vintage Cinnamon Toast recipe.
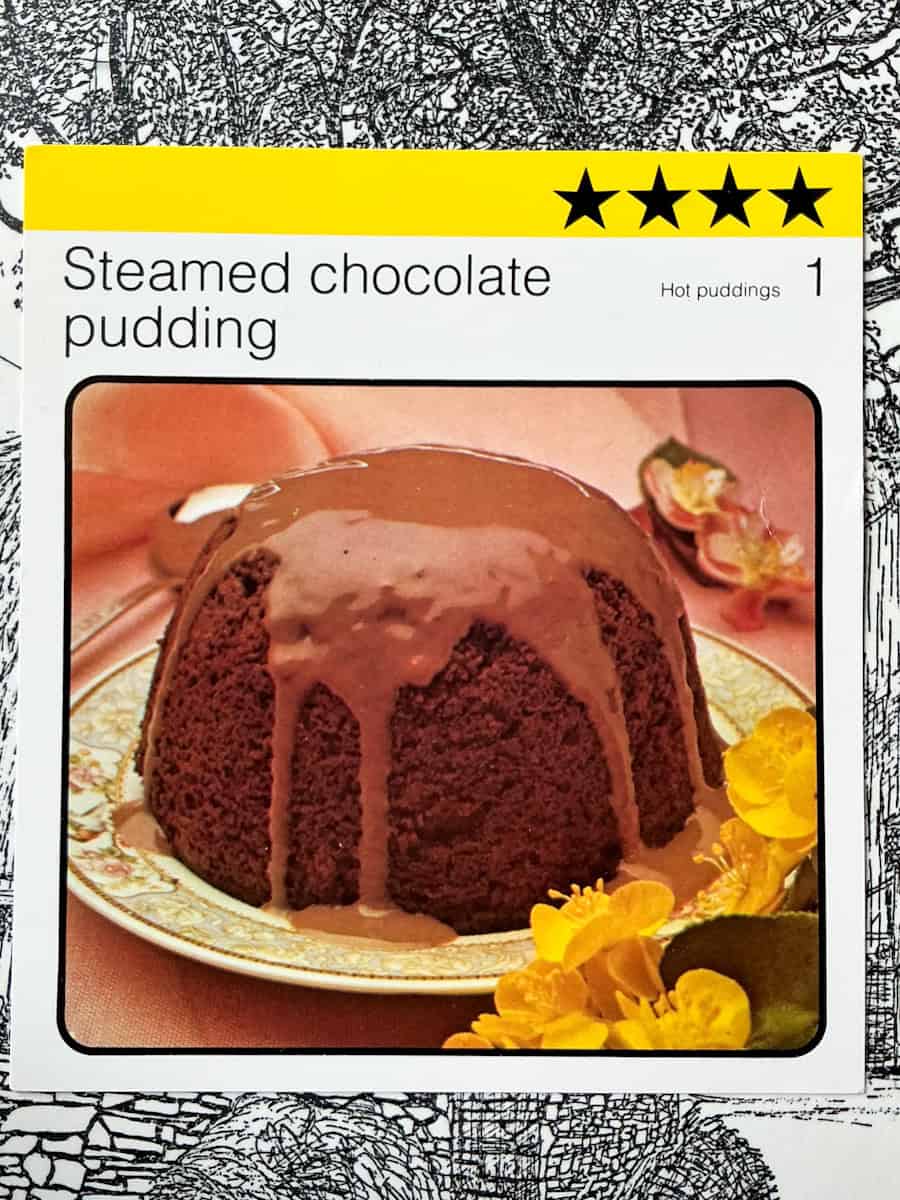
🍫 Steamed Chocolate Pudding (1978 Recipe) Re-Made Vegan!
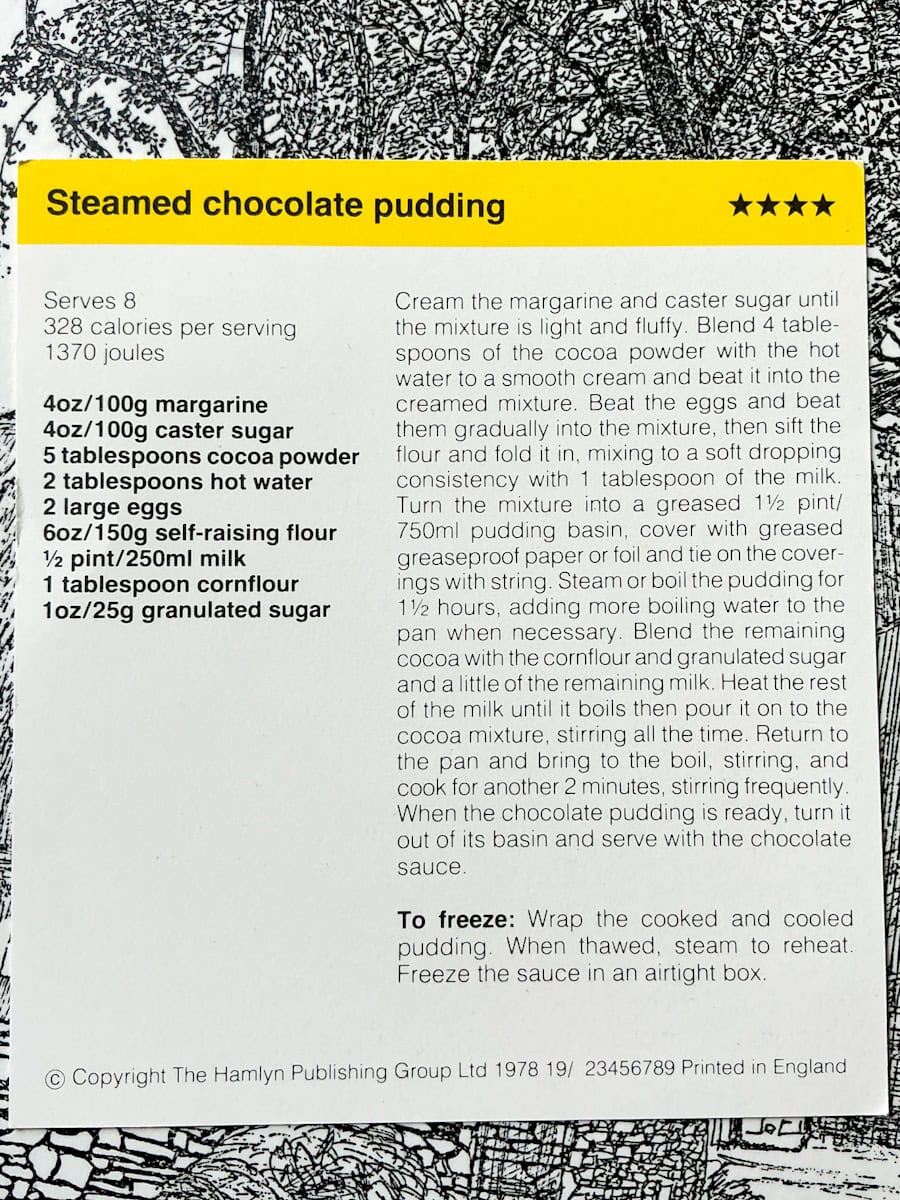
- Original recipe:
- Steamed chocolate pudding prepared with eggs and milk and cooked on the stove-top within a pudding basin/bowl. Recipe card number 1 ' Hot puddings' from Kathie Webber's All-Star Cookery Club recipe box set.
- What I changed:
- I used smooth apple puree or smooth apple sauce instead of egg and this worked a treat for this pudding. There is no apple flavour in the finished pudding so even if you dislike apples you won't be able to taste it. I also replaced the dairy milk with soya milk, added in some baking powder and increased the amount of flour used. To cook I decided to use a 3 litre slow cooker as this way you can just leave the pudding to cook, without having to worry about topping up the water levels. With stovetop steaming, the water must be topped up regularly. However, if you would prefer to cook on the stove-top then place the covered pudding basin into a large pot of boiling water and cook for 1½ hours, topping up the liquid so that it remains at least half-way up the pudding basin.
- Serves: 6-8
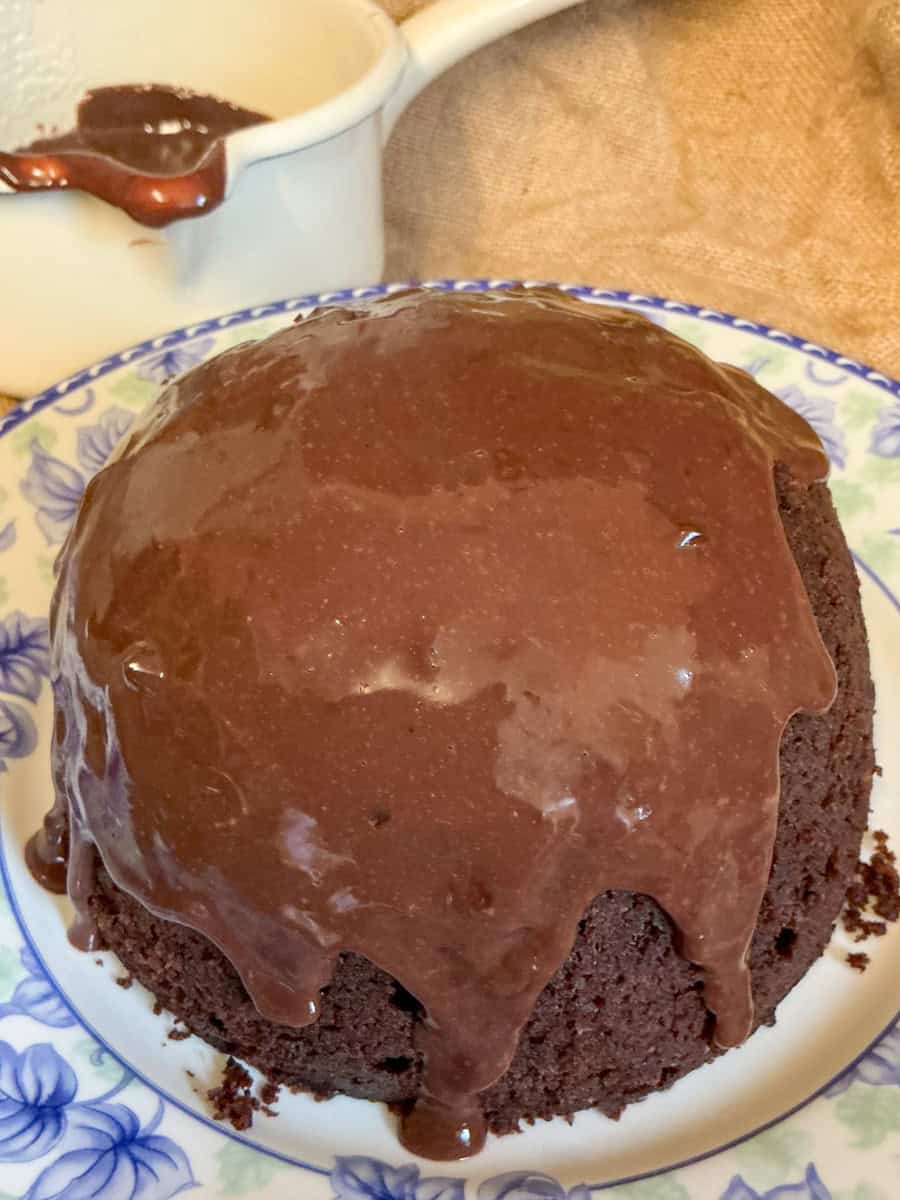
- My notes:
- I really enjoyed this chocolate pudding. The pudding looked impressive as it rose beautifully and the chocolate sauce looks great dripping down the sides, so this pudding would be a nice dessert for a dinner party or even as a Christmas pudding alternative which kids would especially appreciate.
- The pudding is lovely served warm, but it's also very nice at room temperature. The flavour and texture is the same as an ordinary chocolate cake with a soft, light crumb that holds its shape well. The chocolate sauce is nice and thick and goes deliciously with the pudding.
- Ingredients:
- Chocolate pudding:
- 100 grams (4 oz) margarine
- 100 grams (4 oz) granulated sugar
- 4 tablespoons cocoa powder & 3 tablespoons boiling water
- 175 (6 oz) grams self-raising flour
- 1 teaspoon baking powder
- 120 grams (4 ¼ oz) smooth apple sauce or apple puree
- 2 tablespoons dairy-free milk
- Chocolate sauce:
- 1 tablespoon cornflour (cornstarch)
- 1 tablespoon cocoa powder
- 250 millilitres (8 ½ oz) dairy-free milk
- 40 grams (1 ½ oz) granulated sugar
- Method:
- Prepare the chocolate pudding:
- Grease a 1 litre (34 fl oz) pudding basin with margarine.
- Set your slow cooker to the high setting, and pour a few cups of water into the slow cooker bowl. Place the slow cooker lid on and it will pre-heat while you prepare the pudding.
- Add 4 tablespoons of cocoa powder to a small heat-proof dish and pour in three tablespoons of boiling water. Mix well to a smooth paste.
- Add the margarine and sugar to a mixing bowl and using either an electric hand whisk or mixing spoon cream the ingredients together until it looks light and fluffy. This will take a few minutes by hand or less time with an electric whisk.
- Add in the cocoa-water mixture and mix well.
- Next add the apple puree and mix well.
- Add the dairy-free milk and the flour and fold into the mixture with a mixing spoon.
- Scoop the mixture into the pudding basin and level out the surface.
- Place a piece of baking paper (also known as greaseproof paper) directly on top of the pudding.
- Cut a piece of foil big enough to cover the top of the pudding basin and scrunch the foil tightly around the rim. If you are cooking on the stove-top within a pot of boiling water then you may prefer to add a more secure lid. You can access a video demonstrating how to prepare a traditional pudding via this link - How to prepare a steamed pudding lid - the video is a YouTube video from Mason Cash (a British bakeware company that has been selling bakeware for centuries) that I have embedded into my 1940s Christmas pudding recipe post.
- If you're not familiar with steaming puddings, don't worry as it's easier than it sounds! This guide by Mason Cash shows how to do it step-by-step using a traditional pudding basin, string, and kitchen foil.
- Place the pudding into the slow cooker and top the water up with more boiling water so that the level sits about ¾ of the way up the pudding basin.
- Cook for 4 hours.
- Remove the lids and using a cutlery knife gently loosen the sides of the pudding if necessary. Place a plate over the pudding basin. Flip the basin over, and the pudding should slip out onto the plate.
- Prepare the chocolate sauce:
- In a heatproof jug mix the 1 tablespoon of cocoa powder and the 1 tablespoon of cornflour with enough of the milk to create a smooth paste.
- Place the rest of the milk into a saucepan and bring it to the boil.
- Add the heated milk into the cocoa mixture stirring constantly.
- Pour this milky-cocoa mixture into the saucepan and bring to the boil, stirring.
- Cook for a few minutes, stirring, until the sauce has thickened.
- Pour the sauce over the pudding.
- Enjoy warm or at room temperature.

For another chocolate pudding recipe, this vegan chocolate sponge is quick and easy to make, and features a silky chocolate ganache topping.
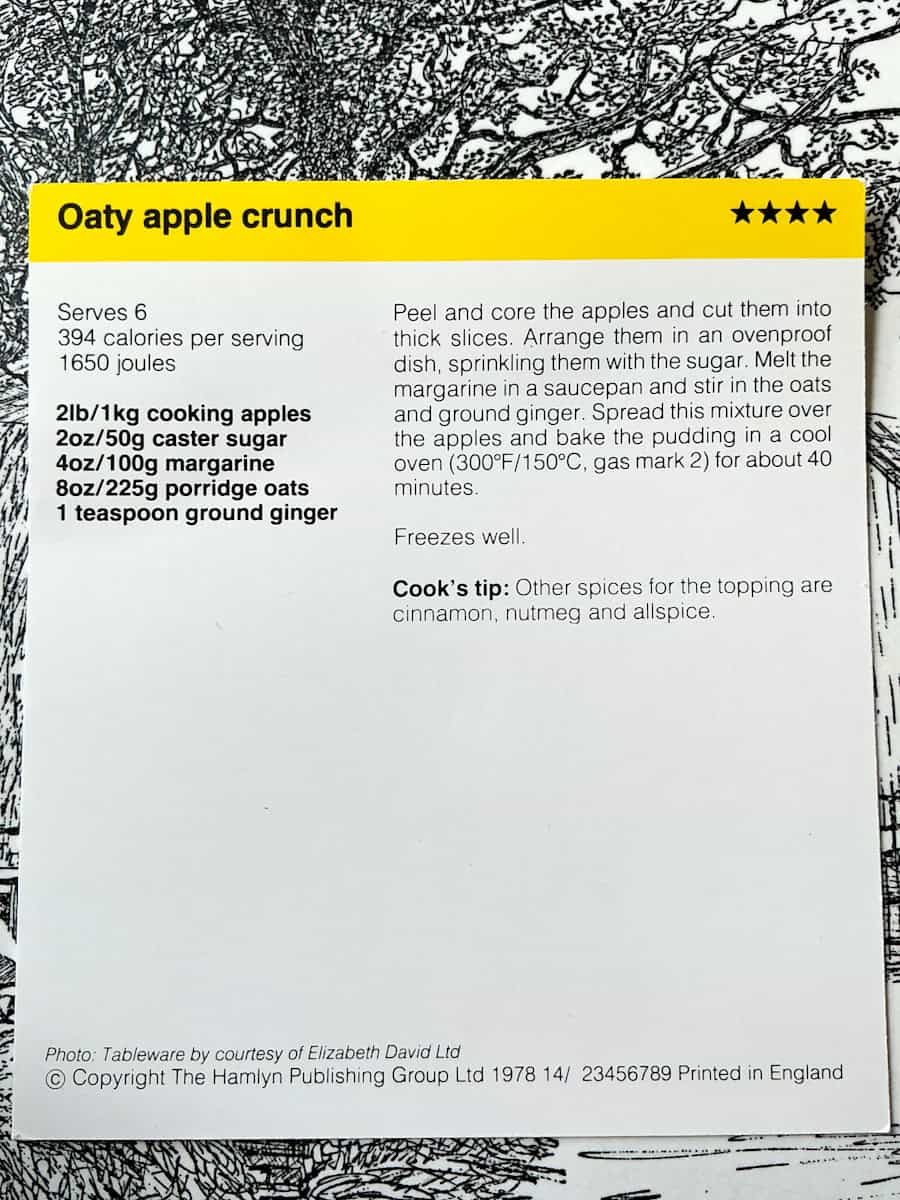
🍏 Oaty Apple Crunch (1978 Recipe) Re-Made Vegan!
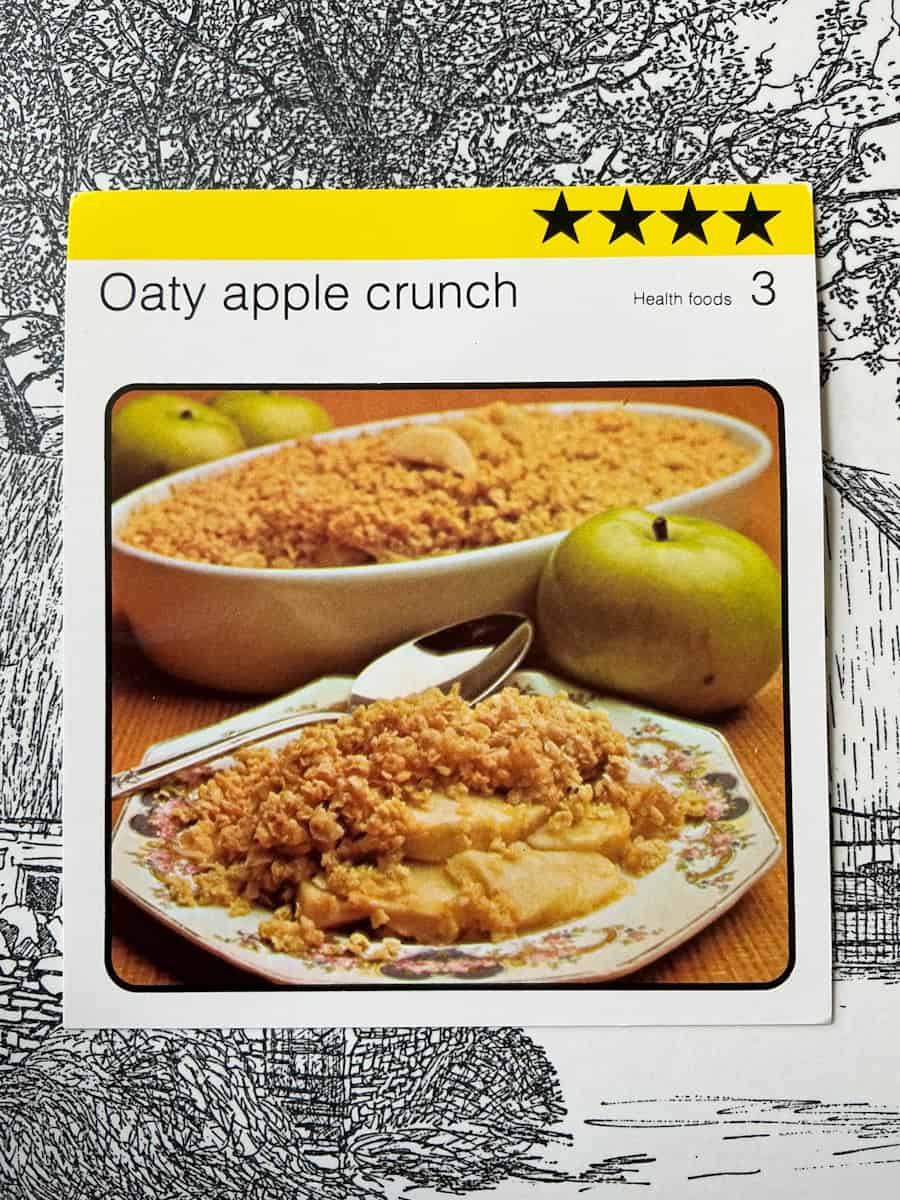
- Original recipe:
- Apples cooked with a crunchy apple topping. Recipe card number 3 ' Health foods' from Kathie Webber's All-Star Cookery Club recipe box set.
- What I changed:
- I didn't have to change much for this recipe, as all the ingredients were at a glance vegan-friendly, although I did use a dairy-free margarine. I also had to increase the cooking times in order for my apples to soften up to my liking. Also, I added sugar to the apple crumble topping as the recipe didn't call for it but I felt that it would need the extra sweetness. Additionally, I increased the amount of sugar mixed through the apples as cooking apples tend to be less sweet, and I felt that 1 kg of apples needed more sugar.
- Serves: 4
- My notes:
- I do recommend using proper cooking apples like Bramley for this recipe, as they soften up beautifully in the oven. I first tested this recipe with eating apples and found they stayed quite firm and crisp, even after extra baking time. In the end I had to cover the dish with kitchen foil and increase the heat and bake until the apples were soft. They did eventually soften up and the apple crunch was very tasty. If you do want to use eating or dessert apples, you could try slicing them more thinly and gently stewing them first with a small amount of water until they are soft but still holding their shape. Add them into the baking dish and stir the sugar through. The apple crunch will be ready once the oat topping is crisp, so you may need to reduce the baking time. I did enjoy this apple crunch as the topping was nice and crisp, and the filling was a good balance of tart and sweet. I will make this recipe again albeit I may try a different fruit for a change to see how it goes.
- It's interesting that this recipe was included in the 'Health Foods' section and I think this is likely due to the oats, and due to the original recipe having less sugar than I added to the vegan re-make! Also, traditional British cookery often associated anything made with oats as wholesome eating!
- Ingredients:
- Apple filling:
- About 1 kg (35 oz) cooking apples such as Bramley apples, peeled, cored and sliced into wedges.
- 100 grams (4 oz) caster or granulated sugar
- Topping:
- 100 grams (4 oz) margarine
- 225 grams (8 oz) porridge oats
- 75 grams (3 oz) caster or granulated sugar
- 1 teaspoon ginger or cinnamon or mixed spice powder
- Method:
- Preheat the oven to 350°F / 180°C / 160°C Fan / Gas Mark 4.
- To prepare the topping add the margarine and sugar to a saucepan and melt.
- Stir through the porridge oats and ginger.
- To prepare the filling add the apple chunks to a casserole dish and mix through the sugar. If your apples are quite tart you may need to add a little extra sugar but only if preferred as some people like a less sweet apple filling.
- Cover the apples with the oat topping.
- Bake on the middle oven shelf for 25-40 minutes or until the apples have softened and the topping is golden and crisp. Check after 20-25 minutes and if it looks like the oat topping is turning too dark but the apples aren't done yet, you can cover it.
- The apple crunch is ready when the apples are soft and the apple juices are bubbling and the oat topping is golden and crisp.
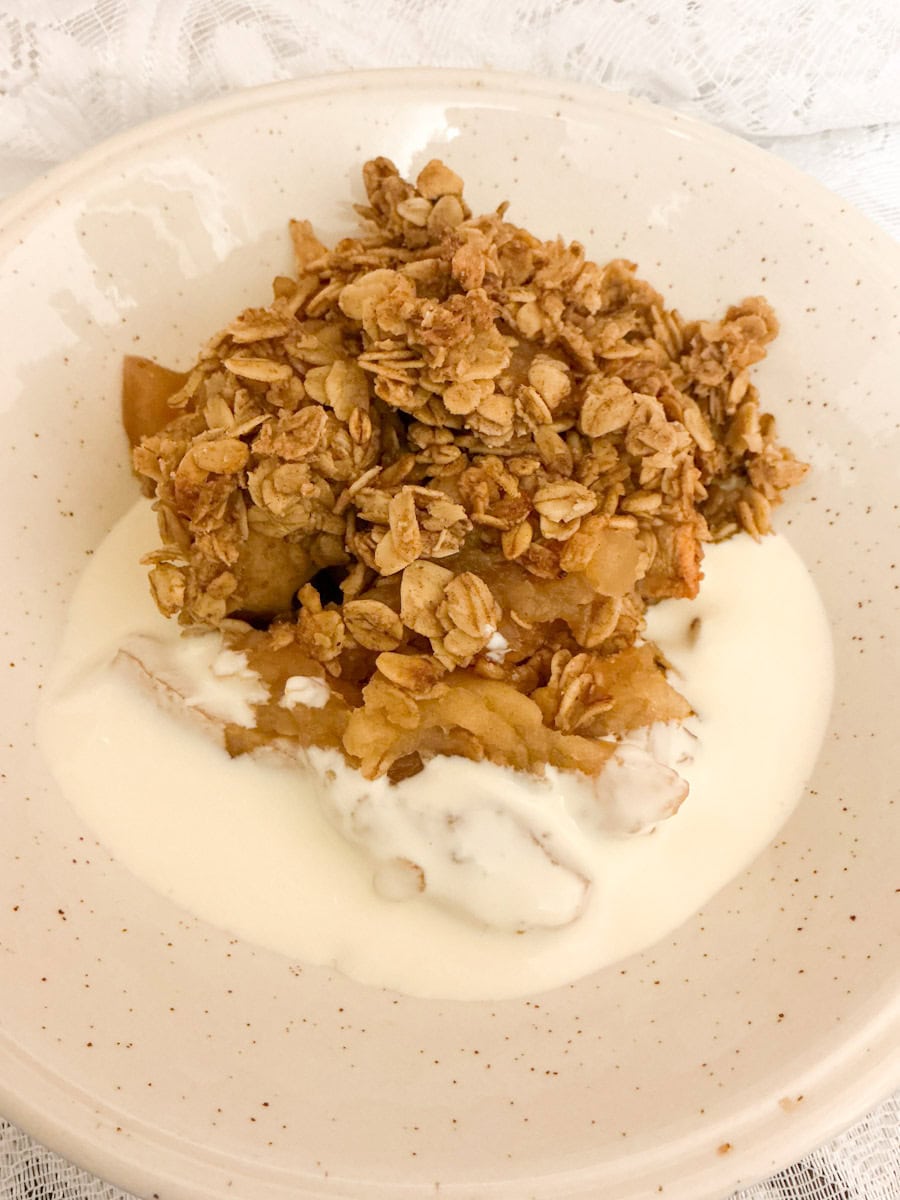
- Serving suggestion:
- Serve hot with dairy-free pouring or whipped cream, ice cream or plain yogurt. This apple crunch is also nice chilled, as I had some for breakfast the next day with a scoop of yogurt.
For another delicious vegan apple dessert recipe our Welsh Apple Cake is very nice and tastes like apple pie! For another vintage apple recipe, this Eve's Pudding is very good, especially served hot with custard.
☕ Date Squares (1978 Recipe) Re-Made Vegan!


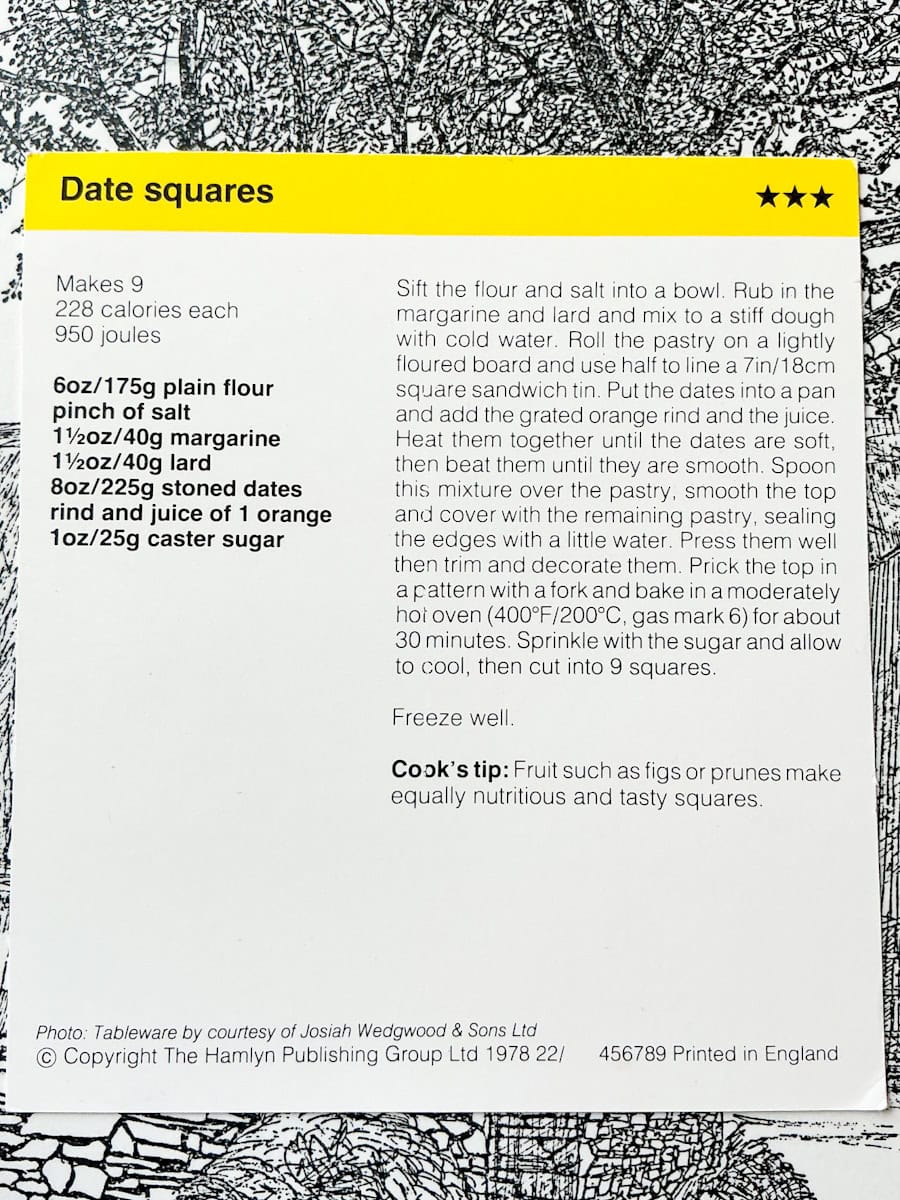
- Original recipe: Dates cooked to a paste and sandwiched between a layer of shortcrust pastry that is prepared with margarine and lard. Recipe card number 12 ' Health foods' from Kathie Webber's All-Star Cookery Club recipe box set.
- What I changed:
- I used Stork baking spread instead of lard and also used the Stork for the quantity of margarine called for. I increased the amount of sugar as I felt that the squares would not be sweet enough otherwise. I didn't add too much more as the date squares were sweet but not overly so, which I did like. However, if you prefer a sweeter bake then you can increase the amount of sugar that is mixed through the dates. Taste the thick date filling once it has been prepared and add more sugar to taste. Alternatively, omit the sugar from the date mix and pastry if you prefer less sweet bakes, as the original recipe does not have sugar added to those parts.
- Serves: 4
- My notes:
- I liked these date squares and felt that they were similar in concept to packaged breakfast bars that are filled with fruit puree or fruit paste. They are also similar to the packaged biscuits fig rolls so next time I will use dried figs instead of dates and see if they turn out. I would really like to bake some vegan fig rolls! The date squares make a really nice snack and they are a good change from more sugary bakes as you can control the amount of sugar added to the date squares and adjust the amount to your preference. I was still eating these date squares a week after they were baked, and they tasted fine!
- Ingredients:
- 175 grams (6 oz) plain flour, sifted
- pinch of salt
- 80 grams (3 oz) margarine, softened, plus extra for greasing the baking tin
- 225 grams (8 oz) stoned dates, chopped
- grated rind and juice of 1 orange. My orange weighed around 200 grams (7 oz)
- 5 tablespoons caster or granulated sugar, divided into 2 tablespoons for the pastry, 1 tablespoon for the date filling, and 1-2 tablespoons for the pastry topping.
- Method:
- Grease a 7 inch (18 cm) square baking tin with margarine and line with baking paper leaving a small overhang of paper. This will help you when removing the baked date squares from the baking pan so you can simply lift the paper edges.
- Preheat the oven to 400°F / 200°C/ 180°C Fan / Gas Mark 6.
- Prepare the filling by adding the chopped dates, grated rind and juice of 1 orange, and a tablespoon of sugar to a saucepan. You can add more sugar if you prefer a sweeter bake. (I used a cheese grater to grate the orange rind then a metal cutlery soup spoon to squeeze out the juice and pulp of the orange. I did get some orange pulp in the mixture and the orange looked quite empty apart from the fibrous parts attached to the inner peel when I was done but I figured this would taste fine in the date mix.)
- Over a medium heat cook the dates for 5 minutes, stirring frequently. The dates will break down as they cook and become very thick.
- Remove the saucepan from the heat and mash and whip the dates with a cutlery spoon or fork until smooth. Set aside while you prepare the pastry.
- To prepare the pastry add the flour and salt to a mixing bowl.
- Add the margarine to the bowl and rub it in to the flour until it resembles fine breadcrumbs.
- Stir through 2 tablespoons of sugar.
- Mix through 2 tablespoons of cold water with a cutlery knife cutting through the ingredients until the mixture starts to come together. I needed another tablespoon of water so add an extra tablespoon if your mixture is too dry to come together into a dough.
- Dust your hands with flour and bring the dough together kneading it in your hands for a few seconds.
- Divide the dough into 2 equal pieces.
- Dust your work surface and rolling pin with flour.
- Roll out one piece of pastry into a size that will fit the bottom of your baking tin.
- Lift the pastry and place it into the baking tin, trimming the edges.
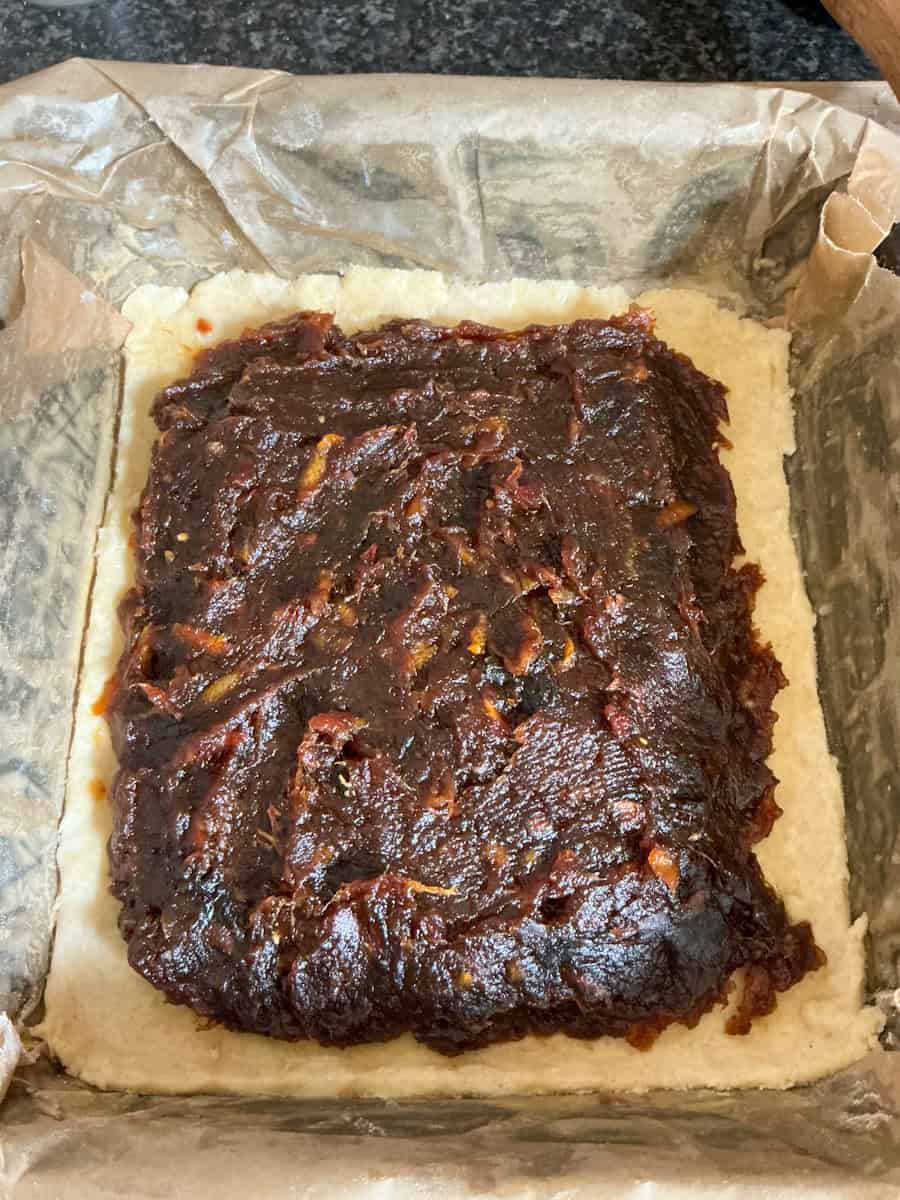
- Cover the pastry that is lining the baking tin with the date mixture, smoothing the top. Leave an edge (about 1 cm) around the pastry for the top layer of pasty to seal over it. Brush around the edge with a little water.
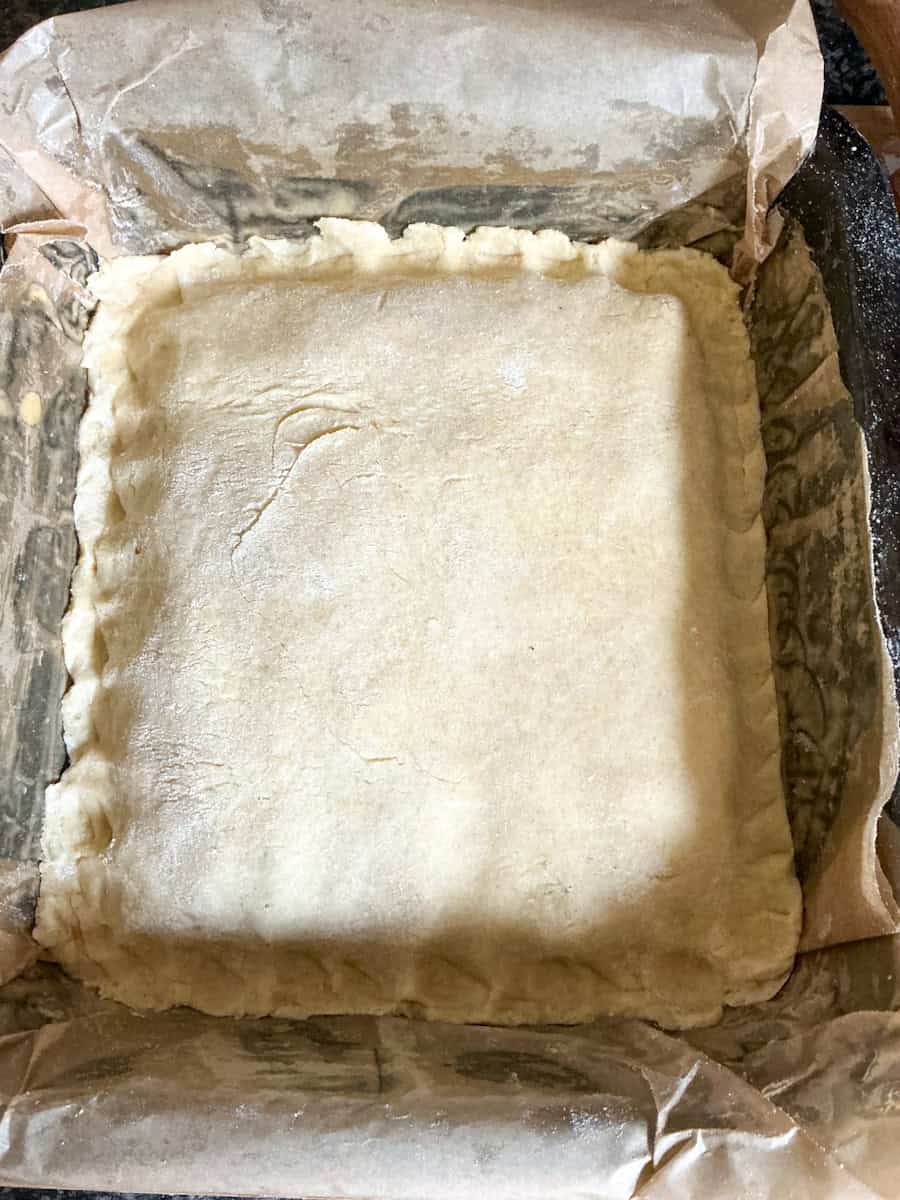
- Roll out the second piece of pastry dough into a size that will cover the date mixture.
- Place the pastry over the dates and press the edges gently with two fingers into the bottom layer of pastry to seal the edges and create a crimped edge (see images below).
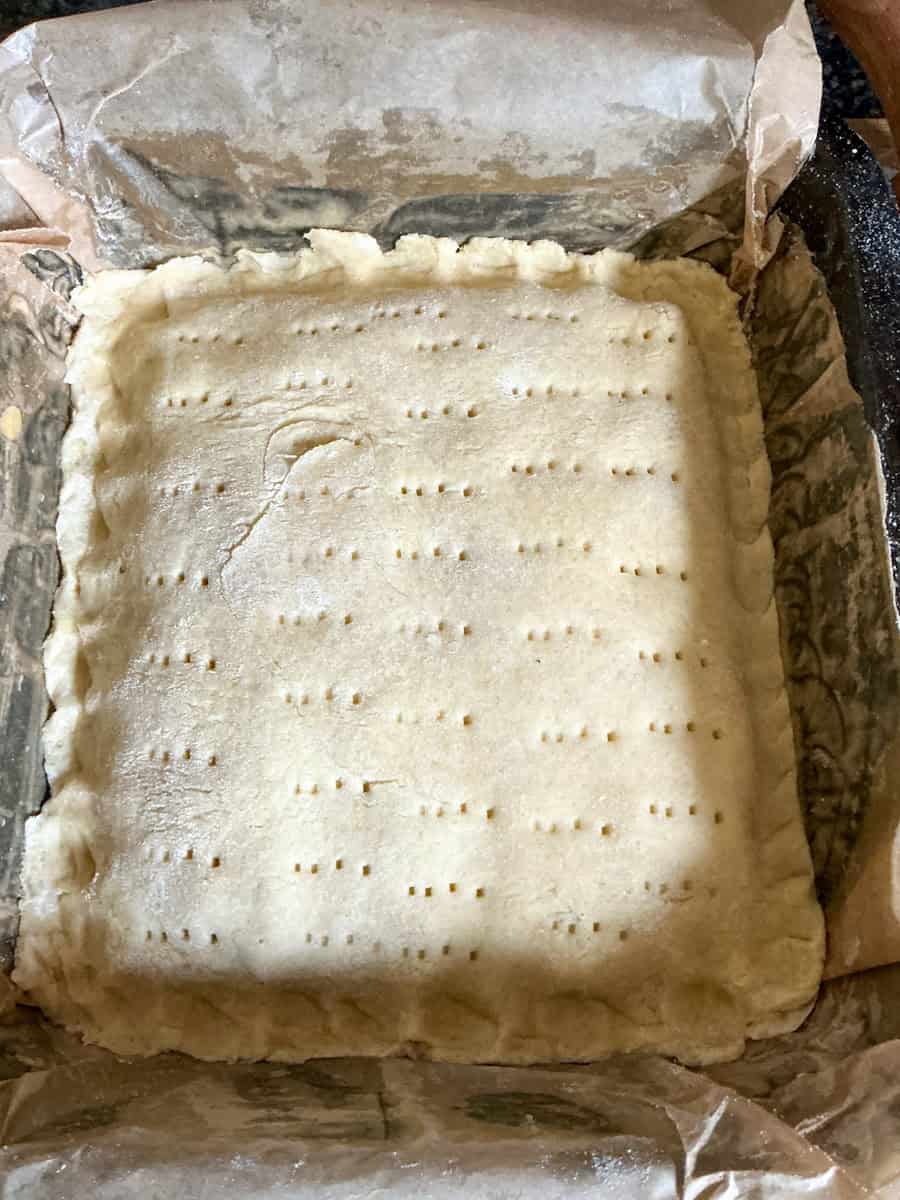
- Using a cutlery fork prick the top of the pastry in a pattern of your choosing (see images below)
- Bake on the middle oven shelf for about 25-30 minutes. I used a Fan oven and my date squares were cooked after 25 minutes. The edges were tinged golden, and the surface was paler but beginning to colour. The pastry will also be firm once baked.
- As soon as the date squares are out of the oven sprinkle 1-2 tablespoons of sugar over.
- Leave to cool in the tin for about 30 minutes before before transferring to a wire rack to cool.
- Once cool, remove the baking paper and slice into 9 squares.
- Variations: The original recipe states this Cook's Tip:
- ''Fruit such as figs or prunes make equally nutritious and tasty squares.''
For a similar recipe, do have a look at my Scottish Fruit Slice recipe which is a classic Scottish vintage bake.
🍯 Honey Baked Bananas (1978 Recipe) Re-Made Vegan!
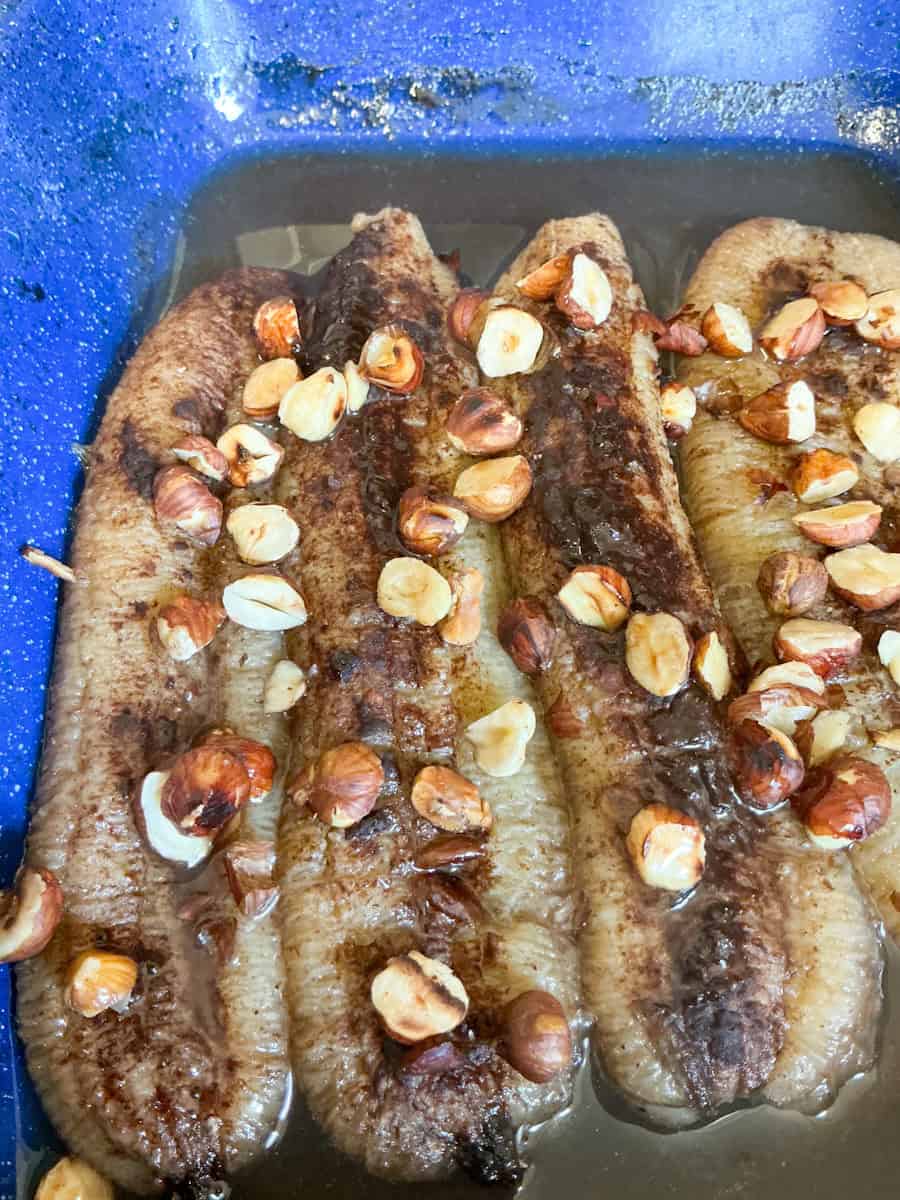
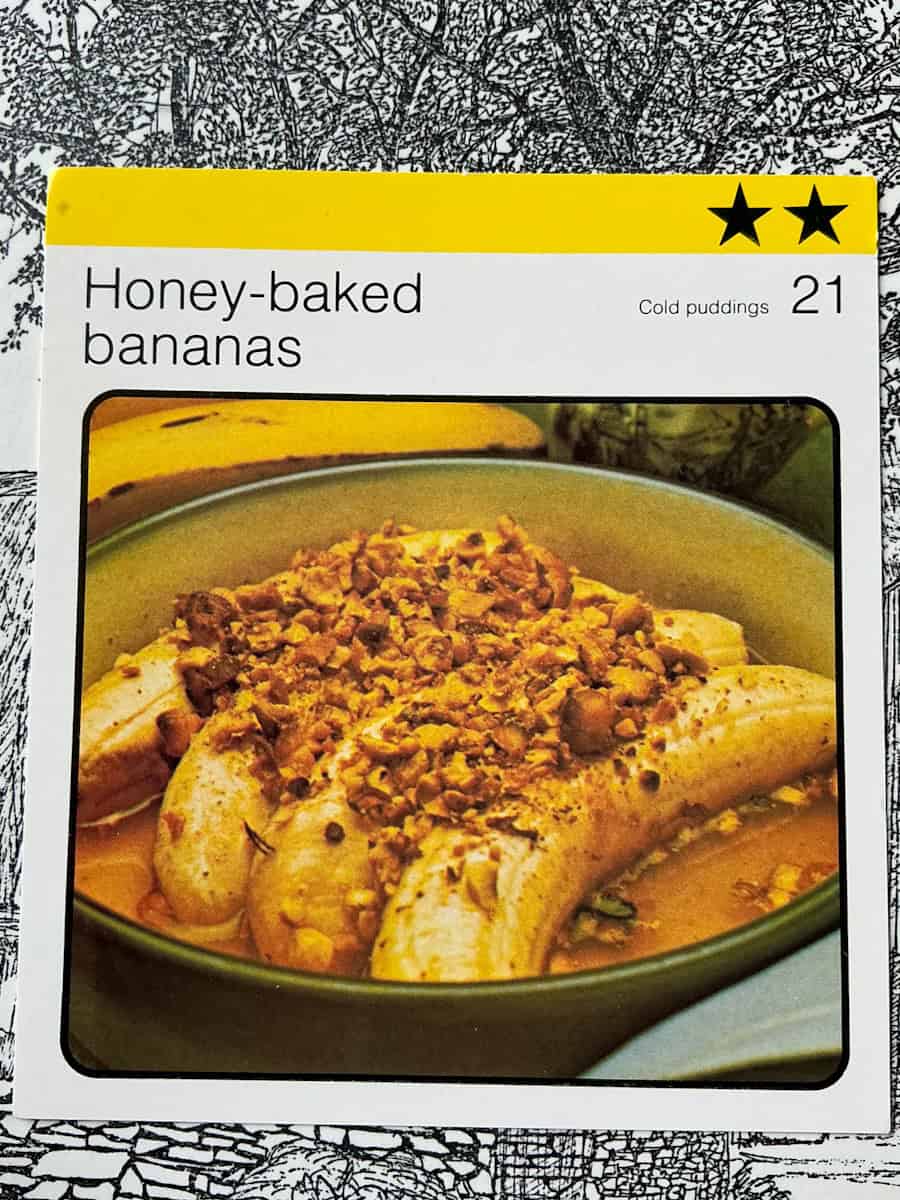
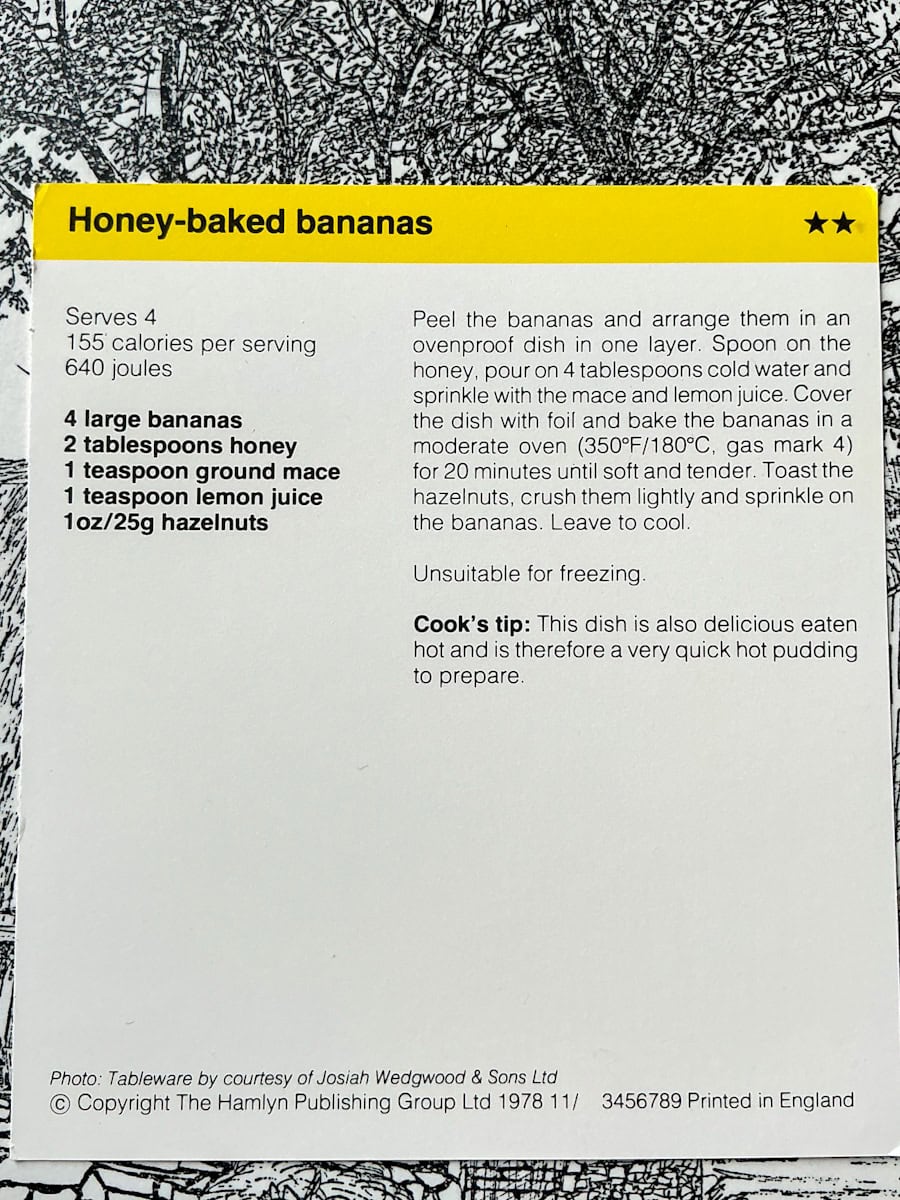
- Original recipe:
- Bananas baked with honey and cinnamon, finished with a garnish of roasted hazelnuts. Recipe card number 21 'Cold puddings' from Kathie Webber's All-Star Cookery Club recipe box set.
- What I changed:
- I didn't have to change much for this recipe. Instead of honey I used brown rice syrup. However, I felt that 4 tablespoons of water, which is what the original recipe called for would be too much, so I reduced the water to two tablespoons and increased the syrup to four, as I wanted a thicker syrupy sauce rather than a watery one. I also swapped the mace for powdered cinnamon as I felt my family would enjoy that warm, familiar spice more.
- Serves: 4
- My notes:
- I really enjoyed these hot, soft, syrupy bananas and they had a nice sweet cinnamon-banana flavour. The recipe was really easy and quick to prepare. I liked how it only needed a short time in the oven. I felt that the baked bananas would also be very nice with some dairy-free ice cream or mashed and stirred through plain dairy-free yogurt. One thing that puzzled me was that the bananas seemed to puff up in the oven and one banana looked like it had been run over as somehow it had puffed, then flattened out! Perhaps they needed less cooking time!
- Ingredients:
- 4 large bananas
- 4 tablespoons syrup of your choice, I used brown rice syrup but any syrup or vegan honey can be used (However, I've tested a few vegan honeys in other recipes, the ones I tried weren't very pourable, as they were quite thick.)
- 2 tablespoons water
- 1 teaspoon lemon juice (can be fresh or from a bottle)
- 1 teaspoon cinnamon or mace (use less if preferred)
- Garnish: 25 grams (1 oz) toasted chopped hazelnuts - to toast add chopped hazelnuts to a small frying pan (without oil) and over a medium-high heat toast until starting to colour, stirring frequently to prevent burning. Once they start to colour remove the pan from the heat and stir for a few moments as the nuts will continue to toast. Remove the nuts from the pan and onto a plate while the bananas are baking.
- Method:
- Add the peeled bananas to a baking dish.
- Drizzle the syrup over the bananas and then sprinkle with water.
- Drizzle over the lemon juice.
- Sprinkle the cinnamon over the bananas.
- Cover the baking pan with kitchen foil.
- Bake at 350°F / 180°C / 160°C Fan / Gas Mark 4 for 20 minutes, or until the bananas are soft. Bake on the middle shelf.
- Once baked sprinkle the toasted hazelnuts over the bananas and drizzle the syrup in the pan over each served banana. The syrup will thicken up more as it cools.
- Serving suggestion:
- Serve hot or cold. Dairy-free ice cream or yogurt is a nice accompaniment.
For another recipe that makes good use of bananas do have a look at my Vegan Banana Bread recipe which is easy to prepare and tastes delicious.
🌟 Bonus Recipes! 🌟
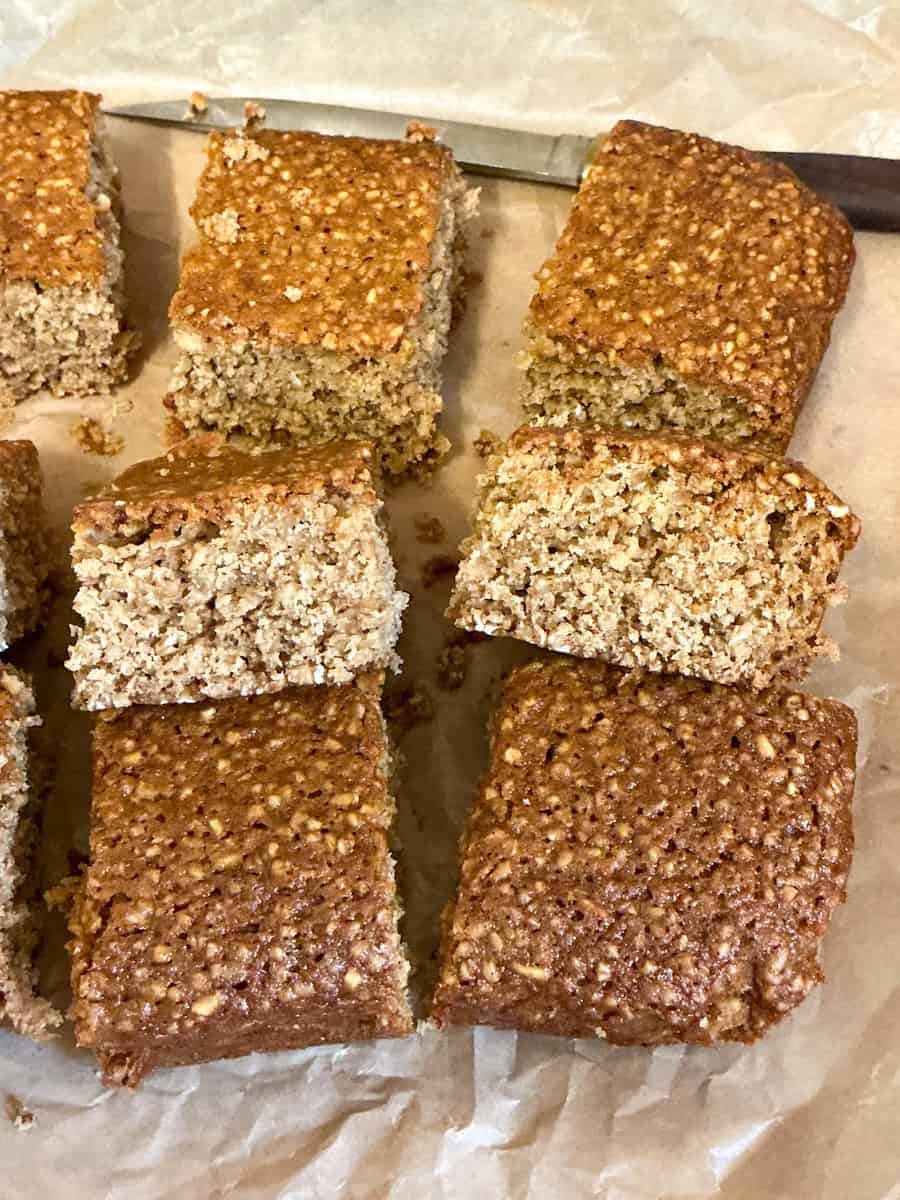
🥮 Something for the tin! Yorkshire Parkin (1978 Recipe) Re-Made Vegan!
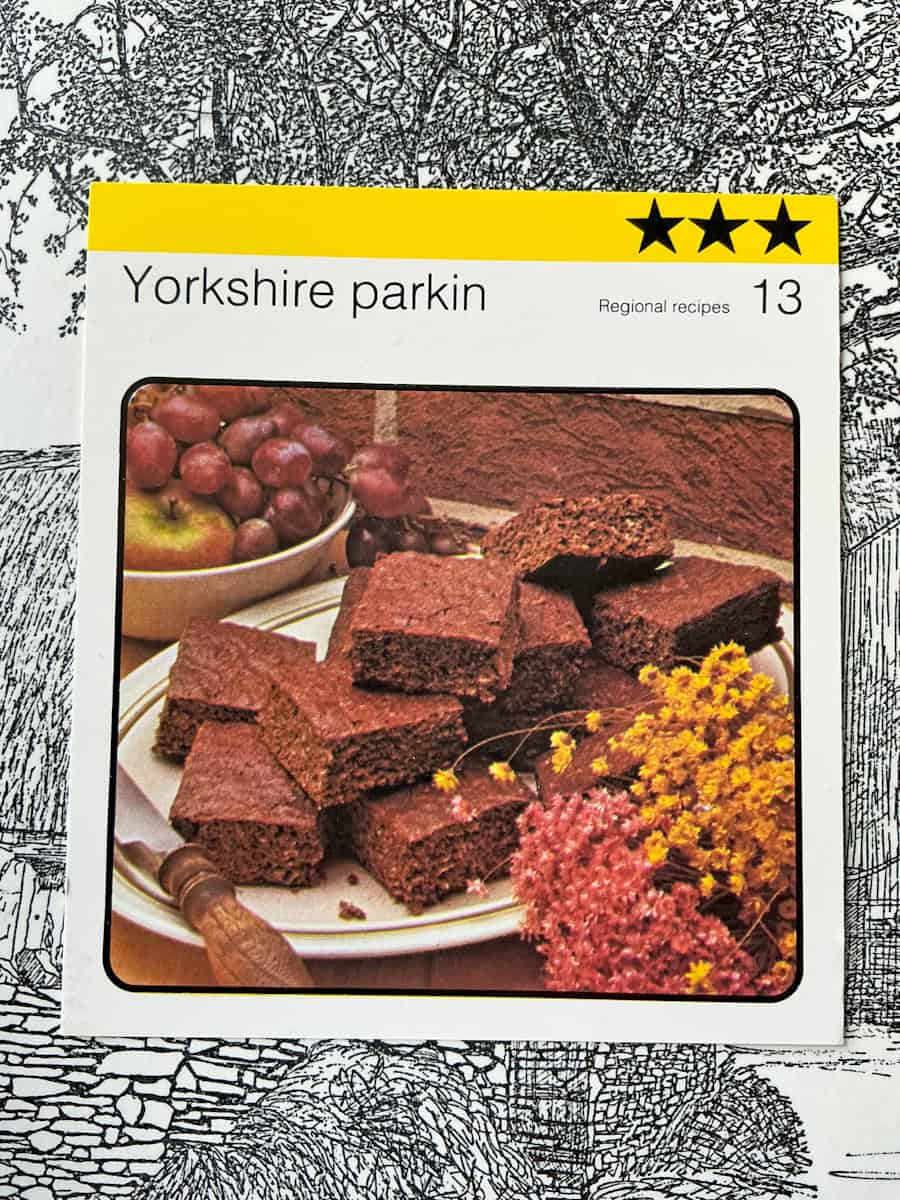
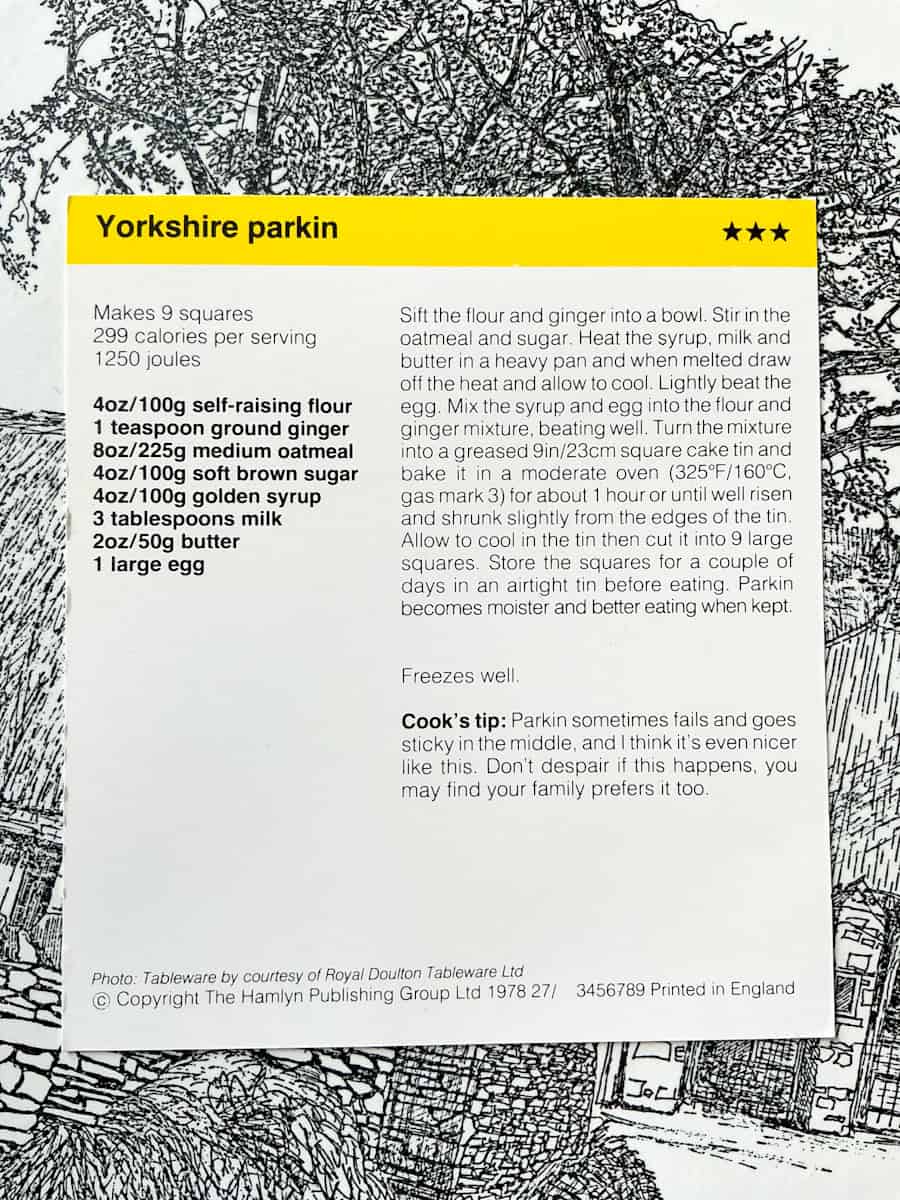
- Original recipe:
- Traditional Yorkshire parkin cake made with butter, milk and eggs. Recipe card number 13 'Regional recipes' from Kathie Webber's All-Star Cookery Club recipe box set.
- What I changed:
- I used smooth apple purée instead of eggs, but smooth apple sauce will also work fine. I also used soya milk and Stork baking spread.
- Serves: 12
- My notes:
- This is a deliciously homely moist, sticky parkin cake packed with warm spice flavours. It is a very easy bake and my favourite parkin recipe to date. I will be baking this parkin again as it's perfect for the cake tin as it gets nicer, stickier and moister the longer it sits. I was still enjoying this parkin a week after baking so keep it wrapped up well, and it should be fine for up to 2 weeks.
- Ingredients:
- 140 grams (5oz) self-raising flour
- 1 teaspoon baking powder
- 70 grams smooth apple sauce or apple puree (I used apple puree from a jar sourced at my local health food/wholefood store but you can make your own by stewing apples until they are very soft in a small amount of water and mashing with a potato masher or pureeing in a food processor until smooth. If you make a batch of smooth apple puree it can be frozen in potion sizes - about 60 grams (2oz plus 2 teaspoons)will replace 1 medium sized egg. Don't worry if you have a few small lumps in your apple purée/sauce as it will bake fine.)
- 1 teaspoon ginger or mixed spice powder; cinnamon would also work fine
- 100 grams (4 oz) golden syrup
- 100 grams (4 oz) soft brown sugar (also known as light brown sugar)
- 225 grams (8 oz) medium oatmeal
- 3 tablespoons dairy-free milk
- 50 grams (2 oz) margarine (use one suitable for baking, I used Stork baking spread), plus a little extra for greasing baking tin
- Method:
- Preheat the oven to 325°F / 160°C / 140°C Fan / Gas Mark 3.
- Grease an 8-9 inch (22-23 cm) square baking tin with margarine and line it with baking paper.
- Add the margarine, golden syrup, and milk to a saucepan and heat until melted. Set aside while you prepare the cake.
- Sift the flour, ginger and baking powder into a mixing bowl.
- Stir through the oatmeal and sugar.
- Add the apple puree/sauce and the melted syrup mixture and mix.
- Pour the mixture into the baking tin.
- Bake on the middle oven shelf for 55-60 minutes. Check the parkin at the 50-55 minute stage to see how it is going especially if you are baking with a fan oven as these tend to bake faster. I used a fan oven and the parkin was ready just after 55 minutes. If the middle looks a bit wobbly or not risen equally to the outer parts then bake longer as removing it too soon may cause the middle to sink. A skewer popped into the parkin should come out clean once baked, and the cake will have pulled slightly away from the pan.
- Leave to cool in the baking pan for 30-60 minutes then remove to cool completely on a cooling rack.
- The parkin will be nicest if left until the next day or even a few days after baking but of course it can be tested on the same day of baking. Wrap the parkin in baking paper followed by kitchen foil, and store in a cake tin. It will continue to get sticker and moister as it's stored, and it will keep for up to 2 weeks.
If you like parkin cake, then you will also love my parkin biscuits which are another British vintage bake.
🥣 Pot of Soup for the Week: Minestrone Soup (1978 recipe) Re-Made Vegan!
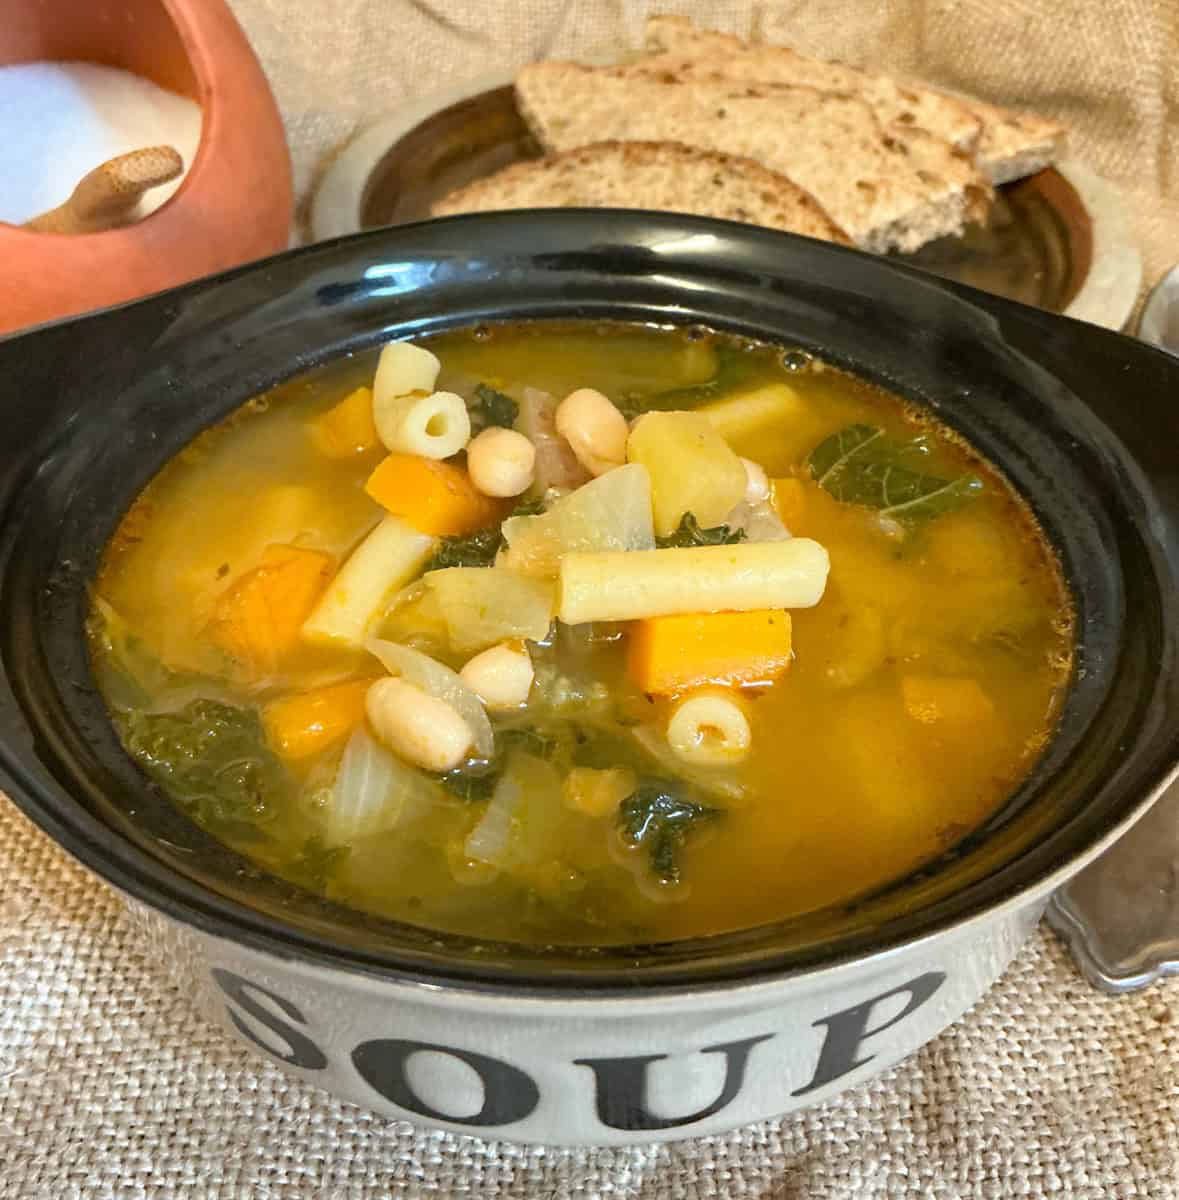

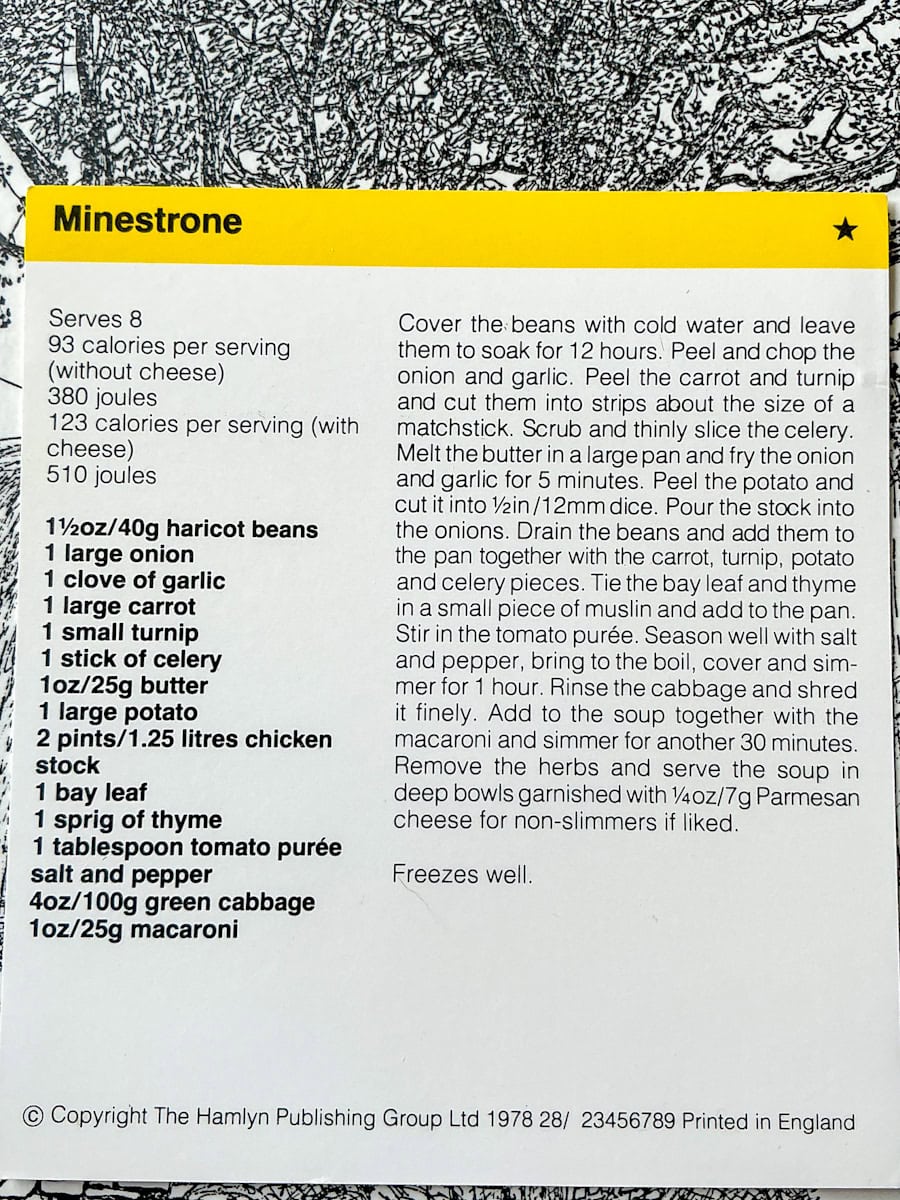
- Original recipe:
- Minestrone soup prepared with butter and chicken stock, and garnished with Parmesan cheese. Recipe card number 18 'Soups' from Kathie Webber's All-Star Cookery Club recipe box set.
- What I changed:
- I used vegetable oil instead of butter, and vegetable stock instead of chicken stock. The original recipe suggests Parmesan cheese as a garnish but I went with nutritional yeast flakes. I also changed the cooking method by using canned haricot beans instead of dried, which reduced the cooking time. Additionally, I increased the amount of macaroni used in the original recipe as I knew my family would want more of the pasta.
- Serves: 6-8
- My notes:
- I like this soup more than other minestrone recipes I have prepared as it tasted more vintage-y! I can't put my finger on it but the taste was familiar and reminded me of a soup I have had in the past, perhaps from my childhood. It's the kind of simple but tasty soup your nan or granny might have made. I will be making this recipe again as it's hearty, homely and packed with wholesome ingredients.
- Ingredients:
- 25 grams (1 oz) vegetable oil or dairy-free butter
- 1 x 400 grams (14 oz) can haricot beans (navy beans) or 250 grams cooked beans
- 1 large onion (about 270 grams / 9½ oz), chopped
- 1 clove of garlic or 1 teaspoon garlic powder
- 1 large carrot (100 grams / 4 oz), chopped into thin batons
- Swede (140 grams / 5 oz), peeled and chopped into thin batons
- 1 stick celery (about 80 grams / 3 oz), thinly sliced
- 1 large potato, (about 400 grams / 14 oz), chopped into ½ inch (12 mm) chunks
- 1.7 litres (57 ½ fl oz) vegetable stock
- 1 bay leaf
- 1 sprig of thyme or 2 teaspoons dried thyme or mixed dried herbs
- 1 tablespoon tomato purée (tomato paste)
- 80 grams (3 oz) kale, large stalks removed and finely shredded, or use 100 grams (4 oz) green or white cabbage, thinly shredded
- 50 grams (2 oz) macaroni or a different pasta shape
- Method:
- Drain the canned haricot beans and rinse them under cold water.
- Heat the oil in a large soup pot and cook the onion and garlic over medium heat for 5 minutes, stirring frequently.
- Add the carrot, swede, celery, and potato. Stir in the tomato purée.
- Pour in the vegetable stock.
- Add the thyme and bay leaf, and season with some salt & pepper.
- Over a high heat, bring the soup to the boil.
- Lower the heat to medium and gently boil for 25 minutes.
- Next, add in the cabbage, macaroni, and haricot beans.
- Cook for a further 15 minutes.
- Check the seasoning and add more salt and pepper if necessary.
- Optional:
- Serve each bowl sprinkled with nutritional yeast flakes as a Parmesan alternative, or some grated dairy-free cheese.
- Serving suggestion:
- Great served with garlic bread, crusty rolls, or a chunk of fresh bread.
For another nice, easy minestrone recipe, although that version uses more tomatoes, do have a look at our family Vegan Minestrone Soup recipe.
WEEK THREE OF VINTAGE RECIPE CARDS - MADE VEGAN COMING SOON!
Vintage Main Meal Recipes Include Vegan Swedish Meatballs, Vegan Chicken Corn Casserole, Barbecue 'lamb' Cauliflower, Guy Fawkes Stew, and more!