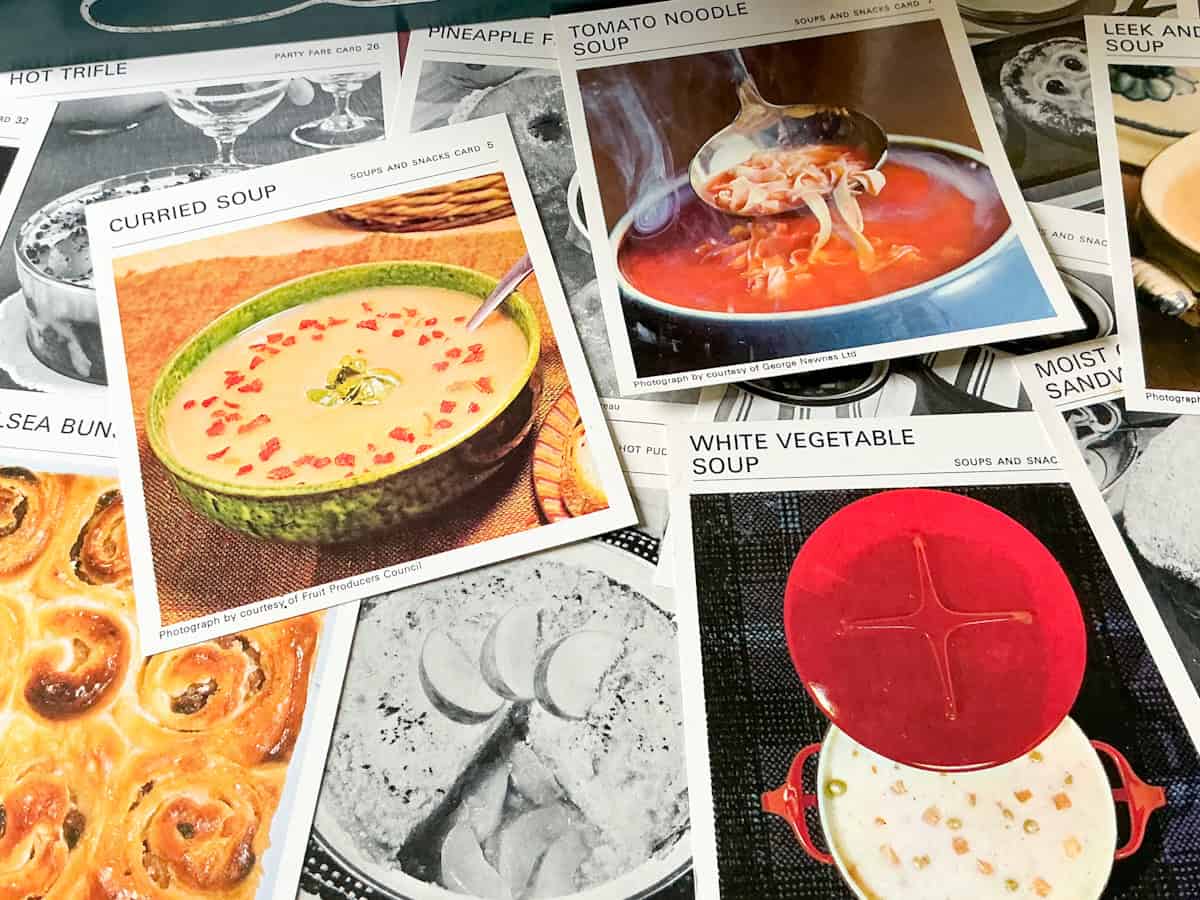
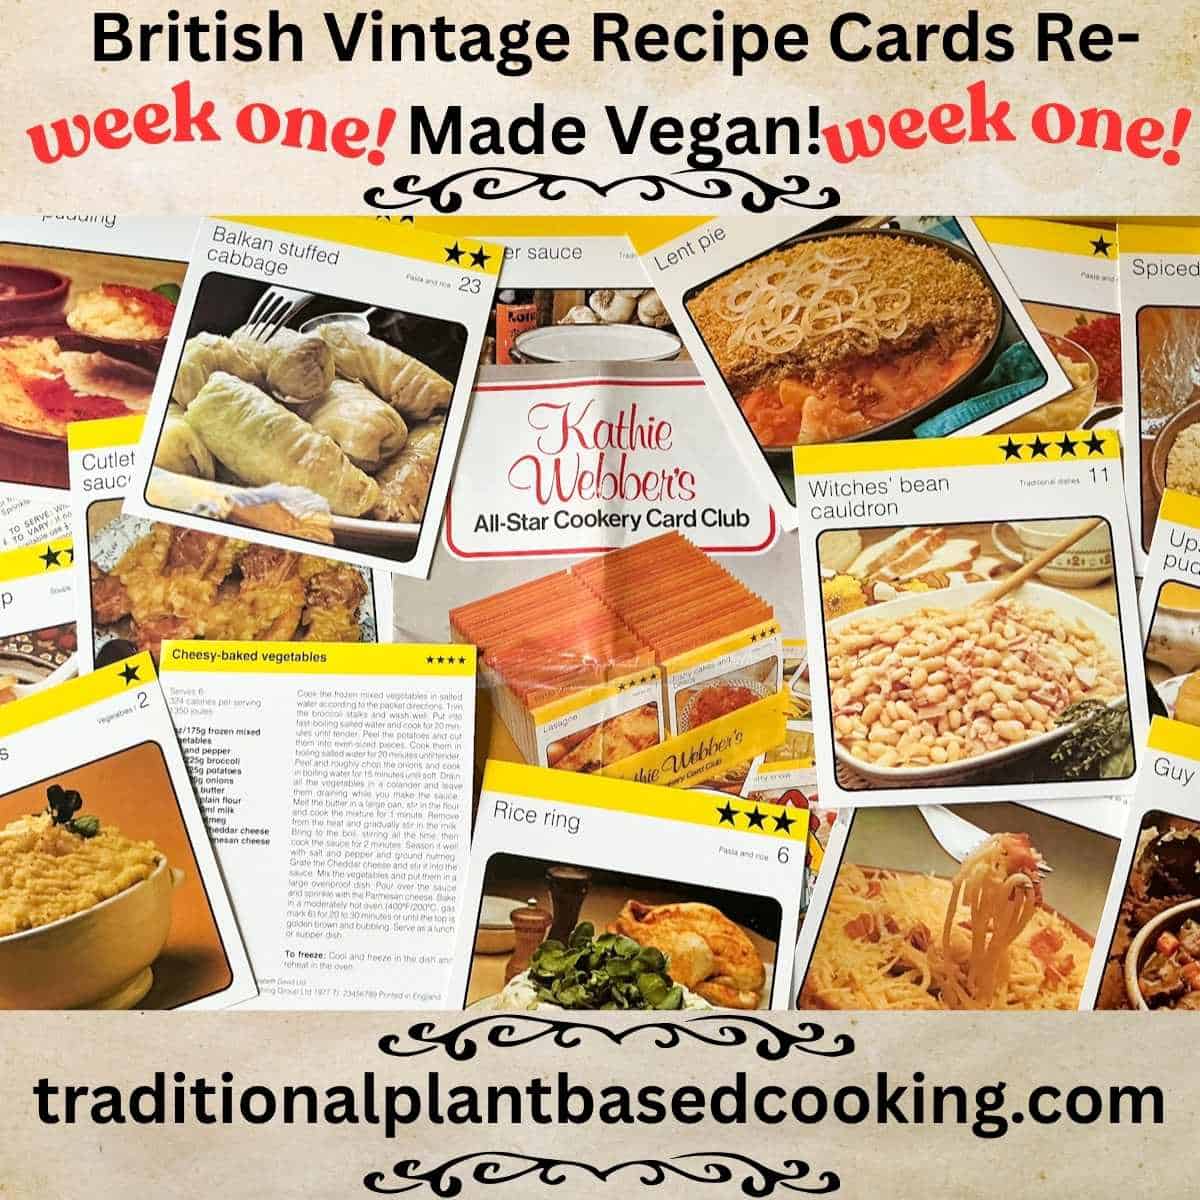
This is week one of re-making vintage recipe cards into easy vegan recipes and meal plans. Each week, I test 7 dinner recipes and 7 dessert or pudding recipes, swapping in vegan-friendly ingredients while keeping the essence of the traditional, family favourite recipes alive. You'll also find kitchen notes alongside each recipe to help you prepare them easily in your own kitchen.
🍽️ Why Try Vintage & Retro Recipes Today?
There's something special & exciting about bring vintage recipes back to life. Here's why I think they're still a brilliant addition to our kitchens:
- 🥣 Not just for vegans! : Whether you're vegan, plant-based, vegetarian, flexitarian, omnivore or just cutting down on meat, eggs & dairy, these recipes are easy to enjoy with everyday affordable ingredients.
- 🥔 Budget-friendly: These recipes were originally created for everyday households using simple, affordable, easy to source ingredients.
- 🕰️ Time-tested: These meals & desserts were made to work and have been enjoyed across the generations.
- 🥕 Plant-based makeovers: These traditional recipes have been re-made with vegan-friendly everyday ingredients but they still have their homely charm.
- 🍰 Nostalgia: Familiar and comforting meals & recipes can often bring back warm memories of loved ones & bygone times. This can help us feel connected to family & friends.
- 🍴 Family-friendly: These recipes are mostly designed to feed 4-6 and they're ideal for batch cooking and meal plans. But they can also be easily halved to provide meals & puds for 1 or 2 serves.
- 🥕 Easily adapted: For most of the savoury recipes you can switch out ingredients, especially vegetables & pulses, for those that need using up. Also, for puddings which require fruit you can use any fruit you prefer.
- 📜 A taste of food history: Each recipe preserves a bit of culture, tradition, & stories from bygone eras.
- 🍽️ Refresh your meals: If you're stuck in a cooking rut and fed up wondering what's for dinner or dessert, these vintage recipe gems offer many fresh new ideas, as well as familiar recipes but perhaps prepared differently from usual, to give your everyday menu a boost.
⭐ Take a look through this week's vegan vintage recipes you might just find your new favourite comfort food or go-to recipes! ⭐
Week one's retro recipes come from Kathie Webber's All-Star Cookery Club recipe card box set (1978-1980), and Marguerite Patten's 1967 set. I've adapted each dish to be meat-free, dairy-free, and egg-free whilst keeping their comforting, old-school, homely feels.
The first part of the current series runs for two weeks and features 14 vintage-inspired vegan dinners and 14 traditional puddings and desserts which combined are perfect for planning your weekly meals. These recipes are ideal for vegans, vegetarians, and anyone looking to enjoy more plant-based versions of classic favourites.
After the initial two weeks, I'll be moving on to the 1990s to explore another recipe box set: Delicious Meals Made Easy (1996-1997), which will run for another two weeks of recipes. By the end of the four weeks, you'll have 28 vintage vegan main meals and 28 puddings and desserts which will be perfect for building a fun and tasty four-week meal plan!
However, that's just the start as I've got stacks of old recipe cards & vintage booklets from newspapers, that I am excited to re-make as vegan and share with my blog visitors, still to come!
For more information about my new series you can find it by heading over to the introduction page ➡️
📘 Table of Contents
🍽️ Week One - Seven Vintage Main Meals Recipes 🍽️
Recipes include meals from the recipe card sections - 'Supper Dishes Card', 'Meals in a Hurry', 'Meals on a Budget' 'Rice and Pasta', 'Vegetables 1' and 'Meals Starters Card'
🍽️ Bubble And Squeak (1978) Re-Made Vegan!
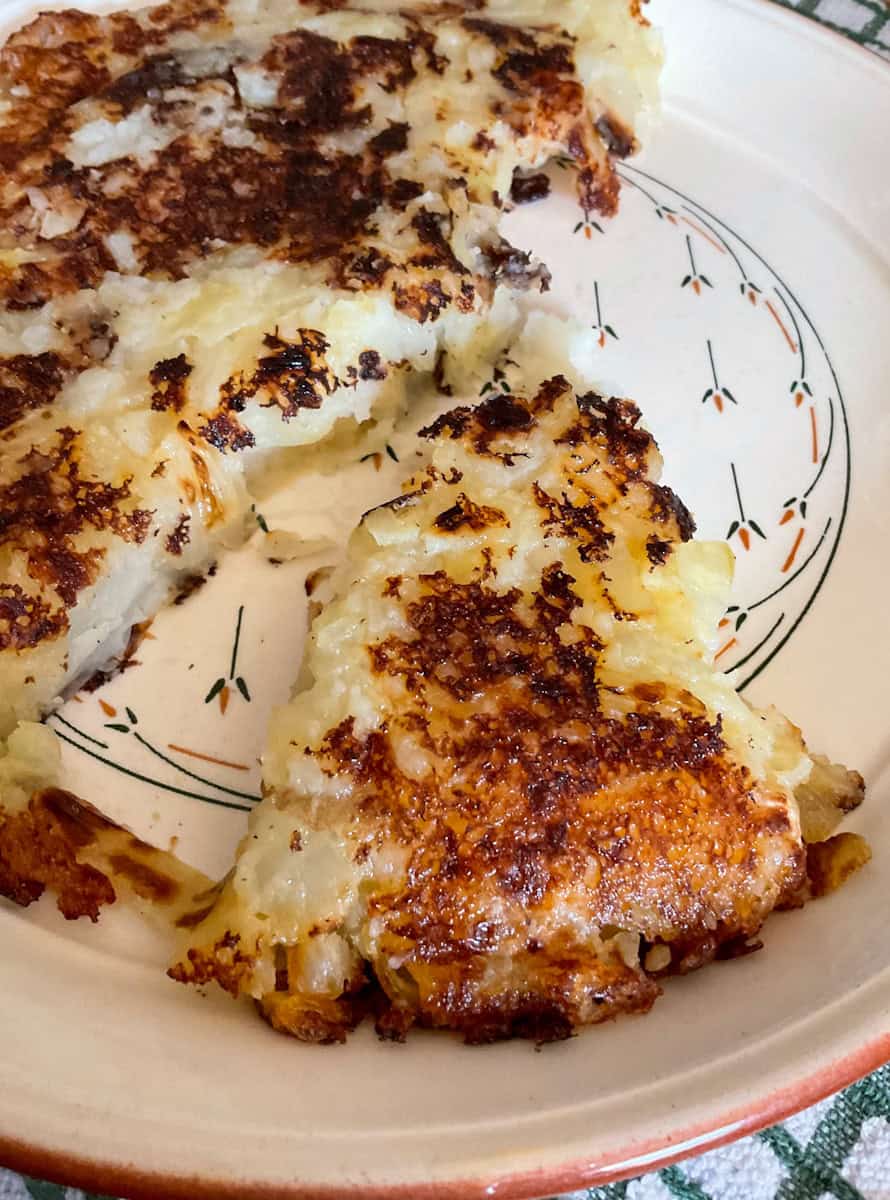
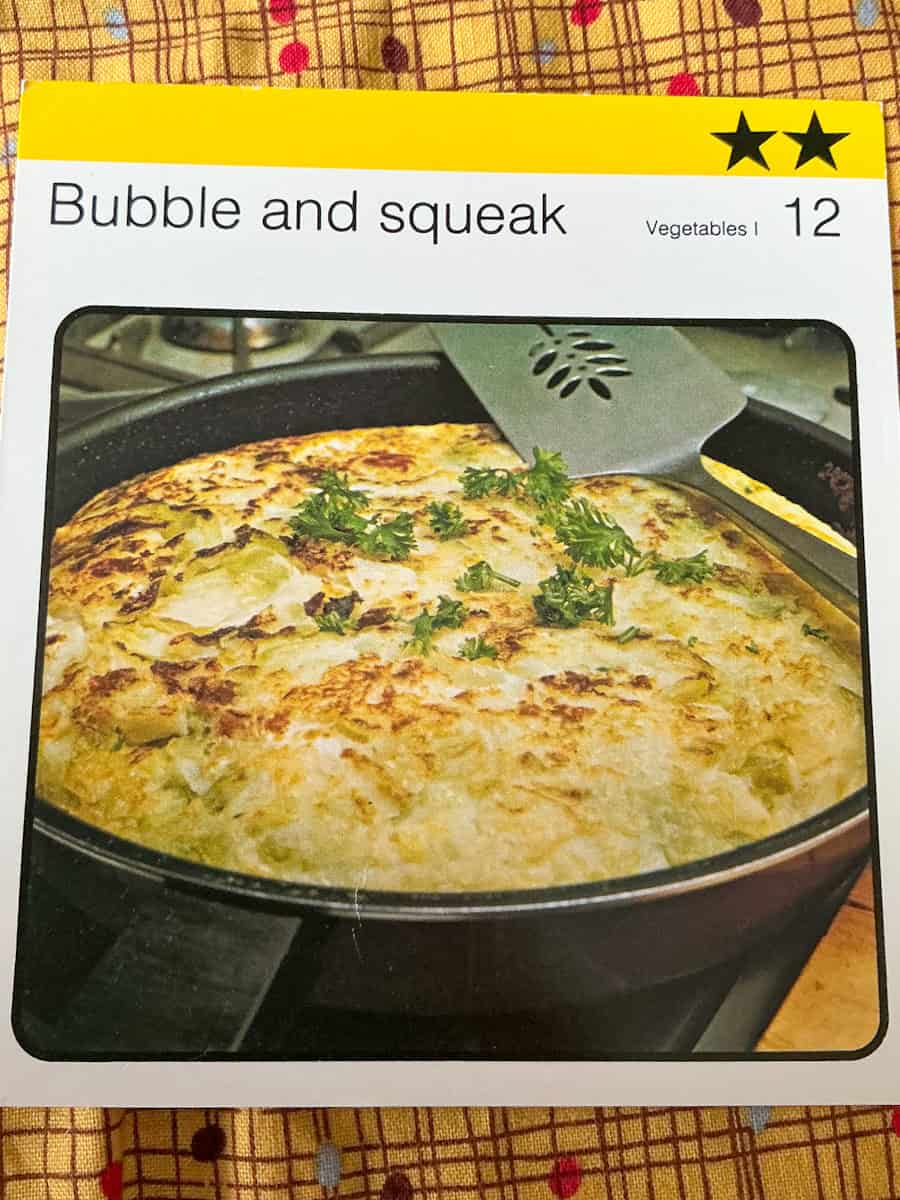
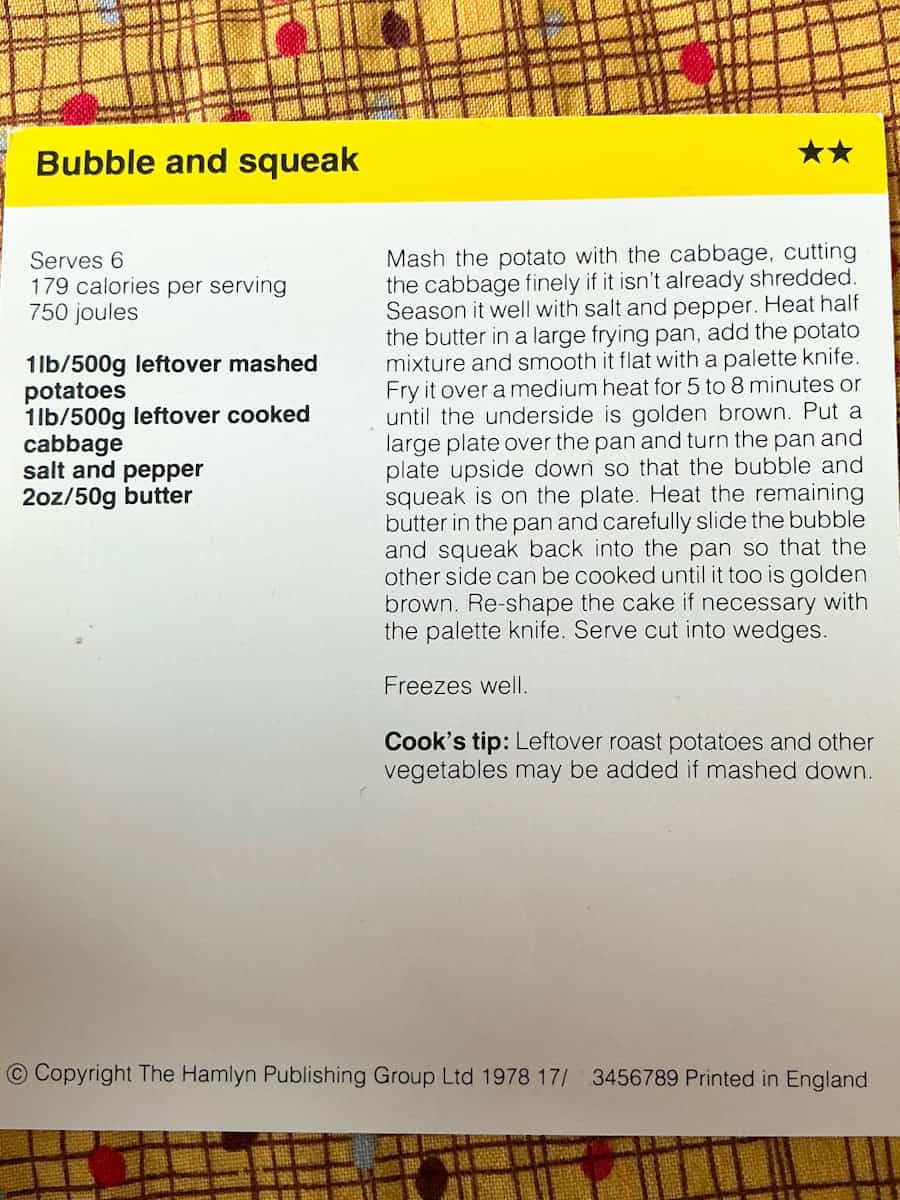
- Original recipe: Cooked cabbage and mashed potatoes seasoned and fryed with butter. Recipe card number 12 'Vegetables 1' from from Kathie Webber's All-Star Cookery Club.
- Serves: 6
- What I changed: Used vegan butter instead of dairy butter.
- My notes: This was very tasty and my family enjoyed it. It can be abit tricky to flip the bubble and squeak over so as to cook the other side, so if you use an oven-proof frying pan or similar you could cook the top side under the grill [broiler] as that would be much easier. I will make this recipe again as its such a good way to use up leftovers and if you only have a small amount of leftovers you can prepare a smaller bubble & squeak and flavour it with any spices or herbs you like.
- Ingredients:
- 500 grams [1Ib/18oz] mashed potatoes, leftover mashed potatoes are ideal
- 500 grams [1Ib/18oz] cooked cabbage, leftover cabbage is ideal
- salt & pepper
- 50 grams [2oz] vegan butter, dairy-free margarine or oil
- Method
- Add the mashed potatoes and cabbage [finely shredded] to a bowl. Mix and mash both together.
- Season with salt and pepper.
- Add half the butter to a non-stick frying pan and heat it over a medium heat.
- Add the potato mixture to the pan and using a cutlery or palette knife smooth the mixture out to cover the pan.
- Cook for 5-8 minutes over a medium heat. Underneath should be golden brown.
- Place a large plate over the frying pan rim and flip the pan over so that the bubble and squeak slips out onto the plate.
- Heat the rest of the butter in the frying pan and gently place the bubble and squeak back into the pan golden side upwards so that the top side can also become golden.
- If the bubble and squeak breaks up a little while removing or placing it back into the pan you can use the cutlery knife or palette knife to push it back together.
- To serve, carefully slice the bubble and squeak into triangles.
- My suggested additions: Add dried or fresh herbs to the mixture before cooking, or some dairy-free cheese or nutritional yeast flakes. Finely chopped spring onions [green onions], leeks, onions or chives are a nice addition.
- My suggested variations: As bubble and squeak is a good recipe that utilises leftovers any cooked vegetables can be mashed up and added to the mixture. For example, at Christmas time many people like to prepare leftover Christmas dinner as bubble and squeak for Boxing Day lunch. It is also traditional in some areas to have bubble and squeak along with a cooked breakfast.
- Original recipe cooks-tip: ''leftover roast potatoes and other vegetables may be added if mashed down''.
- My serving suggestions: Serve on its own with bread and butter, and/or a nice crisp salad. It's also tasty with baked beans or canned spaghetti hoops and meat-free sausages.
If you like this vintage recipe for bubble and squeak then you will likely also like this British 1950s wartime recipe for Champ which is a dish of potatoes, turnip & cabbage cooked & mashed together, and is adapted from a 1950s Margeritte Patton recipe.
🍽️ Hasty Prawn Curry (1967) Re-Made Vegan!
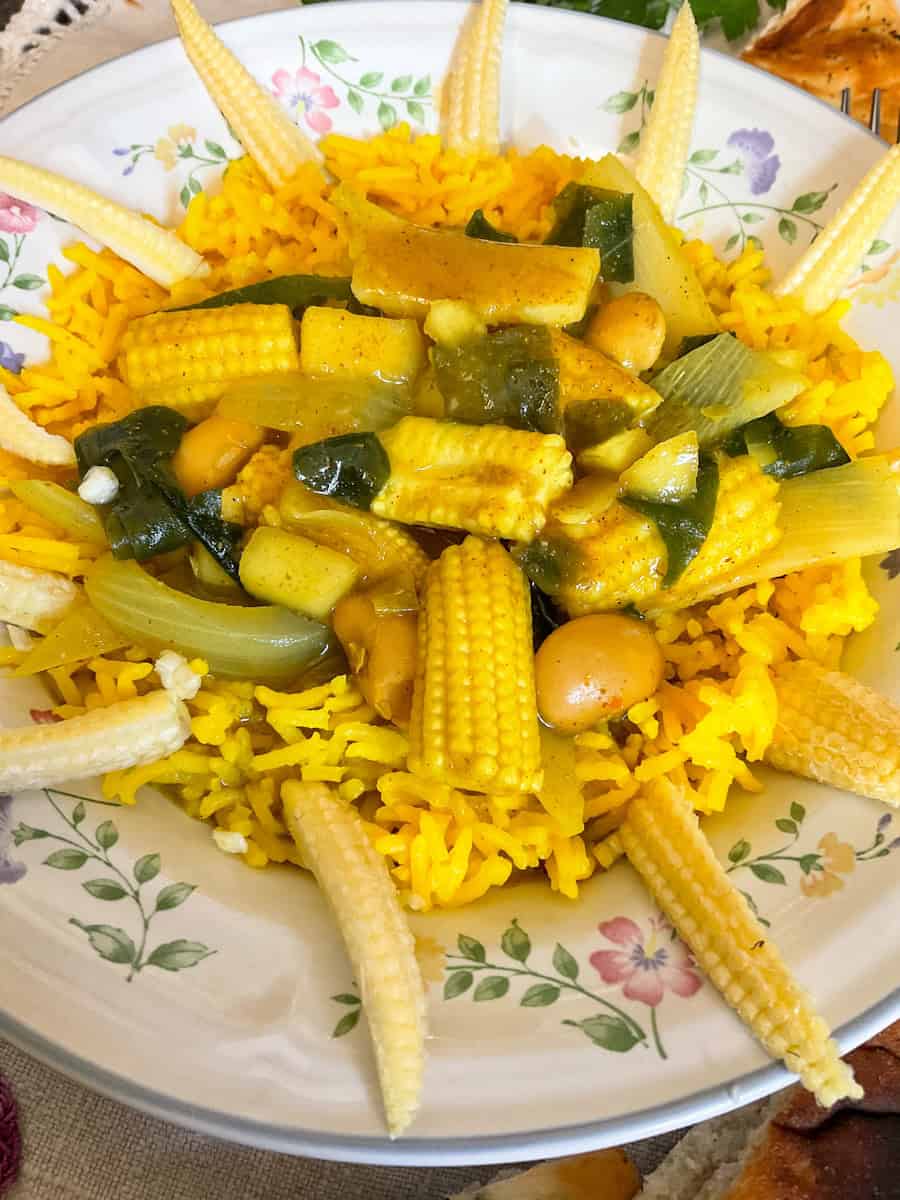

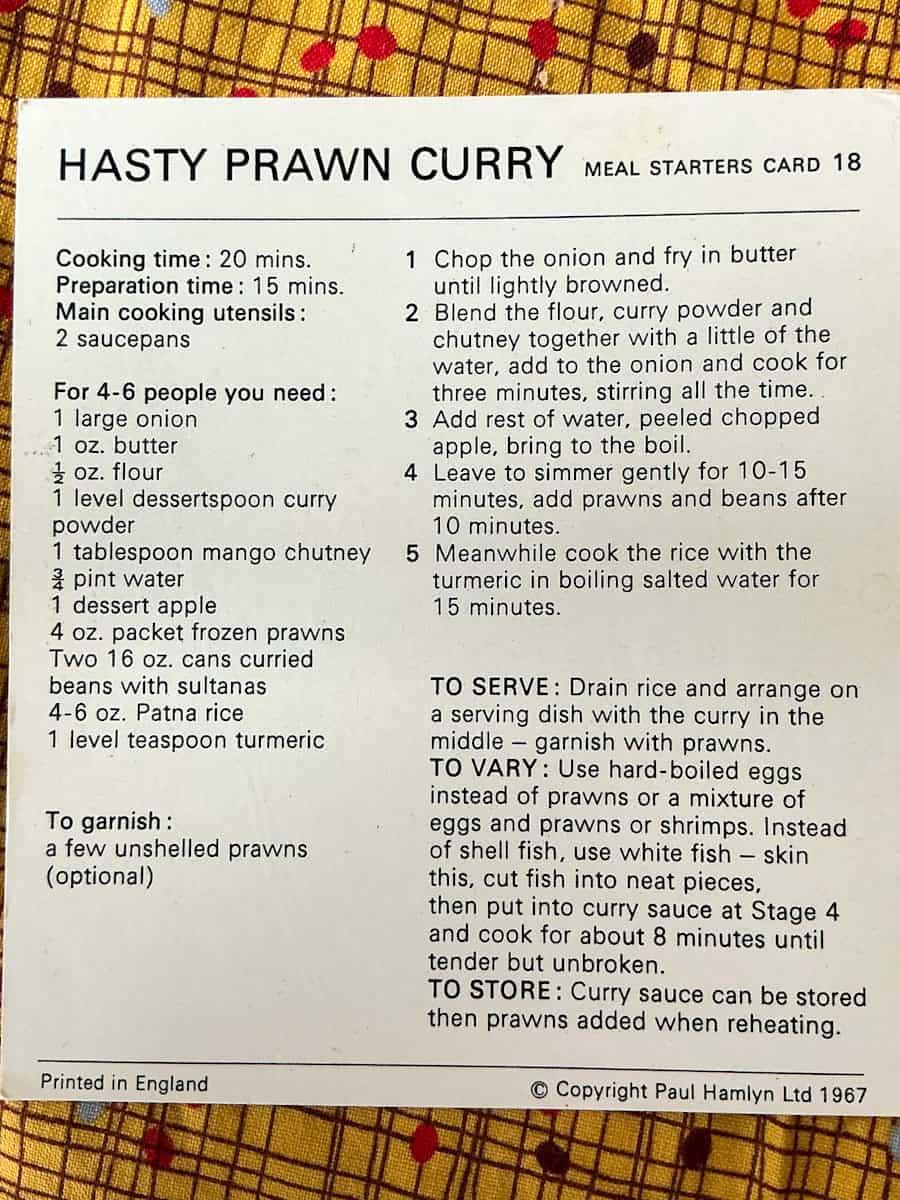
- Original recipe: A quick light curry made with prawns & canned curried beans and served with turmeric rice. Recipe card number 18 'Meal Starters Card' from Margeruitte Patton Recipe Box Set.
- Serves: 4
- What I changed: Used bamboo shoots, mini corncobs and beansprouts instead of prawns, a can of butter beans instead of canned curried beans & sultanas, & dairy-free margarine instead of butter. Also added seaweed for a fishy-sea flavour.
- My notes: This was a surprisingly delicious curry with a nice mix of fruity, sweet & savoury, curry flavours. The bamboo shoots provided a nice bite and a subtle acidic flavour, while the corn cobs gave a nice sweet firm texture, and the butter beans were deliciously creamy. The seaweed was a very nice addition and worked really well with the curry flavours.
- Ingredients:
- 1 can [14oz] butter beans, or 240 grams of cooked butter beans
- 1 ½ tablespoons curry powder, I used mild madras curry powder
- 2 tablespoons dairy-free margarine
- 1 ½ tablespoons [15 grams] plain flour
- 1 ½ tablespoons mango chutney
- 400 millilitres [14oz] vegetable stock
- 1 large onion, about 240 grams, [8 ½ oz] sliced
- 1 dessert/eating apple, peeled & fine diced
- 1 can bamboo shoots, [120 grams [4oz], weight is for drained bamboo shoots] can replace wth same amount of mung beansprouts
- 2 packets of mini corncobs, [250 grams or 9oz in total] sliced into 1 inch [2 ½ cm] pieces and then sliced in half lengthwise several times to create thinner long pieces. The thinner tapered edges look like curled prawns and I kept some of those back to use as a garnish similar to the original recipe photo.
- 5 grams dried seaweed, I used Wakame which I re-hydrated in boiling water for 5 or so minutes before draining and using for the recipe.
- Accompaniment suggestion: 4-6 oz basmati or long-grain rice & 1 teaspoon of turmeric powder cooked together according to rice package instructions - however prepare as much rice as you require.
- Method: Cook the onion in the margarine over a low-medium heat for about 10 minutes until lightly browned.
- Add the flour, curry powder, and mango chutney to 4 tablespoons of the vegetable stock and mix well.
- Stir the mixture through the onions, add a lid to the pan. Cook, and stir a few times, for 5 minutes.
- Pour in the remaining vegetable stock and stir through the apple, bamboo shoots, butter beans and mini corn cob pieces. Bring to the boil and simmer for 15 minutes.
- To finish stir through the garam masala and seaweed. Season to taste.
- Serving suggestion: Serve the curry with rice, extra mango chutney, and add a coriander garnish if liked. Garnish with any of the thinly sliced ends of the corn cobs that you might have kept back. Naan breads or popadoms are also a nice accompaniment.
If you liked this quick vegan prawn curry then you will likely enjoy this other easy & quick curry: Vegan Thai Red Sweet Potato, Broccoli & Chickpea Curry.
🍽️ Spaghetti Carbonara (1977) Re-Made Vegan!
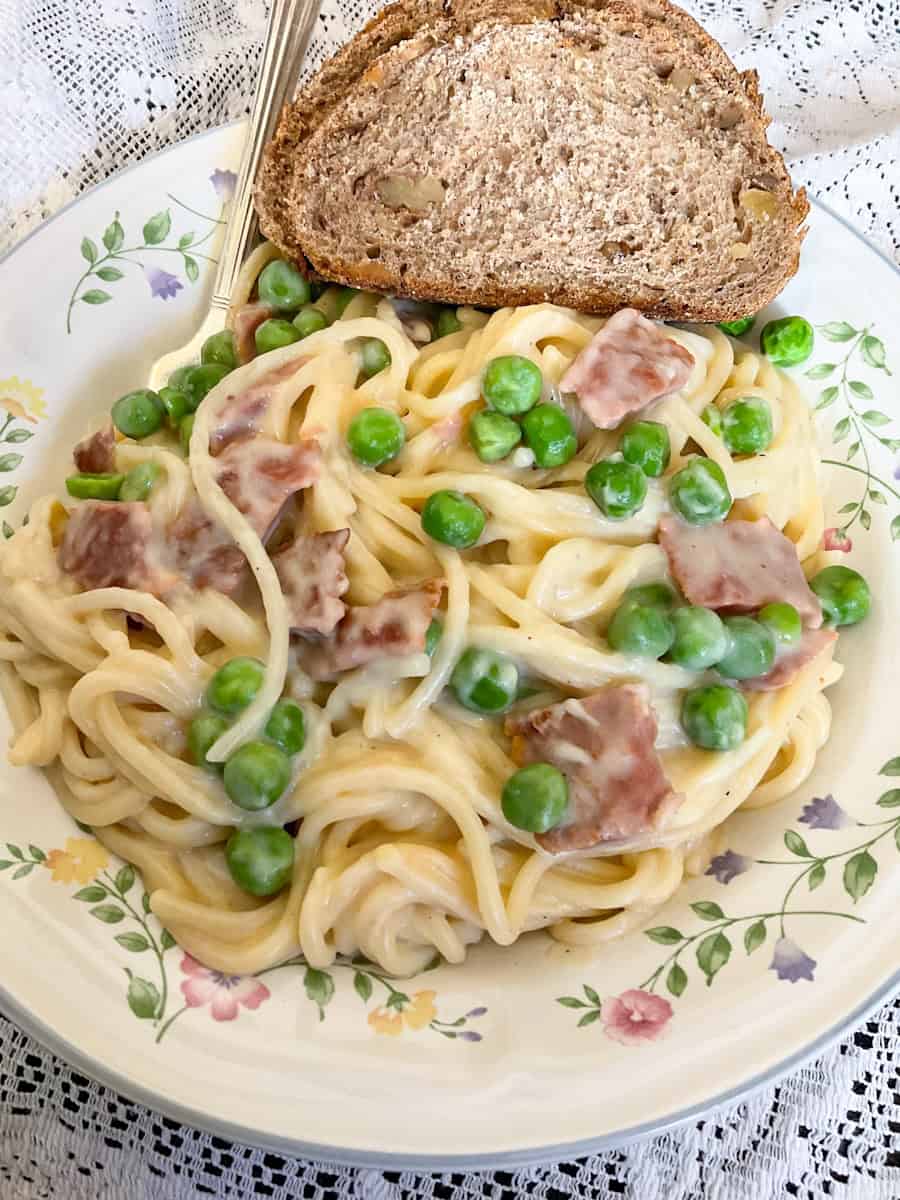
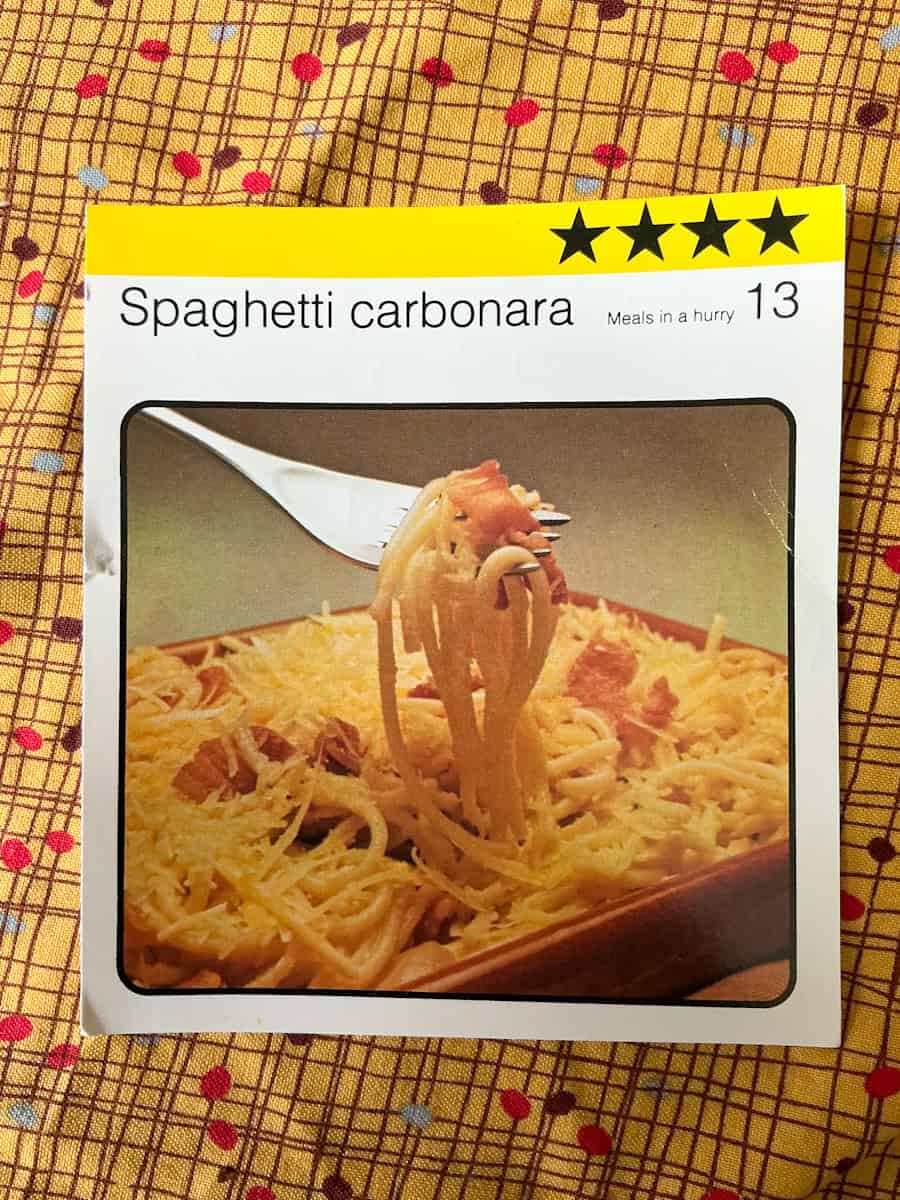
- Original recipe: Rashers streaky bacon, large eggs, grated cheddar or parmesan cheese, this is a no flour recipe as 4 raw whisked eggs are mixed through the cooked spaghetti instead. Recipe card number 13 'Meals in a Hurry' from Kathie Webber's All-Star Cookery Club.
- Serves: 4
- What I changed: Swapped egg for a simple white sauce seasoned with garlic & onion powder, and dairy-free cheese instead of cheddar. I used Morrisons cheddar alternative.
- My notes: This was a hit with the family who loved the creamy cheesy flavours and the bacon flavours provided by the meat-free bacon. I will be making this recipe again as its tasty, as well as being quick and easy and only requiring a few ingredients.
- Ingredients:
- 350 grams [12 oz] spaghetti, or your preferred amount
- 1 packet of vegan bacon or vegan deli ham slices, I used 'This Isn't Bacon Plant-Based Rashers' 120 grams [about 4 oz].
- 250 grams [9 oz] frozen peas
- White sauce: 500 millilitres [17 fl oz] oat or soya milk
- 2 tablespoons [30 grams] plain flour
- 2 tablespoons [40 grams] dairy-free margarine or butter
- 1 teaspoon garlic powder & 1 teaspoon onion powder
- 70 grams [2 ½ oz] dairy-free cheese
- Salt & pepper
- Method: Cook the vegan bacon according to package instructions. Once its cooled slice it up. If using vegan deli ham this doesn't need to be cooked so just slice it into pieces.
- Cook the spaghetti according to the packet instructions while the sauce is prepared, after 4 minutes of cooking the spaghetti add in the frozen peas and bring the liquid back to the boil and continue cooking until the spaghetti is done.
- Once the spaghetti is cooked drain the liquid.
- While the spaghetti cooks prepare the sauce: Melt the margarine, then stir through the flour and cook & stir for 2 minutes.
- Slowly whisk through the milk.
- Whisk in the garlic & onion powder and some salt & pepper.
- Gently simmer for 3-4 minutes, stirring frequently.
- Mix in the dairy-free cheese.
- Next stir in the vegan bacon into the sauce.
- Season to taste.
- Mix the spaghetti through the sauce.
- Serving suggestion: Garnish with nutritional yeast flakes or some dairy-free cheese, sliced spring onions (green onions) would also be a nice addition. Crusty bread is a nice accompaniment as is a green salad.
For another really easy vegan pasta meal do try this Vegan Cheesy Pasta as it's prepared all in one pot and the flavours are really delicious. My daughter loves cheesy pasta leftovers for her work lunch, she used to also take it to college for lunch, and I often cook a big pot of this pasta just so she can have it for budget-friendly work lunches throughout the week.
🍽️ Cutlets With Onion Sauce (1977) Re-Made Vegan!
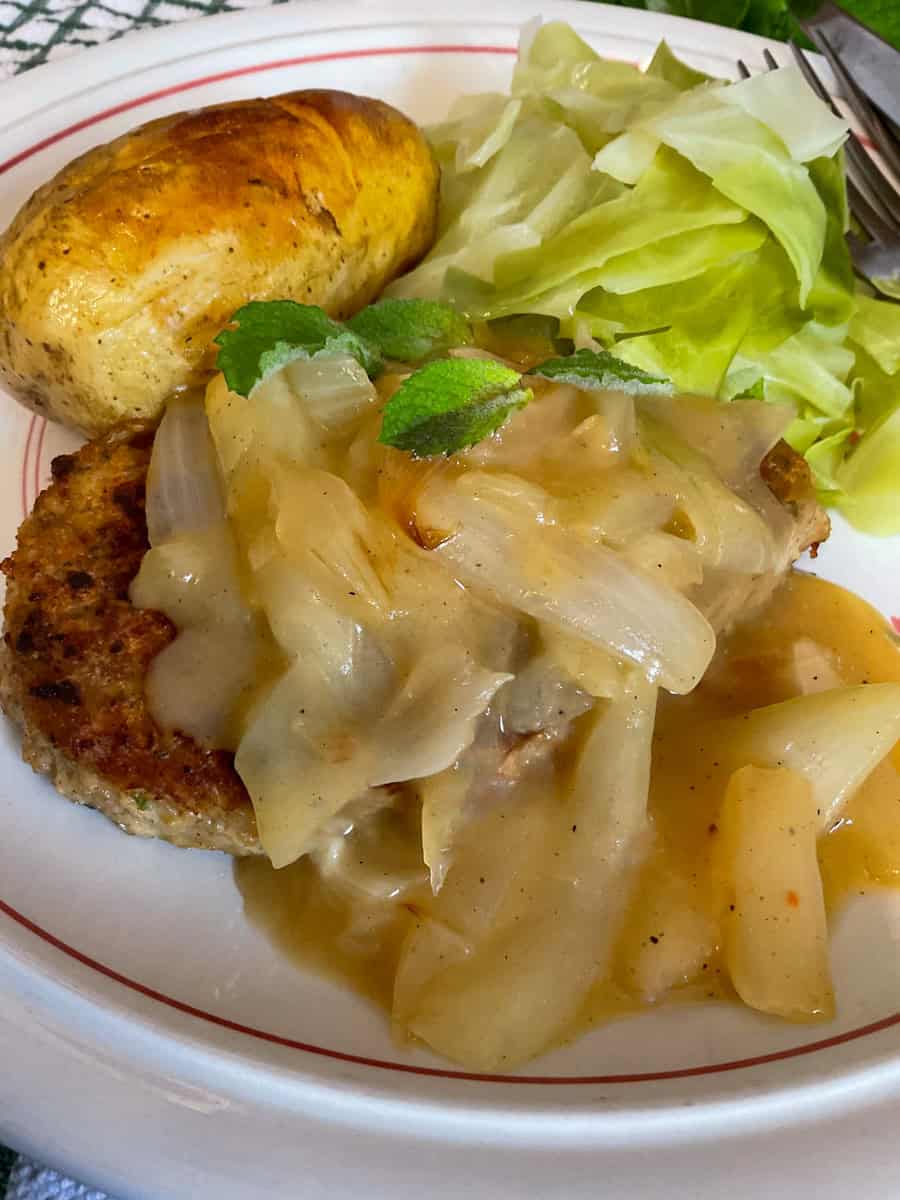

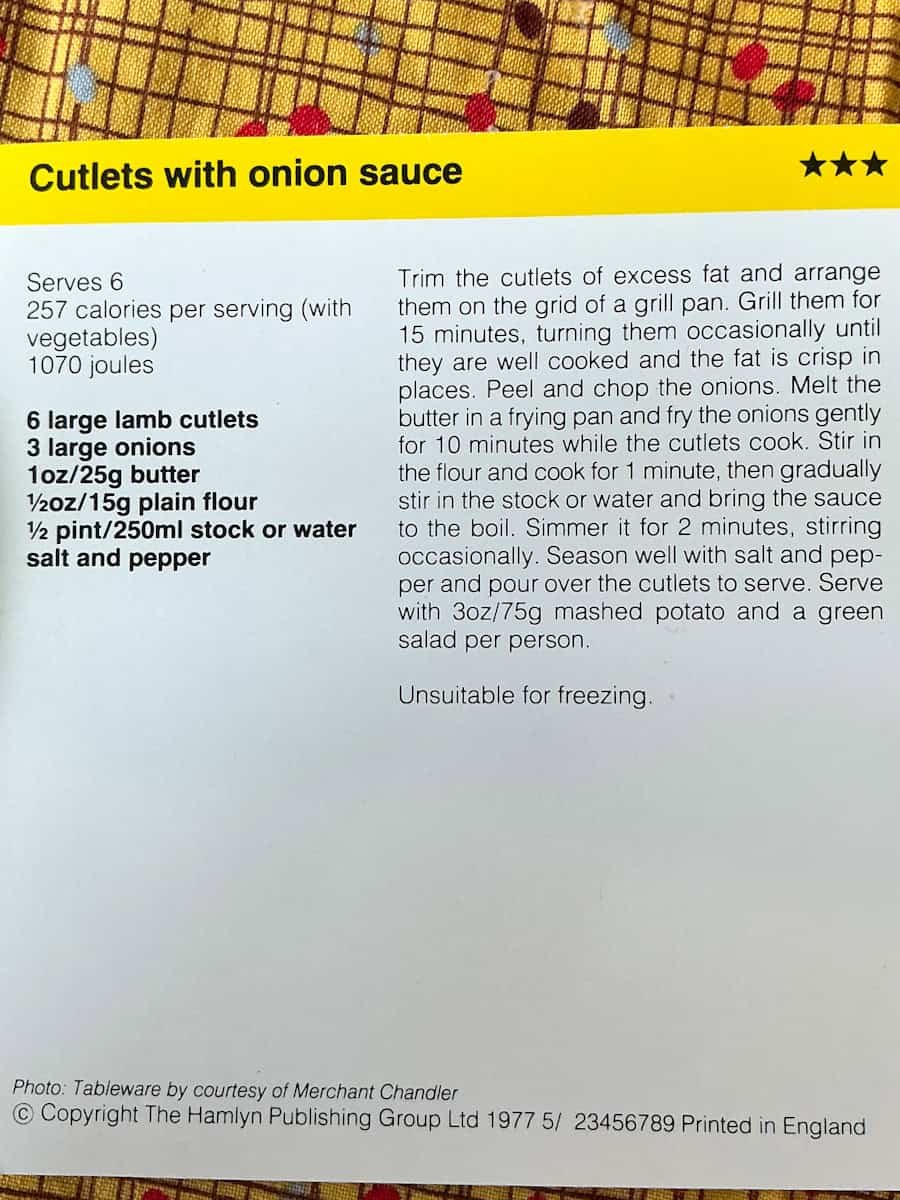
- Original recipe: Ready-prepared lamb cutlets with a home-made onion sauce. Recipe card number 2 'Meals in a Hurry' from Kathie Webber's All-Star Cookery Club.
- Serves: 4
- What I changed: Used meat-free cutlets & vegan butter. I also increased the amount of vegetable stock and flour while reducing the amount of onions required as I was making 4 portions instead of 6.
- My notes: This makes a nice thick onion sauce or topping that is creamy, sweet & savoury. The texture of the onions and the flavour of the sauce is very nice. I will be making this sauce again. I think it would make a tasty topping for vegetable burgers/patties. When I served this up to my adult daughter she commented - this looks very old-fashioned! And yes it does look like a nice homely meal which is what I love!
- Ingredients: 4 meat-free cutlets, I used Linda McCartney vegetarian lamb cutlets which state on the packaging that they are also Vegan approved. Alternatively, you could use Portobello or large mushrooms instead of the cutlets.
- 2 large onions, chopped into thin slices [540 grams/19oz prepped onions]
- 25 grams (1oz) plain flour
- 25g (1oz) dairy-free butter or margarine
- 350 millilitres [12 floz] vegetable stock
- Salt & pepper to taste
- My optional garnish suggestion: Mint leaves for garnish as they go very well with the onion sauce.
- Method:
- Cook the cutlets according to the package instructions while you prepare the sauce.
- Melt the dairy-free butter in a pan and cook the onions over a low-medium heat for 10 minutes, stirring frequently.
- Stir through the flour and stir & cook for 1 minute.
- Add the vegetable stock gradually, stirring, until fully incorporated.
- Gently simmer for 2-3 minutes. Stir frequently.
- Season to taste with salt & pepper.
- Serve the cutlets with the sauce spooned over. Garnish with some chopped mint if using, or perhaps a spoonful of mint sauce from a jar.
- Serving suggestion: Mashed potatoes or jacket potatoes & a green vegetable such as cabbage/kale or a green salad.
- My leftovers suggestion: Mix a little dairy-free unsweetened milk through the leftover onion sauce and reheat. I reheated in a microwave and served this over toasted bread for next-days lunch and it was very nice.
This onion sauce recipe would also go really well with our Vegan Meatloaf recipe.
🍽️ Cheesy-Baked Vegetables (1977) Re-Made Vegan!

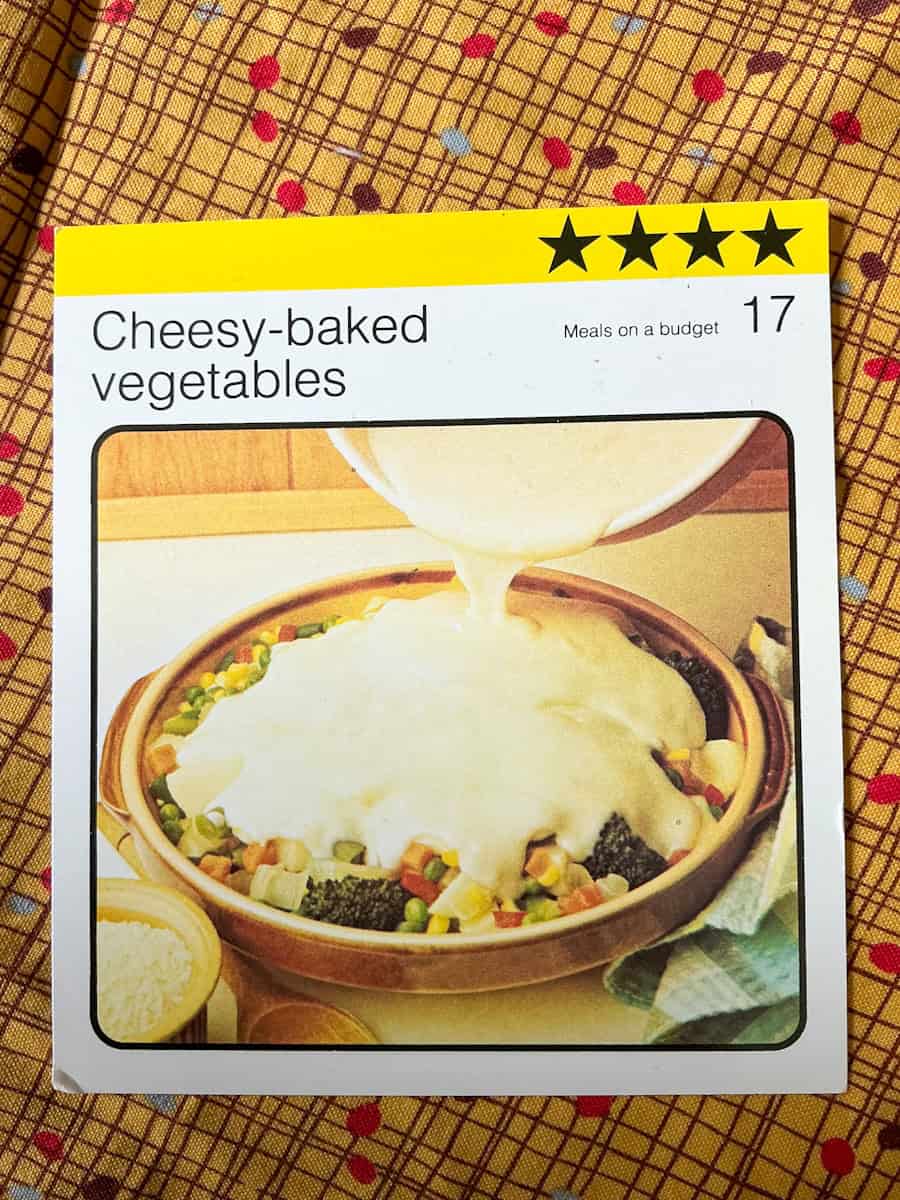
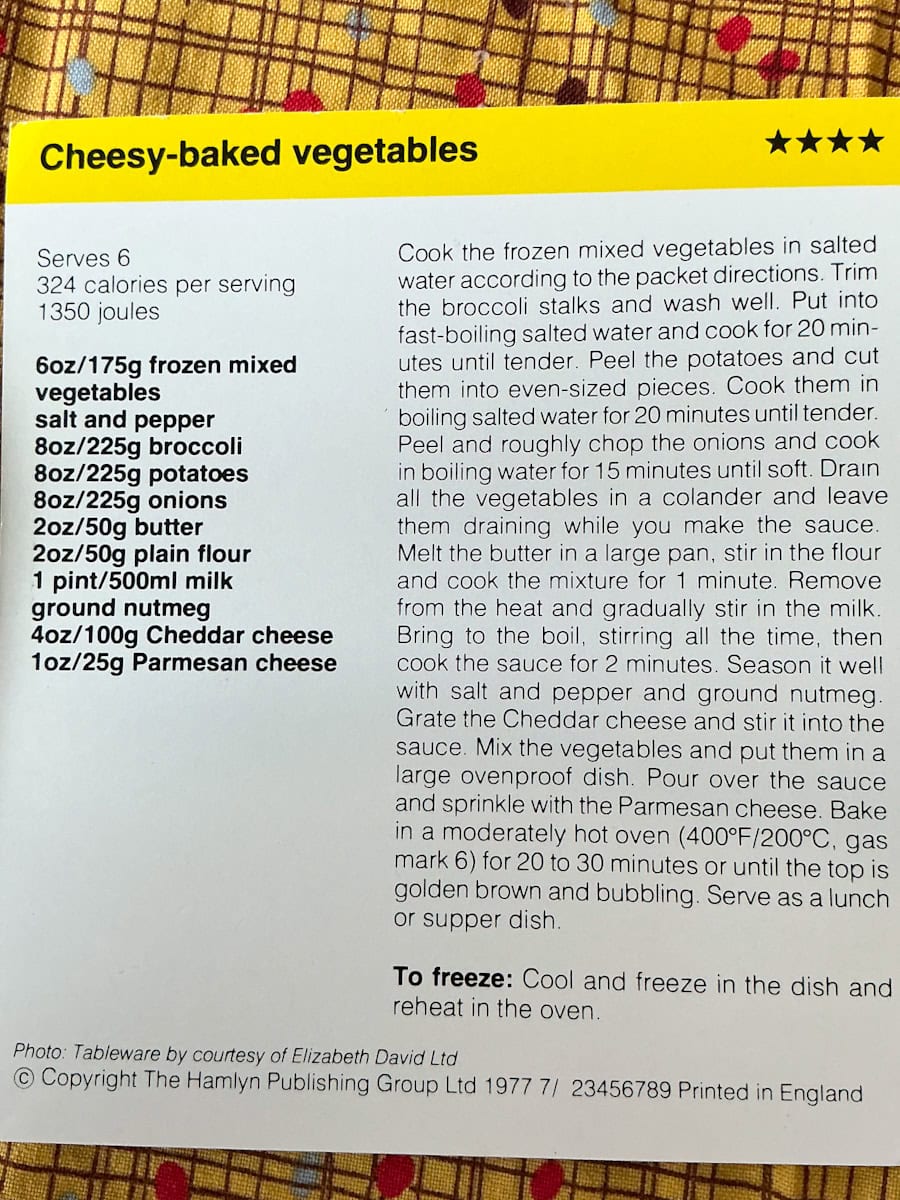
- Original recipe: Butter, cheddar cheese, Parmesan cheese, milk. Recipe card number 17 'Meals on a Budget' from Kathie Webber's All-Star Cookery Club.
- Serves: 4-6, depending on accompaniments & appetites.
- What I changed: Used vegan butter or dairy-free margarine, nutritional yeast flakes instead of Parmesan and dairy-free alternative to cheddar (Morrisons supermarket own brand) instead of cheddar cheese, & also used soya milk. Additionally I increased the amount of vegetables and potatoes, as well as used more milk. I replaced ground nutmeg with turmeric powder. I also found that more time was needed to bake the cheesy vegetables for a nice golden topping.
- My notes: This was an easy recipe that could be even easier if left-over vegetables and potatoes are used as these will be already cooked. It has nice cheesy flavours which went really well with the vegetables and potatoes. I served it up with slices of seeded bread and my family recipe for home-made lentil soup. I had leftovers so the next day I mashed these a little and mixed some plain flour in. I shaped the mixture into patties and fried them off. I had a couple for lunch with a scoop of dairy-free Oatly crème fraîche. The patties were very tasty and I will definitely be making this recipe again, possibly just so I can prepare more patties.
- Ingredients: (Any mixture of vegetables will work fine for this recipe so feel free to substitute any of the vegetables for those you prefer)
- 230 grams [8oz] frozen mixed vegetables
- 350 grams [12oz] broccoli, prepared into small florets, stalk can also be used - peel and slice into thin batons
- 400 grams [14oz] potatoes, chopped into bite-sized pieces
- 245 grams [9oz] or 1 large onion, diced
- 50 grams [2oz] vegan butter or dairy-free margarine
- 50 grams [2oz] plain flour
- 600 millilitres [just over 20 fl oz] dairy-free milk, I used unsweetened soya milk
- ¼ teaspoon turmeric powder
- 1 teaspoon garlic powder
- 1 teaspoon onion powder
- 100 grams [4oz] dairy-free cheese
- 1 tablespoon nutritional yeast flakes
- Salt & pepper to taste
- Method:
- Cook the frozen vegetables & broccoli together for about 5 minutes, drain.
- Cook the potatoes & onions in boiling water until the potatoes are just soft, drain.
- (I reserved both of the cooking liquids to add to a vegetable stock to prepare a lentil soup which my family had as an accompaniment with this recipe)
- Melt the butter in a pan and stir through the flour.
- Take the pan off the heat while you pour in the milk in stages whisking constantly.
- Place the pan back on the heat and bring to a gentle boil, stirring.
- Cook for 2 minutes, stirring frequently.
- Whisk in the turmeric, garlic & onion powders.
- Season with salt & pepper to taste, and simmer for another minute.
- Stir the dairy-free cheese into the sauce.
- Place the cooked vegetables into an oven-proof dish.
- Pour the sauce over and sprinkle with nutritional yeast flakes or extra cheese.
- Bake at 200°C / 180°C Fan / 400°F / Gas Mark 6 for 35-40 minutes or until the top is bubbling and golden.
- Serving suggestion: Serve with peas & a green salad, and perhaps a wedge of crusty bread or dinner rolls. The original recipe states this is a lunch or supper dish. My family had slices of seeded bread and a bowl of lentil soup as accompaniments.
- Variation: Prepare this recipe as a vegan cauliflower cheese instead. To do this make the cheese sauce and cook cauliflower florets until just soft. Add the cauliflower to an oven proof dish and pour over the cheese sauce and proceed with the recipe above. See the image below for a cauliflower cheese I prepared with the cheese sauce recipe - I used extra dairy-free cheese to top the sauce.

If you enjoyed this cheesy vegetable recipe you will likely also like one of our other family favourite meals this very easy Vegetable Hotpot.
🍽️ Curried Mince (1978) Re-Made Vegan!

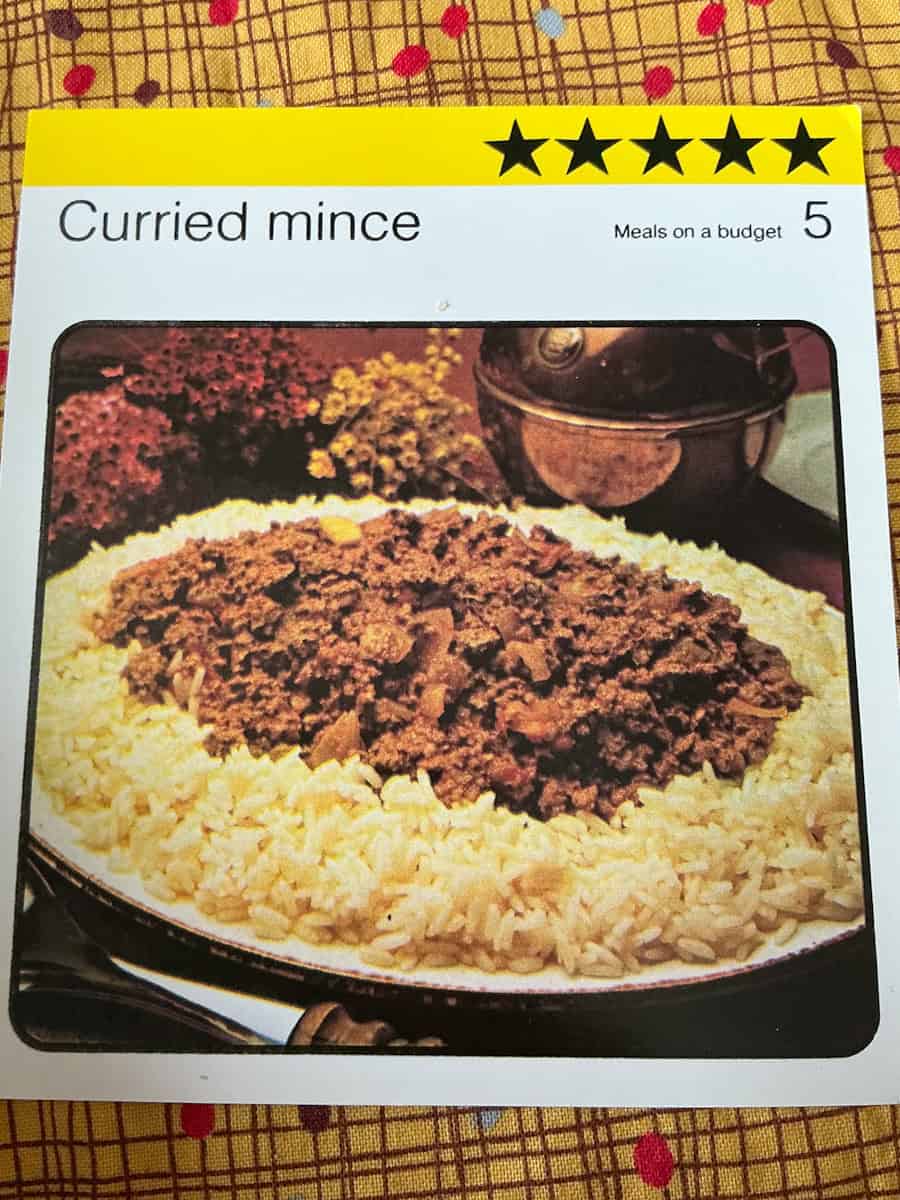

- Original recipe: Beef mince cooked with canned tomatoes & curry flavours. This is very similar to a Keema curry. Recipe card number 5 'Meals on a Budget' from Kathie Webber's All-Star Cookery Club.
- Serves: 4
- What I changed: Used green lentils instead of beef mince and mango chutney instead of curry paste. The original recipe calls for both curry powder and curry paste so as I had some mango chutney left over from the hasty prawn curry recipe I decided to use this instead of the paste. I also increased the amount of curry powder slightly and included some soy sauce and tomato puree.
- My notes: I really enjoyed the curried lentils. The flavours were fruity and savoury with lovely spicy curry flavours. The green lentils worked really and added to the flavours and a nice bite texture. My daughter took leftovers for her work lunch the next-day, and I tasted a bit of the curried lentils whilst they were chilled and it tasted even better! I will be making this recipe again.
- Ingredients:
- 1 large onion, fine chopped, about [240 grams/8oz], prepared
- 1-2 tablespoons oil
- 600 grams [21oz] of cooked whole green or brown lentils or 3 x 400 grams [14oz] cans of lentils, with the liquid drained
- 1-2 bay leaf (if cooking your own dried lentils for this meal then use about 260 grams of dried green lentils and add the bay leaf to the lentils as they cook. If using canned lentils add the bay leaf along with the chopped tomatoes.)
- 1 can [14oz] chopped tomatoes
- 1 tablespoon tomato puree [paste]
- 1 ½ tablespoon mild curry powder, I used mild madras curry powder
- 1 ½ tablespoon mango chutney, or replace with curry paste
- 1 tablespoon soy sauce
- salt & pepper
- Optional additions: Add a cup or two of frozen peas along with the canned tomatoes.
- Method:
- If using dried lentils cook these according to the package instructions and include the bay leaf. Once cooked drain the liquid. (The liquid can be reserved and used as a base to prepare a vegan gravy or added to stews or soups as lentils cooked with bay leaf produces a very nice flavoured base)
- Heat the oil over a medium heat and cook the onion in a large frying pan for 5 minutes, stirring frequently.
- Stir in the curry powder, mango chutney & tomato paste, stir and cook for 1 minute.
- Stir through the cooked lentils.
- Pour in the canned tomatoes and soy sauce. Season with salt & pepper.
- Bring to the boil and over a low-medium heat cook for 20 minutes until the curried lentils are nice and thick. If having rice this is a good time to prepare.
- Season to taste.
- Serving suggestions: Rice, naan breads, mango chutney, vegan plain yogurt, or use the curried lentils as a side or accompaniment to another curry.
For another vegan mince recipe which also uses green lentils have a look at our Slow Cooker Spaghetti Bolognese recipe. I make this recipe at least once a month as its nice and easy.
🍽️ Pasta With Spinach & Herbs (1967) Re-Made vegan!
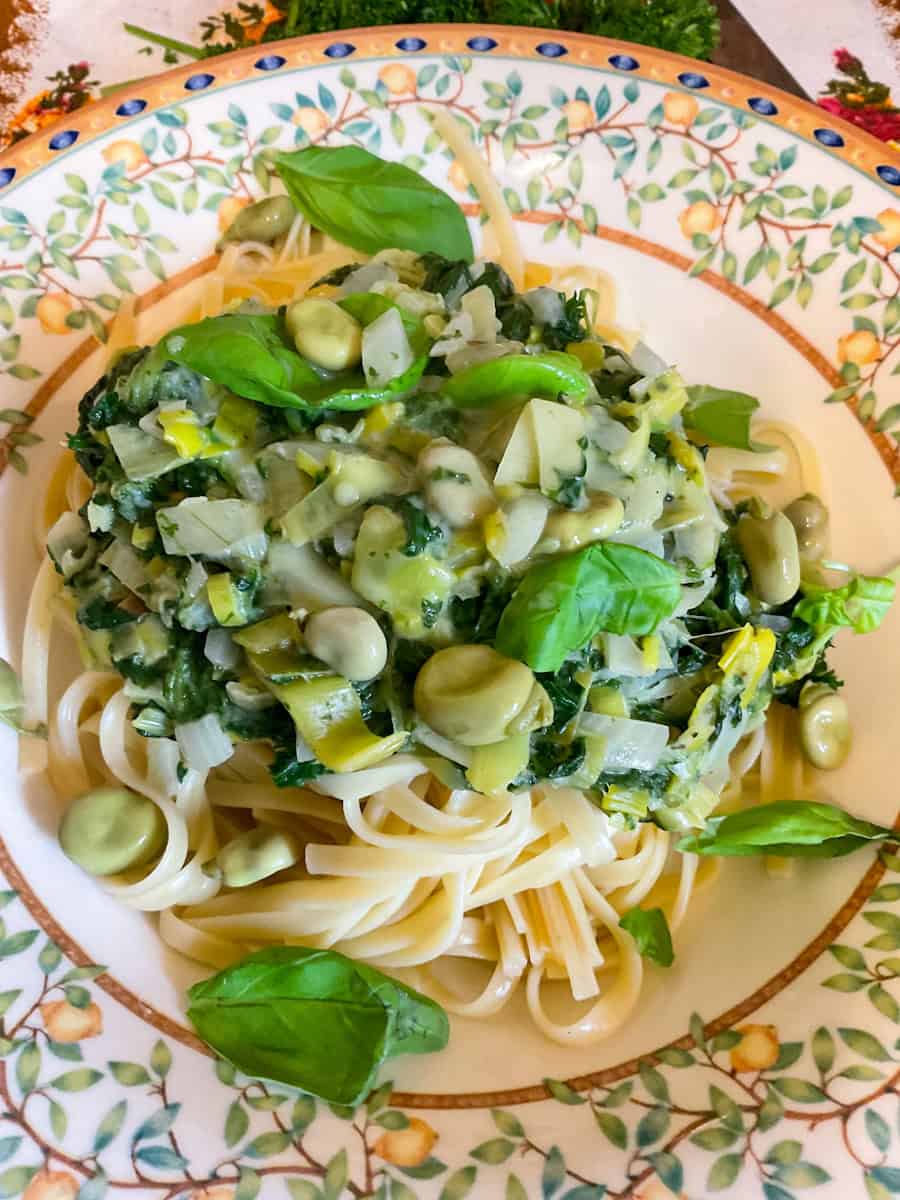

- Original recipe: Creme fraiche
- What I changed: Used dairy-free Oately creme fraiche
- Serves: 4
- My notes: This was a very nice fresh tasting creamy pasta sauce which was quick and easy to prepare. I will be making this again as its easily adaptable and is a good way to make use of frozen spinach.
- Ingredients:
- 2 small leeks [345 grams/12oz prepared leeks], sliced thin
- 1 onion, [230 grams/9oz], finely chopped
- frozen spinach, [280 grams/10oz] thawed, drained & pressed to get rid of the excess water
- 1 tablespoon oil
- 2 garlic cloves, fine diced
- 250 millilitres [9 fl oz/ 1 cup plus 1 tablespoon] vegetable stock
- 1 teaspoon dried oregano
- small bunch fresh basil [about 9 grams/½oz]
- small bunch fresh parsley, sliced [about 115 grams/ ½oz]
- salt & pepper
- 4 tablespoons dairy-free crème fraîche, such as Oatly crème fraîche
- 350 grams [12oz] tagliatelle or spaghetti pasta
- Garnish: extra fresh basil
- Method:
- Warm the oil in a non-stick frying pan.
- Cook the onion and garlic for 5 minutes over a low heat.
- Stir through the leek and cook for 2-3 minutes, stirring frequently.
- Pour in the vegetable stock and gently boil over a medium heat for 10 minutes.
- Meanwhile prepare the tagliatelle according to package instructions.
- Stir in the spinach, oregano, basil and parsley into the leek mixture.
- Season with some salt & pepper.
- Bring the sauce back to the boil.
- Remove from the heat and stir through the crème fraîche - adding more if liked.
- Serve the tagliatelle with the sauce poured over or stir the sauce through the pasta.
- Garnish with extra fresh basil.
- Serving suggestion: Garlic bread or crusty bread, fresh salad.
For another easy vegan pasta recipe that is ideal for quick mid-week meals do have a look at our Cabbage & Noodles recipe.
🍰 Week One - Seven Vintage Desserts, Puddings & After Dinner Treats Recipes 🍰
Recipes include recipe cards from the sections 'Pasta and Rice', Meals on a Budget', 'Small Cakes and Biscuits', 'Hot Puddings', 'Winter Warmers' & 'Traditional Dishes'.
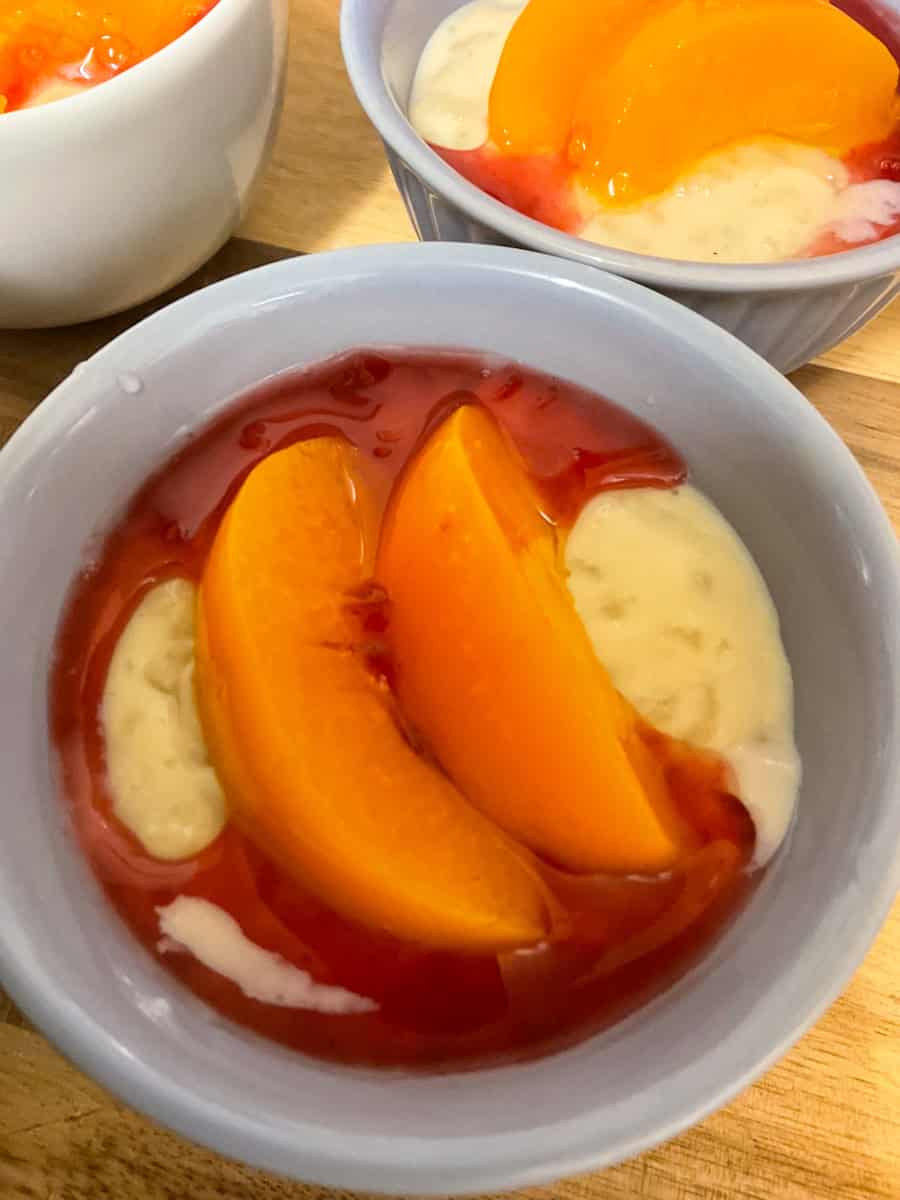
🍰 Rice Conde (1978) [Chilled Rice Pudding With Canned Peaches And Jam Sauce] Re-Made Vegan!


- Original recipe: Short-grain rice cooked with milk & sugar, topped with peaches and a quick jam sauce. Recipe card number 10 'Pasta and Rice' from Kathie Webber's All-Star Cookery Club.
- Serves: 4
- What I changed: Used soya milk & pudding rice
- My notes:
I used a slow cooker to cook the rice as its much easier & fuss-free. The rice pudding might seem thin when cooked but as it cools it will continue to thicken up nicely. This was a lovely easy retro pudding similar to Mueller rice corners so this recipe is a nice vegan alternative to Mueller rice corners and similar chilled puddings. I wanted to prepare more servings so I doubled all the ingredients and prepared 8 portions using ramekin dishes. - Ingredients:
- 40 grams [1½] short-grain rice or pudding rice
- 500 millilitres [18oz] dairy-free milk
- 40 grams [1½oz] caster or granulated sugar
- 400 grams [14oz] can of peach halves or peach slices
- 75 grams [3oz] strawberry jam & 2 tablespoons of water mixed together
- Method:
- Add the rice, sugar and milk to a non-stick pan and cook until the rice is creamy and soft. You will have to stir the rice frequently as it cooks over a low heat to prevent it catching and burning, this can take up to 2 hours. The vintage method had the rice cooking on the top of a double saucepan (double boiler) to avoid the mixture directly contacting the bottom of the saucepan and being too close to the heat. Instead of this method I cooked the rice mixture in a small slow cooker on the high setting for 3-4 hours and I stirred it once about half way through cooking. (For more information about cooking rice pudding in a slow cooker have a look at my vegan slow cooker rice pudding recipe.)
- Cool the rice pudding before dividing it out between 4 small serving bowls. The original recipes recommends glass serving dishes. I used 4 ramekin bowls.
- If your rice pudding seems thin it will be fine as it will thicken up as it cools.
- Place a peach half or a few peach slices on top of each bowl of rice pudding.
- To prepare the jam sauce place the jam in a saucepan and if it is a thick jam then stir through 2 tablespoons of cold water. Heat the sauce over a low heat until it is hot. Take the saucepan off the heat and leave it for a few moments to cool slightly before pouring over the peach halves.
- Place the bowls in the refrigerator so that the puddings can chill before eating.
- The original recipe card states this ''Cook's Tip: Although it takes longer on the stove, the rice will remain creamy-white. If you bake it in the oven, remove the skin before continuing with the recipe.''
For another chilled dessert you may also like this Vegan Chocolate Custard Pudding.
🍰 Baked Rice Pudding (1977) Re-Made Vegan!

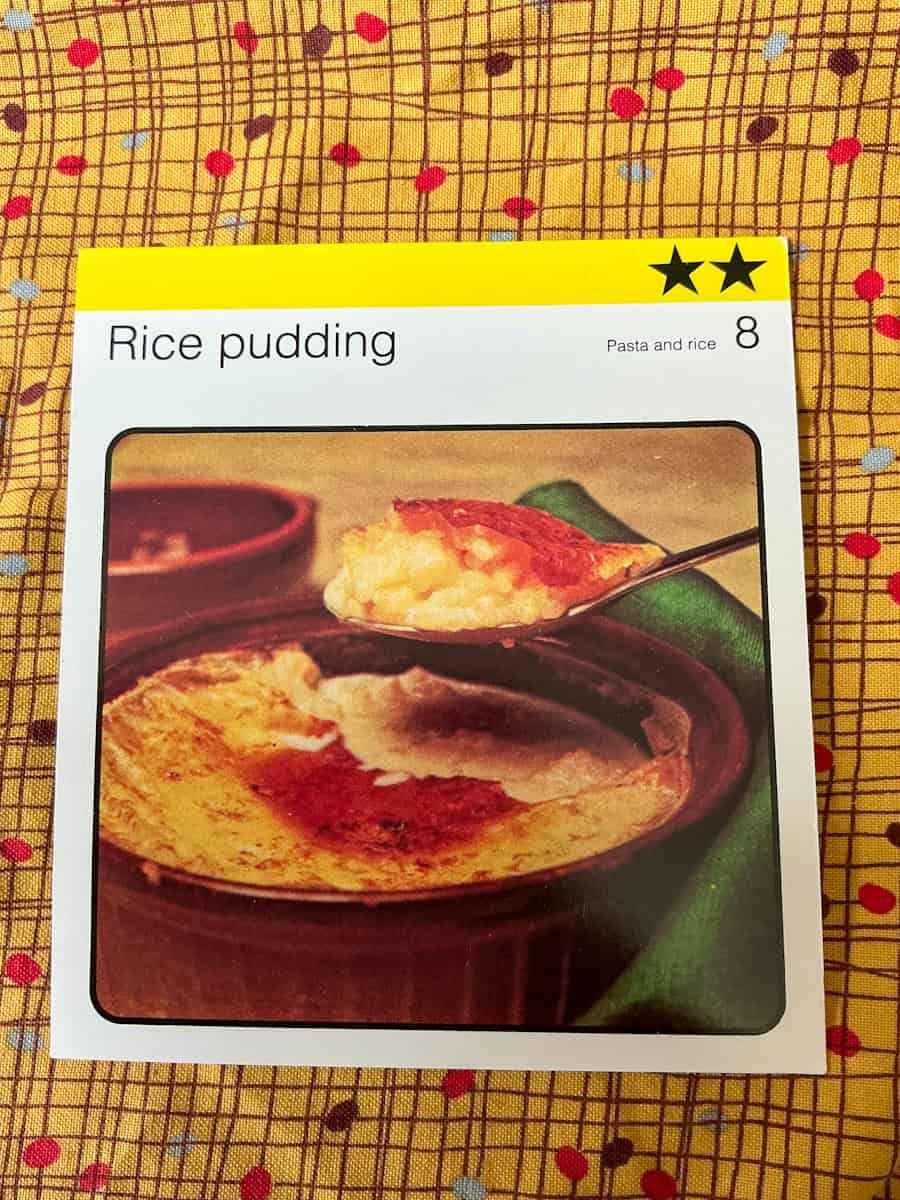

- Original recipe: Round-grain rice baked with sugar and milk. Recipe card number 8 'Pasta and Rice' from Kathie Webber's All-Star Cookery Club.
- Serves: 4 (however for good sized portions I would say this serves 2, three at a push which is what I did but one of my adult kids mentioned that it didn't feel like enough pudding for her! So I would recommend doubling the recipe for 4 servings as leftovers can always be enjoyed chilled or reheated)
- What I changed: Used soya milk and pudding rice.
- My notes: I liked preparing this vintage rice pudding in the oven as it's the traditional old-fashioned method but to save energy you could use the oven for something else at the same time such as a batch of slow-baked or jacket potatoes. Rice pudding baked in the oven creates a skin over its surface which just needs pulled away although some people do enjoy the rice pudding skin! Compared to slow cooker or stove-top rice pudding, the rice has a chewier thicker bite which is very nice. I will use this recipe again especially if I am already using the oven to bake something that takes awhile.
- Ingredients:
- 40 grams [1½ oz] round-grain rice or pudding rice
- 500 millilitres [1 pint or 17fl oz] dairy-free milk
- 25 grams [1oz] caster or granulated sugar
- ground nutmeg or cinnamon
- Method:
- Add the rice to an ovenproof dish along with the sugar and milk.
- Stir and add a sprinkle of nutmeg over the surface.
- Bake at 150°C / 130°C Fan / 300°F / Gas Mark 2 for 2 hours (After the first 30 minutes of cooking give the pudding a stir) or until the rice pudding has a golden surface and the rice underneath has cooked through and is creamy and thick - however the pudding may seem a little thin once cooked so give it a good stir and it will thicken up more as it cools.
- The rice pudding will also have developed a milky skin which can just be removed and discarded if preferred.
- Serving suggestion: A spoonful of fruit jam, marmalade or fruit coulis (sauce).
- Variation: Add a handful of raisins or sultanas to the pudding before baking.
For another similar rice pudding recipe we have our family and blog-visitor favourite this Slow Cooker Vegan Rice Pudding and for a fun change this milky sweet Barley Pudding is very good and is also a vintage British recipe.
🍰 Spiced Mandarins (1978) 'Canned Mandarins Baked With A Crumble Topping' Re-Made Vegan!

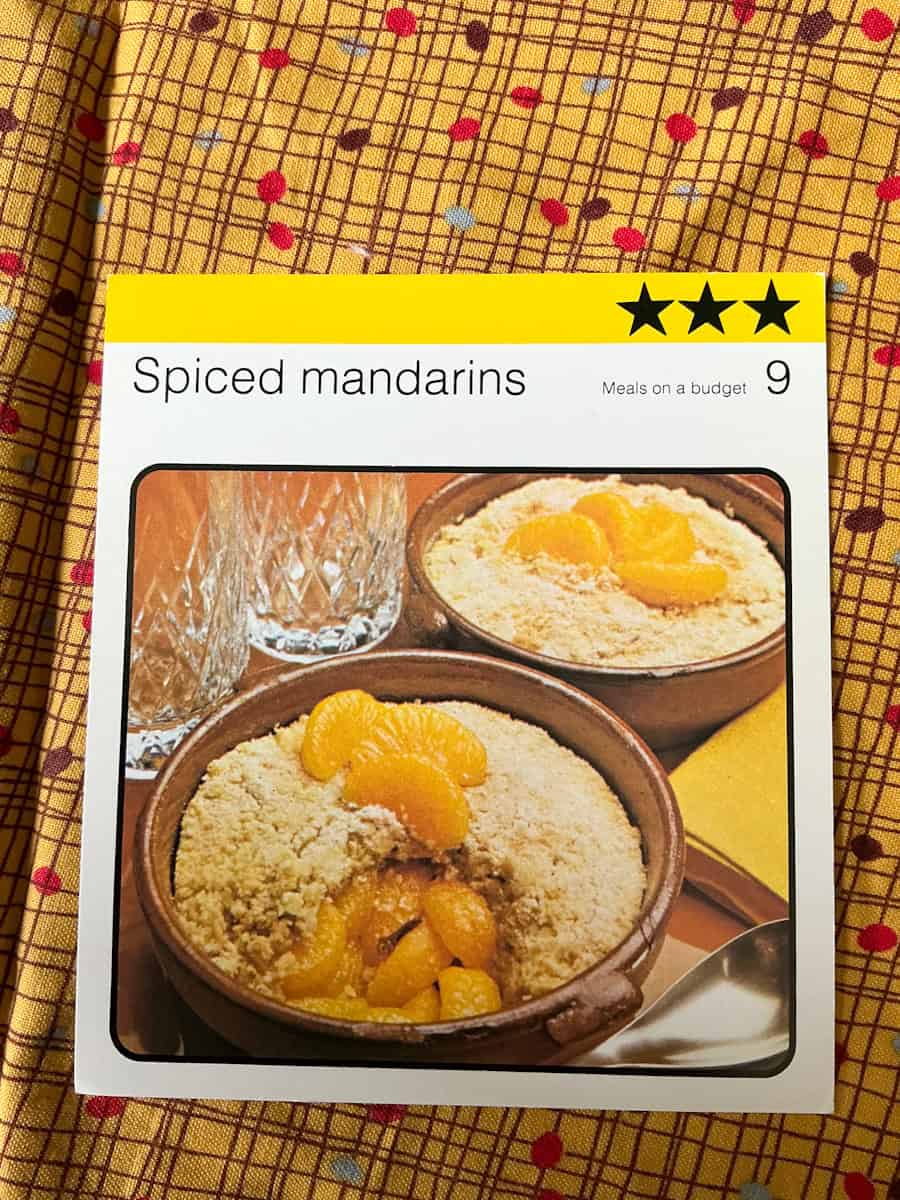
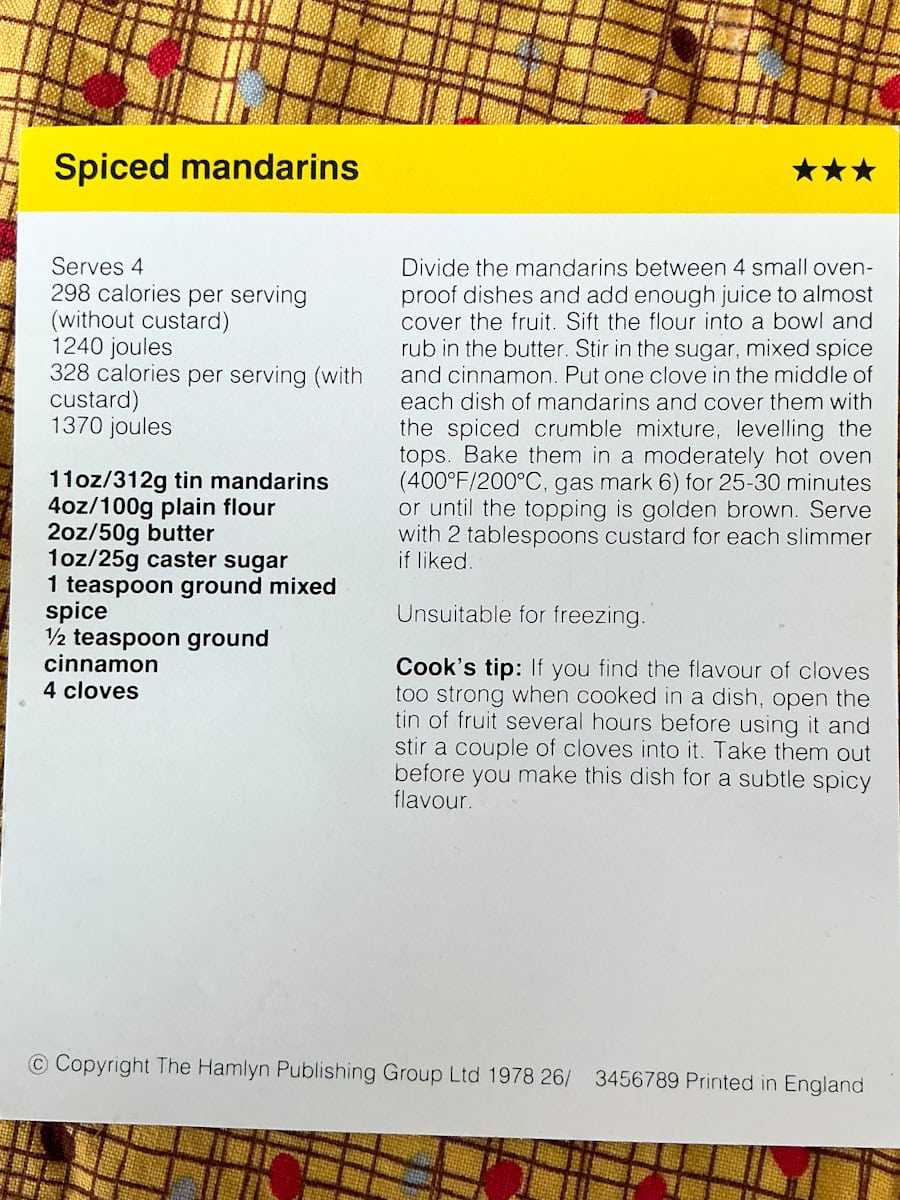
- Original recipe: Canned mandarins baked with a crumbled spiced topping so essentially a mandarin crumble (similar to what's known as a fruit crisp in the US). Recipe card number 9 'Meals on a Budget' section from Kathie Webber's All-Star Cookery Club box set.
- Serves: 4
- What I changed: Used Stork baking spread instead of butter, and extra cinnamon instead of cloves. I also added more sugar to the crumble mixture as the recipe amounts seemed rather small.
- My notes: I enjoyed these little fruit crumbles as the crumble topping was crunchy with warm spices and the mandarins were refreshing and very tasty. I also had one of these crumbles chilled the next day and the crumble topping remained crisp and the mandarin filling was thicker and even more refreshing. I will be making this crumble again perhaps testing it out with a different canned fruit or fruit that I might find in the reduced section such as peaches or plums.
- Ingredients:
- 312 grams [11oz] canned mandarins, drained, syrup or juice reserved, can replace with canned fruit of your choice just use enough to fill your ramekins about three quarters the way up the dish.
- 100 grams [4oz] plain flour, sifted
- 50 grams [2oz] vegan butter or dairy-free margarine
- 60 grams [2½ oz] caster or granulated sugar
- 1 teaspoon ground mixed spice
- 1 teaspoon ground cinnamon
- Optional: 4 cloves or ¼ teaspoon of ground cloves or omit
- Method:
- Share the mandarins out between 4 ramekins or similar sized small oven-proof dishes. Pour into the ramekins some of the canned mandarins juice or syrup so that it covers up ¾ of the way up the mandarins.
- Add the flour and butter (in small pieces) to a bowl and rub the butter into the flour until it resembles breadcrumbs.
- Add the sugar, mixed spice and cinnamon and stir.
- Pop a clove in the middle of mandarins or if using ground cloves add this along with the mixed spice - see above step.
- Divide the crumble mixture between each ramekin and bake on the middle oven shelf at 200°C / 180°C Fan / 400°F / Gas Mark 6 for 25-30 minutes or until the topping is crisp and golden brown.
- Serving suggestion: Dairy-free custard, cream, plain or vanilla yogurt or ice-cream.
For another similar vegan British fruit crumble recipe that can be individually prepared in ramekins we have this delicious English Winter Dried Fruit Crumble.
🍰 Jam Cushions (1978) [Chunky Biscuits Similar To Scones Crossed With Rock Cakes, Shortbread & Vintage Raspberry Buns!] Re-Made Vegan!


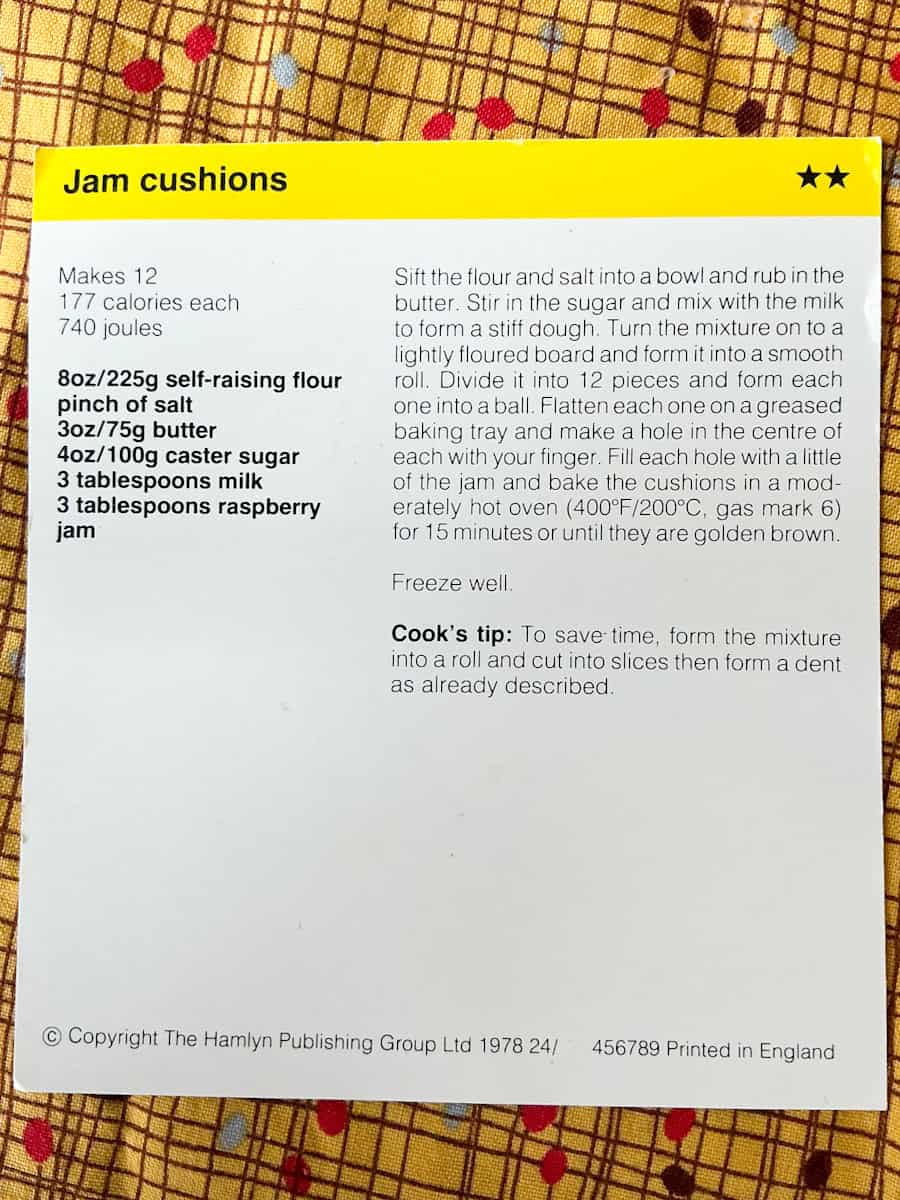
- Original recipe: Butter & milk. Recipe card number 6 'Small Cakes and Biscuits' from Kathie Webber's All-Star Cookery Club.
- Makes: 12 biscuits.
- What I changed: Used Stork margarine & Alpro unsweetened soya milk.
- My notes: These chunky biscuits are like a cross between a scone, a rock cake, and shortbread! They are crunchy on the insides and crumbly and softer on the inside. They are very tasty and moreish and perfect for tea time as they would have been originally intended for.
- Ingredients:
- 225 grams [8oz] self-raising flour, sieved
- pinch of salt
- 75 grams [3oz] dairy-free margarine or butter, suitable for baking
- 3 tablespoons dairy-free milk
- 3 tablespoons raspberry jam, or your preferred jam
- Method:
- Add flour into a mixing bowl and stir through the salt.
- Add the margarine in small pieces.
- Using your fingertips rub the margarine into the flour until it resembles breadcrumbs.
- Mix in the sugar.
- Pour in the milk and with a cutlery knife mix it by cutting through the mixture and mixing it thoroughly.
- Press the mixture firmly together using floured hands and knead firmly in your hands.
- Sprinkle flour on your work surface and shape the dough into a long roll.
- With a sharp knife slice the roll into 12 even-sized pieces and place these onto a baking tray.
- Using your finger gently mould a hole in each biscuit centre and fill each hole up with jam.
- Bake on the middle oven shelf for 200°C / 180°C Fan / 400°F / Gas Mark 6, for 15-20 minutes or until they are golden brown.
- Place on a cooling rack.
- My variation suggestion: Drizzle cooled jam cushion biscuits with a simple water icing, prepared with mixing icing (powdered) sugar and water until a drizzling consistency has formed, and allow the icing to set before eating.
- The original recipe states that these Jam cushions freeze well.
For another traditional British biscuit recipe which features jam have a look at my Empire Biscuit recipe.
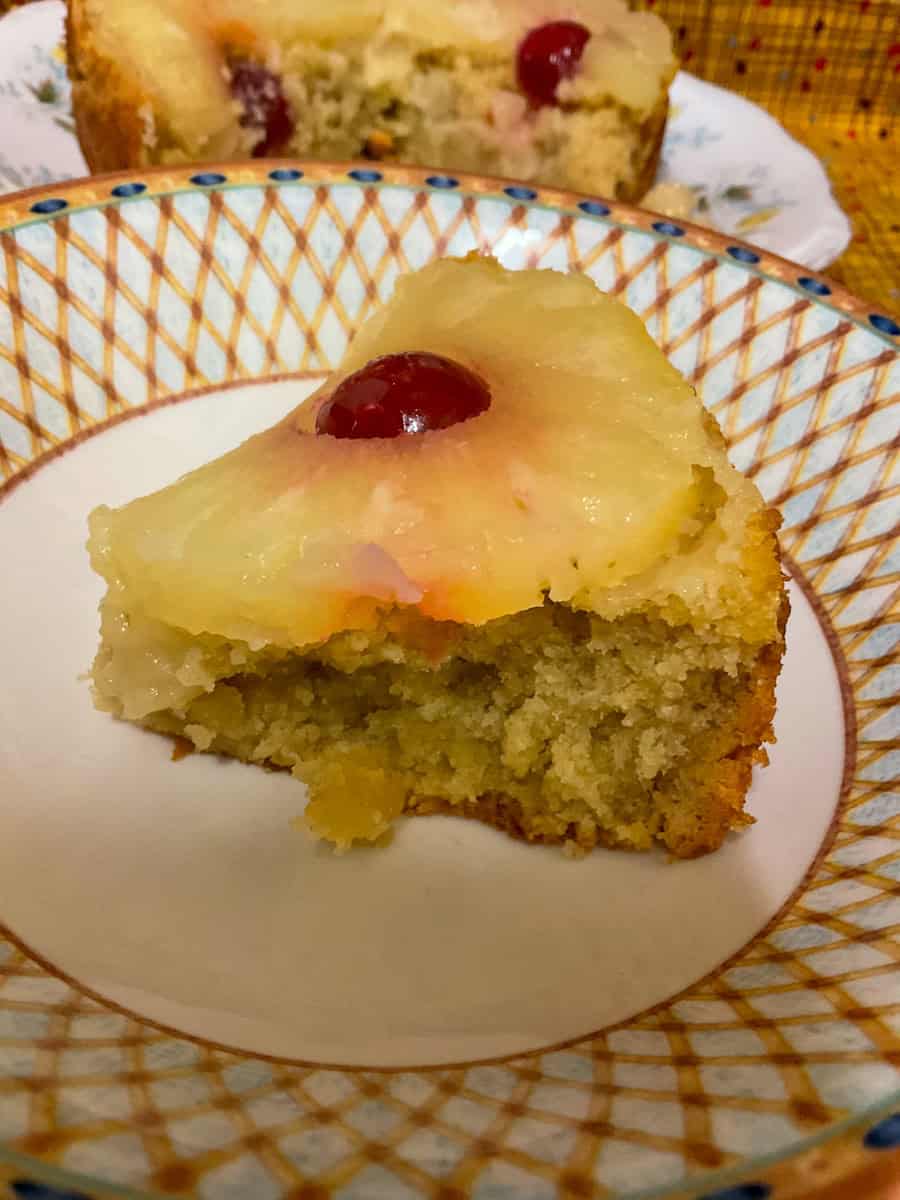
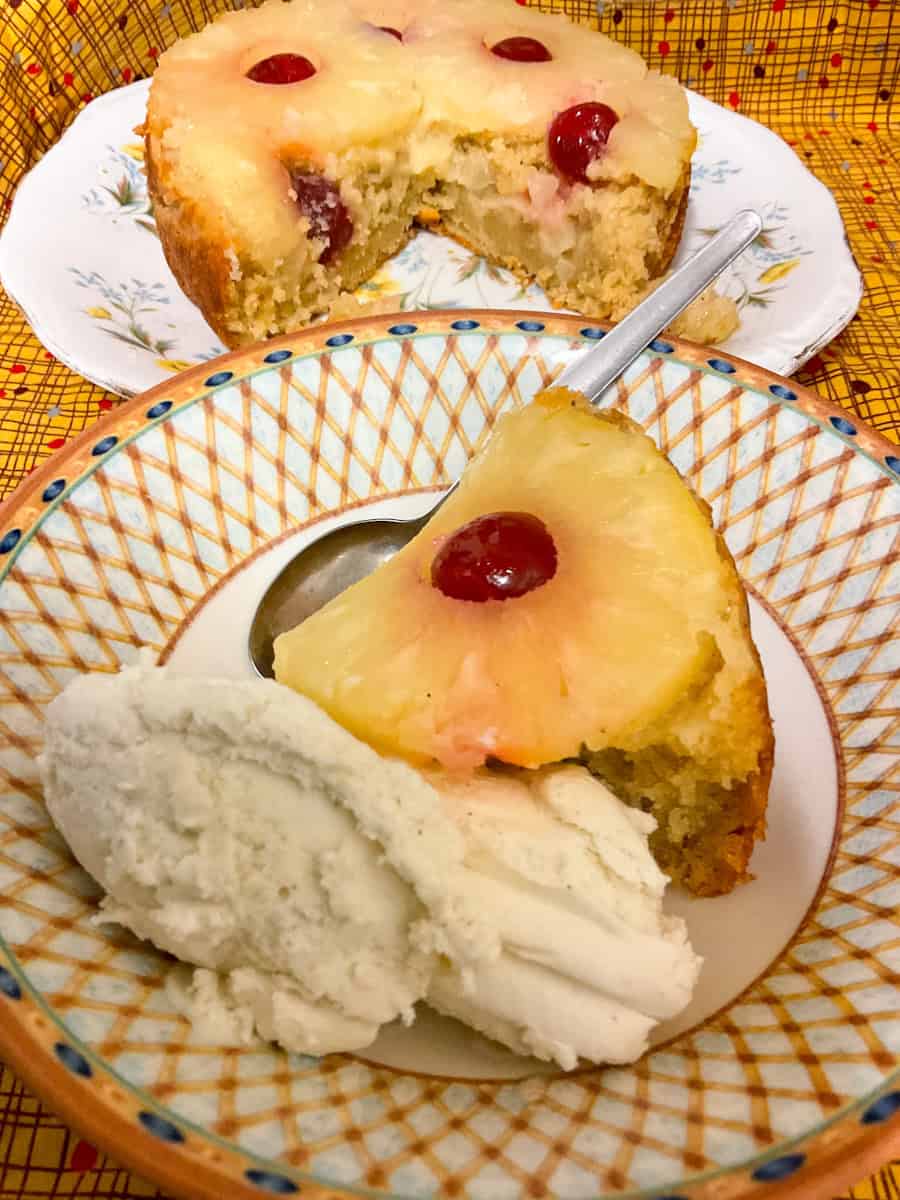
🍰 Upside-Down Pudding (1978) [Canned Pineapple Rings Baked With Sponge Pudding] Re-Made Vegan!
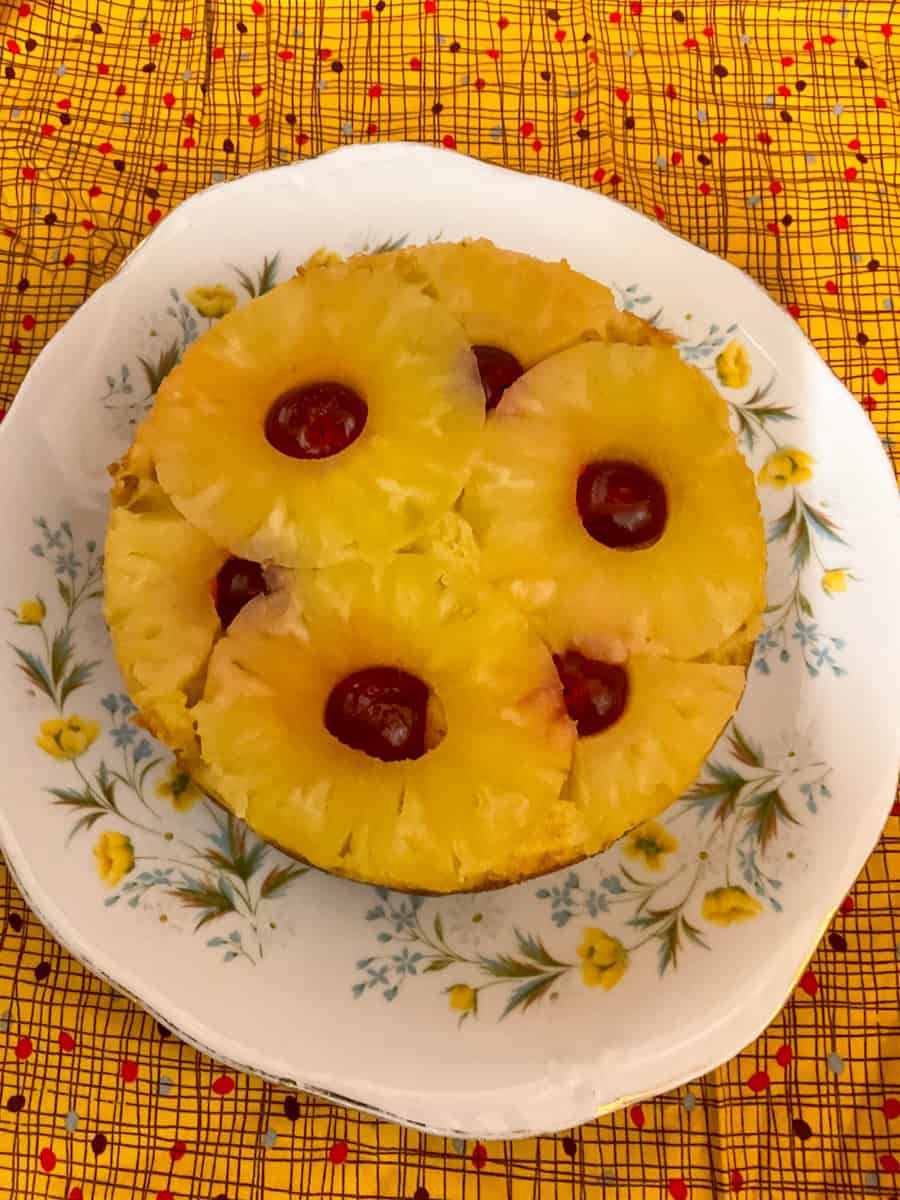


- Original recipe: Pineapple upside-down pudding prepared with butter and eggs. Similar to an upside-down cake but described as a pudding instead. Recipe card number 10 'Hot Puddings' from Kathie Webber's All-Star Cookery Club.
- Serves: 8 (however I would say it serves 6 portions)
- What I changed: Used smooth apple sauce instead of 2 large eggs and Stork baking spread instead of butter. Also replaced caster sugar for granulated sugar, and included a teaspoon of baking powder and increased the amount of flour slightly.
- My notes: This is a delicious moist soft pudding. Once baked and still hot from the oven it needs more care to slice portions so use a good sharp knife. Once cooled to room temperature the pudding will firm up and its just as nice eaten at room temp. My family enjoyed the pudding with a slice of extra pineapple and a scoop of vegan ice cream (see image below). The pudding-cake is also very nice enjoyed at room temperature. I will be making this pudding again.
- Ingredients:
- 4 pineapple rings, reserve the juice or syrup
- 6 glace cherries [candied cherries]
- 100 grams [4oz] dairy-free margarine or butter
- 100 grams [4oz] caster or granulated sugar
- 140 grams [5oz] self-raising flour, sifted
- 1 teaspoon baking powder
- 120 grams smooth apple sauce or apple puree [you can make your own by stewing apples in a small amount of water, until soft, and then mash the apples until smoothish]
- 1 tablespoon of the pineapple juice or syrup from the can
- Method:
- Using a 6 inch [15cm] cake tin (original recipe calls for a cake tin with a fixed base but I only had a cake tin with a loose or removable base which I used and the pudding was fine, however I did line the tin completely with baking paper) place 3 pineapple rings firmly onto the bottom. Slice the 4th pineapple ring into pieces that will fit into the spaces between the whole rings. Place a cherry into the centre of all three rings and in the gaps between the rings.
- Add the butter and sugar to a mixing bowl and cream together until light & fluffy. I used an electric hand whisk but you can do this by hand with a mixing spoon.
- Next whisk in the apple sauce. This will take a few minutes if doing it by mixing spoon or about a minute if using an electric hand whisk.
- Add the flour and a tablespoon of the canned pineapple juice or syrup and using a mixing spoon fold the flour gently into the creamed ingredients.
- The mixture should be a soft dropping consistency so if its not you can add a teaspoon or two of extra pineapple juice.
- Gently add the cake mixture to the top of the pineapple rings and smooth down the surface.
- Bake on the middle shelf in the oven at 180°C / 160°C Fan / 350°F / Gas Mark 4 for 45-50 minutes. Once baked the sponge will be golden brown, firm, and will have begun to shrink away from the cake tin edges. A skewer popped in will come out clean.
- Carefully remove the cake from the tin onto a serving plate and brush or drizzle over some of the pineapple juice over the fruit.
- Serving suggestion: Dairy-free custard, cream or ice cream.
For another easy British vintage cake-pudding that is also delicious served hot with custard or ice cream have a look at this Eve's Pudding which is a baked sponge with apples.
🍰 Steamed Marmalade Pudding (1980) Re-Made Vegan


- Original recipe: A traditional steamed pudding flavoured with marmalade. Recipe card number 4 'Winter Warmers' from Kathie Webber's All-Star Cookery Club.
- Serves: 4-6
- What I changed: I replaced the 2 large eggs with apple sauce, the butter with Stork baking spread, and the milk with soya milk. I also added in some baking powder.
- My notes: This was a delicious soft, fluffy, light fruity steamed pudding. Although it was quite soft at first as it was just cooked and steaming hot while serving up, it did firm up more while stored in the fridge so that the next day I was able to slice clean pieces to reheat. I will definitely be making this steamed pudding again.
- Ingredients:
- 4 tablespoons marmalade
- 100 grams [4oz] self-raising flour, sifted
- 1 teaspoon baking powder
- pinch of salt
- 100 grams [4oz] dairy-free butter or margarine
- 100 grams [4oz] granulated sugar
- 120 grams [4¼]apple sauce
- 1 tablespoon dairy-free milk
- Marmalade sauce to serve: A few tablespoons of marmalade and water
- Method:
- You can cook this pudding either in a slow cooker or on the stove-top. To cook on the stove-top place the pudding basin into a large pot and pour boiling water into the pot so that it comes at least half-way up the pudding basin. You will have to keep an eye on the water level as it will evaporate as it boils and cooks the pudding.
- If using a slow cooker set the slow cooker to the high setting and pour a few cups of water into it, place the lid on, and allow it to preheat while you prepare the pudding.
- Grease a 1 litre pudding basin [I used a glass pyrex oven proof bowl] with margarine, grease it well as this will prevent the pudding sticking to the sides.
- Add the marmalade to the bottom of the pudding basin.
- Add the margarine and sugar to a mixing bowl and cream together until light and fluffy. I used an electric hand whisk but a mixing spoon can be used instead - just allow for extra whisking time.
- Add the apple sauce and whisk well so that it is thoroughly mixed.
- Add the flour, salt, and milk to the bowl and fold the flour gently into the creamed mixture using a mixing spoon.
- Add the pudding mixture on top of the marmalade and smooth the surface.
- Cover the pudding with a layer of baking paper placed directly over the surface.
- Cover the top of the pudding bowl with kitchen foil scrunching the foil firmly up the sides around the rim so that the foil stays in place.
- If cooking on the stove-top place the basin in the pot with water and bring the water to the boil. Reduce the heat to medium-high and cook for 2 hours.
- If cooking in the slow cooker place the prepared pudding basin into the slow cooker which is preheating, and pour boiling water into the slow cooker pot so that the liquid level comes about three quarters of the way up the pudding basin. Cook for 5 hours.
- The pudding is ready when it is golden brown, risen, firm, and a skewer popped in the middle comes out clean. If its not ready then cook for an extra 30 minutes and then check again.
- Once cooked, carefully remove the pudding from the pot or slow cooker and allow to settle for 5 minutes before removing from the pudding basin - running a cutlery knife carefully around the sides can help loosen the pudding and to remove I placed a plate over the pudding basin and gently flipped it over so that the pudding could slip out.
- Serving suggestion: Prepare marmalade sauce: This step is optional but very nice addition. Place 2-3 tablespoons of marmalade into a small saucepan and mix through a few tablespoons of water. Break up any large pieces of marmalade. Gently bring to the boil stirring and gently simmer for 1-2 minutes stirring frequently. Cool slightly then pour some over each portion of pudding or pour it all over the entire pudding before slicing.
- Variations: Use fruit jam or golden syrup instead of marmalade for the pudding. The original recipe also states: ''for a black-cap pudding, mix currants [dried] with a little sugar and spoon them into the basin before adding the mixture''.
For similar old-fashioned British steamed puddings made vegan have a look at our Spotted Dick Pudding & Steamed Jam Pudding (can also be prepared as a steamed syrup pudding) & Date Steamed Pudding & this easy Steamed Christmas Pudding (1950s era recipe which is not just for Christmas!)
🍰 Petticoat Tails (1978) [Shortbread/Biscuit] Re-Made Vegan!

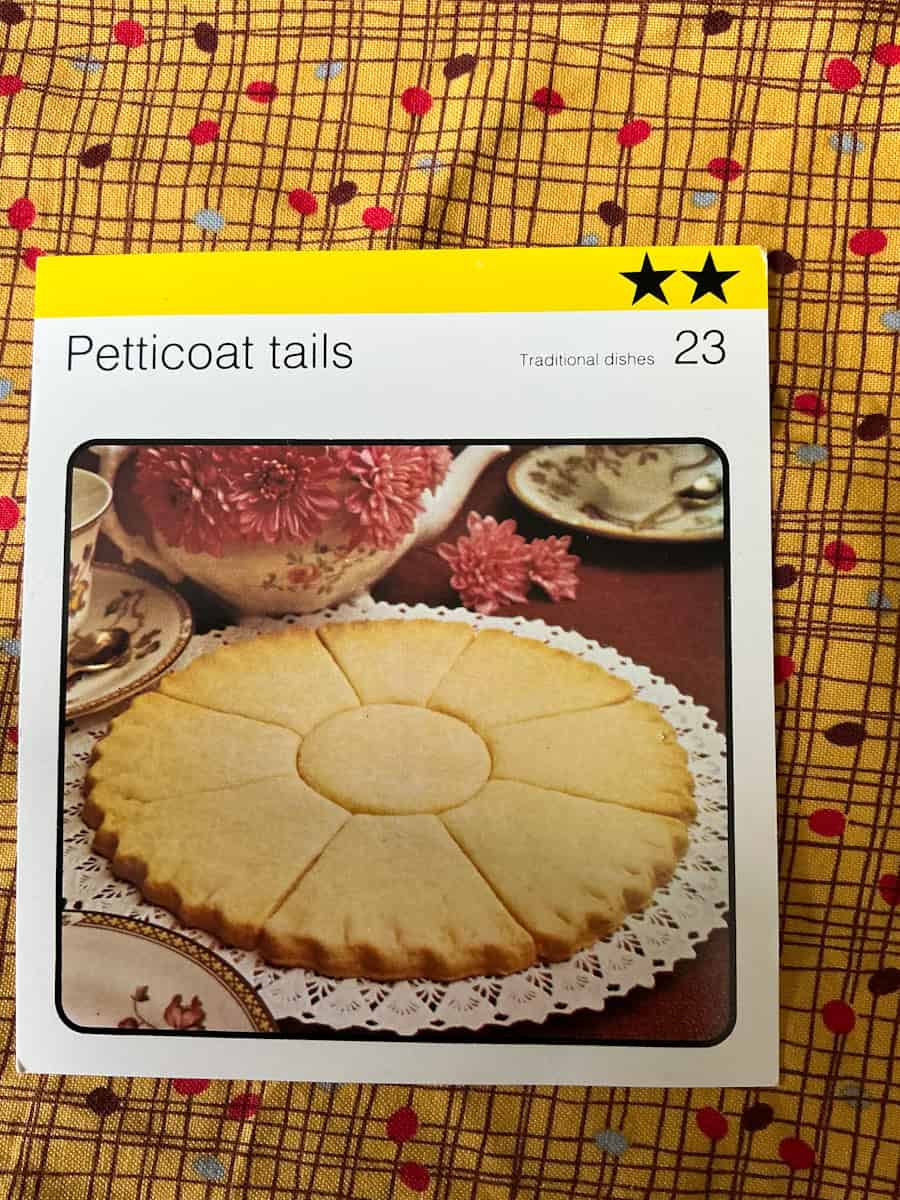
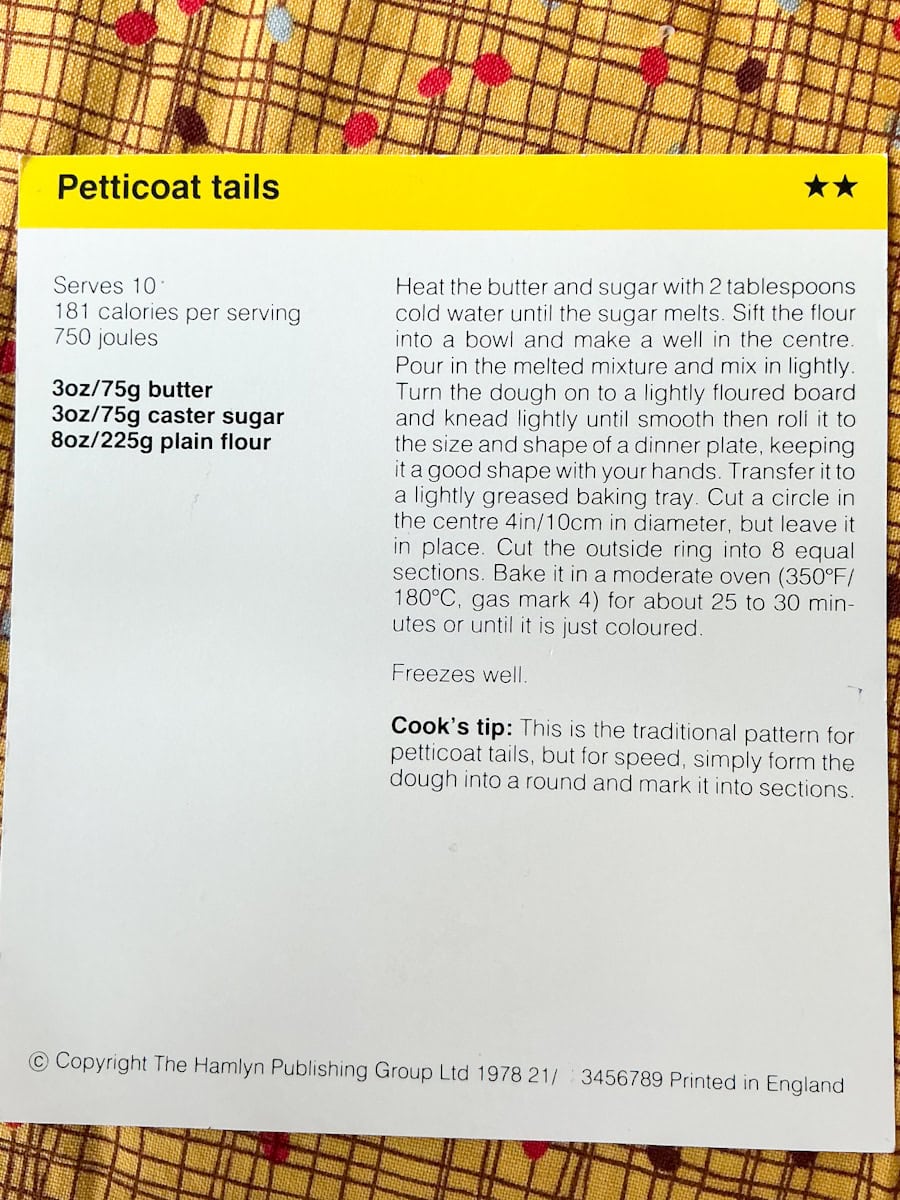
- Original recipe: Classic Scottish shortbread baked in the shape of traditional petticoat tails. Recipe card number 23 'Traditional Dishes' from Kathie Webber's All-Star Cookery Club.
- What I changed: Used vegan butter.
- My notes: I wasn't that keen on this recipe as I thought it had too little butter in ratio to the flour, although I did switch out the butter for vegan Flora butter so I expected the flavour and texture to be slightly different. However, the end texture wasn't as crisp as I would have liked but perhaps I didn't quite get it right, and someone else might have better luck! I still recommend my shortbread recipe if you would like to bake tried and tested many times crisp and buttery shortbread biscuits [cookies].
- Plant-based version ingredients:
- 75 grams [3oz] vegan butter
- 75 grams [3oz] caster sugar
- 225 grams [8oz] plain flour, sifted
- Method:
- Place the butter and sugar into a small saucepan along with 2 tablespoons of water. Heat over a low heat until the ingredients have melted.
- Add the flour to a mixing bowl and make a well in the middle by pushing the flour to the sides.
- Pour in the melted butter and mix gently.
- Add a little flour to your work space and with floured hands press the dough together.
- Knead gently until it's smooth, although it won't be completely smooth which is fine.
- Roll out the dough to the size of a dinner plate - about 8 inches.
- Place the dough onto a baking tray lined with baking paper.
- Using a 3-4 inch cookie cutter gently stamp out a circle into the middle of the dough but keep the circle in place.
- Using a knife score the circle into 8 even triangles starting from the circle edges.
- Optional: Using your fingers crimp or pinch the edges of the shortbread circle.
- Score little short lines coming from the crimps or using a chopstick or toothpick create little holes over each triangle.
- Bake on the middle shelf at 180°C / 160°C Fan / 350°F / Gas Mark 4 for 25-30 minutes or until the shortbread is starting to turn lightly golden.
- Optional: Sprinkle sugar over the baked shortbread and allow it to cool for a few minutes before removing each segment to cool on a wire rack or leave the shortbread to cool on the baking tray.
For another shortbread recipe have a look at my Vegan Shortbread Biscuit recipe which is a tried and tested family recipe.
🍰 Extra Recipe! 'Something To Fill The Cake Or Biscuit Tin!' - Vinegar Cake 🍰
Each week I'll be testing an extra bake which will be something simple and cosy to keep in the cake or biscuit tin for those moments when you fancy a sweet treat or have visitors pop in for a cup of tea. From homely traybakes and quick biscuits to no-fuss sponges like this week's vinegar cake, these bakes are all about tradition, homeliness and nostalgia. It may also save you a little money as you may not need to buy those ready-prepared biscuits and cakes from the supermarket. Besides home-made always tastes better!
Vinegar Cake (1978 Recipe)

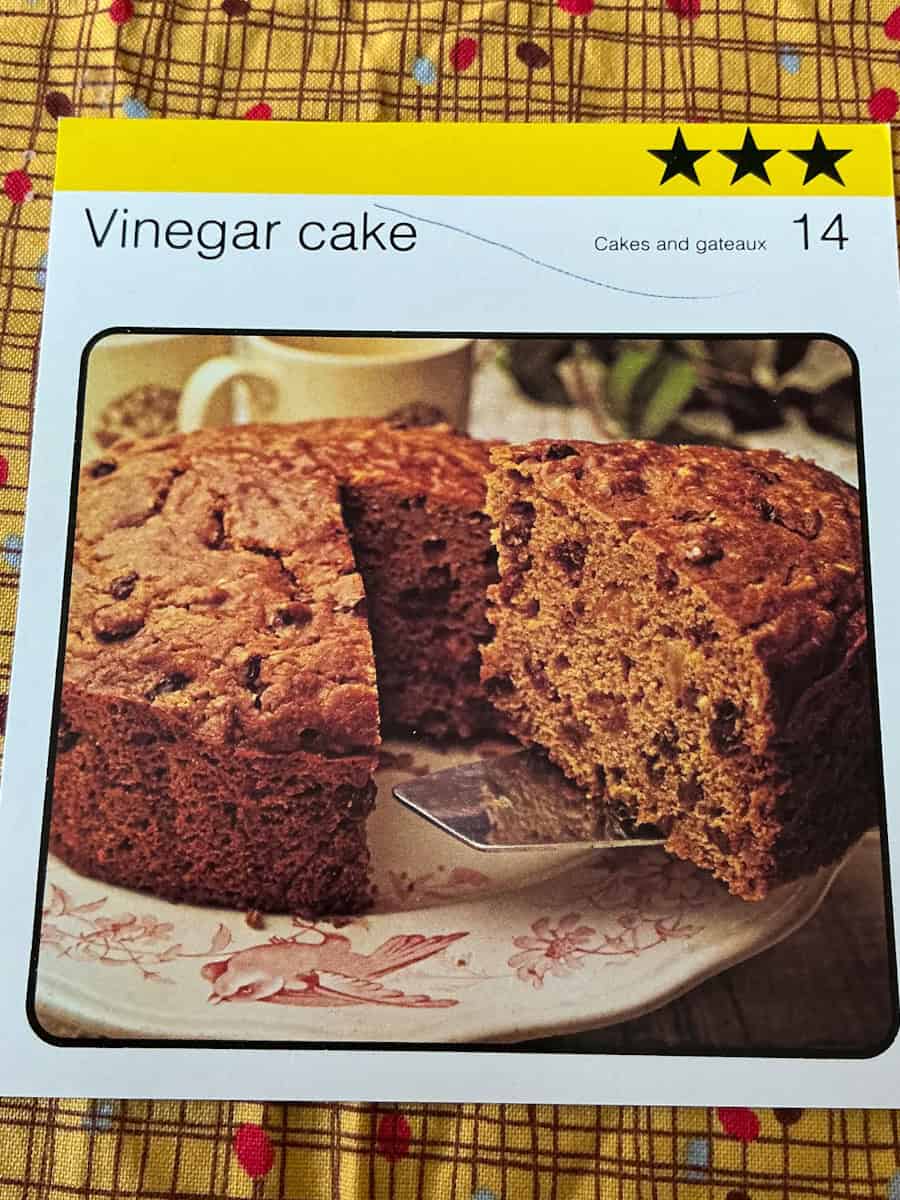

- Original recipe: A classic plain family fruit cake naturally prepared without eggs as it originates from the 1940s war years when frugal egg-free recipes were designed out of necessity. The vinegar and bicarbonate of soda work replace the need for eggs and there is no vinegar taste in the finished cake. Recipe card number 14 'Cakes and gateaux' from Kathie Webber's All-Star Cookery Club.
- Serves: 8-12 slices
- What I changed: Used Stork baking spread and soya milk. I didn't have to change very much for this recipe as it was naturally egg-free. All I changed was the milk to soya milk, and instead of using raisins and chopped mixed peel I went with a dried fruit mix which was made up of currants, raisins, sultanas and mixed fruit peel.
- My notes: This was an easy and quick to prepare cake. Its a lovely plain fruit cake which is very pleasant with a cup of tea. It has a nice crumb and texture with a softer inside and more of a bite on the outside. You could always add some mixed spice powder or cinnamon if you prefer a spiced cake. I would definitely make this cake again as it filled up my cake tin very well and lasted most of the week.
- Plant-based version ingredients
- 225 grams [8oz] plain flour, sifted
- pinch of salt [1 gram/⅛ teaspoon]
- 100 grams [4oz] margarine
- 75 grams [3oz] dark soft brown sugar [can also use granulated sugar]
- 125 grams [4½ oz] dried fruit mix or 100 grams [4oz] raisins & 25 grams [1oz] mixed fruit peel.
- 1 teaspoon bicarbonate of soda
- 12 tablespoons dairy-free milk
- 1 tablespoon white distilled vinegar or apple cider vinegar
- Method:
- Add the flour and salt to a mixing bowl.
- Add the margarine in small pieces and using your fingertips rub it into the flour until it resembles breadcrumbs.
- Mix through the sugar and dried fruit mix.
- Add 2 tablespoons of the milk to another smaller bowl and mix through the bicarbonate of soda until it has dissolved.
- Pour the milk-bicarbonate mixture into the mixing bowl that has the flour mixture. Also add the rest of the milk and the vinegar.
- Mix all the ingredients until just combined.
- Place the mixture into a 7 inch cake pan that has been greased with margarine and lined with baking paper.
- Bake at 180°C / 160°C Fan / 350°F / Gas Mark 4 for 45 minutes-1 hour on the middle oven shelf.
- The original recipe states 1- 1hour 15 minutes but I found that to be too long for this cake with my fan oven and it was ready at the 45 minute mark. So do check the cake after 45 minutes to see how its going.
- The cake will be ready once it is risen, firm, golden brown and a skewer popped in the middle will come out clean. The sides of the cake will also be coming away from the pan edges once it has baked through.
- Cool the cake in the cake tin for 10 minutes before removing to cool on a cooling rack.
- Store wrapped up in fresh baking paper and kitchen foil or within a cake tin.
- The original recipe has this cook's tip: ''This is an economical cake because it has no eggs. The bicarbonate of soda and vinegar provide the raising agent. Nevertheless, it's a good family cake.''
For another vintage vinegar cake recipe have at look at my Chocolate Vinegar Cake recipe.
Meal Accompaniment Ideas
Below is an image from the small booklet that accompanies Kathy Webber's All-Star Cookery Card Club box set. If you like you can use if for ideas for simple accompaniments to the main meal & dinner recipes.

Information about Kathy Webber's All-Star Cookery Card Club
Kathie Webber was a popular cookery writer in the 1970s, who was well known for her practical, family-friendly approach to home cooking. As she was both a professional food writer and a busy homemaker, she understood the daily challenges of feeding a family well without fuss or frills. Her All-Star Cookery Card Club was created with these realities in mind as it offered a growing collection of easy-to-follow, calorie-counted recipes designed to suit both hearty appetites and those keeping an eye on their waistline.
Each recipe was given a star rating based on its calorie content, making it one of the first recipe collections in card format to include clear, visual calorie guidance. The star rating was: 1 star for recipes up to 100 calories, 2 stars for recipes up to 200 calories, 3 stars for recipes up to 300 calories, 4 stars for recipes up to 400 calories and 5 stars for recipes up to 500 calories. But these recipes weren't labelled "slimming" as in her own words, they were "ordinary, down-to-earth meals for the family".
Kathie brought a friendly, no-nonsense tone to her writing, and her cards were designed during a time when home cooking was beginning to move towards convenience and the idea of short-cuts in the kitchen. Though little is widely known about her today, her All-Star recipes remain a nostalgic, charming and quaint honest snapshot of 1970s home cooking.
The image below is the original welcome note included with the All-Star Cookery Card Club box. It features a photo of Kathie Webber and her message to new subscribers.

👉 Week Two of Vintage Recipe Cards Re-Made Vegan - Now Live!
Preview of recipes in Week Two:
🍽️ Main meal & dinner recipes: Scone-Base Pizza, Biriani (Biryani), Vegan Creamed Chicken on Rice, and more!
🍰 Dessert & pudding recipes: Steamed Chocolate Pudding, Fruit Jelly, Apple Crunch, and more!